If a customer cancels a diary booking or cancels during the booking process the contact is classed as a Decline Inbound. These can then be viewed on the Declines Inbound Report.
When contacts are updated via the After Sales Diary, ‘Customer Declines’ can be selected by users if a customer refuses to place a service booking. When this scenario arises, the data entered by the user can be reported on via the Declines Outbound Report.
This information is broken down on the Customer Retention report within Workshop reporting.
Select Workshop > Reporting > Customer Retention from the side menu to display the following screen.
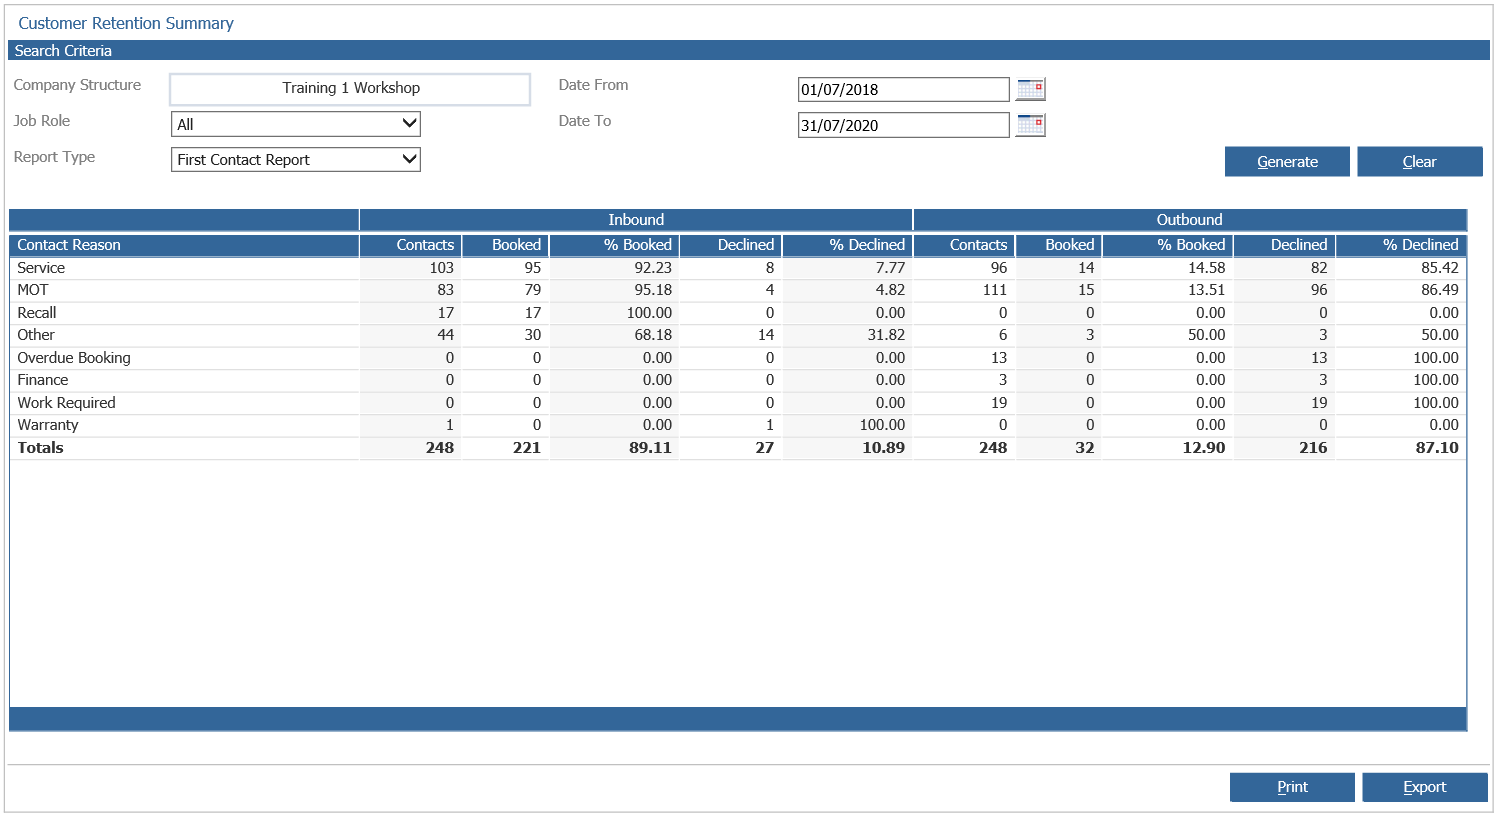
The report contains a number of filters located at the top of the screen these can be used to narrow the search results down to specific workshops, job role and date range.
The report is broken into sections,
• Contact Reason: Populated from the job type when creating a booking
• Inbound: Populated from contacts made into the service department
• Outbound: Populated from contacts made from the aftersales diary within CRM
The ‘Inbound’ section contains a number of headings.
• Contacts: Represents the number of operations relating to the contact reason and not the number of customers who have made contact with the Service department.
• Booked: Represents the number of bookings made for a particular contact reason
• % Booked: Represents the conversion of contacts to bookings.
• Declined: Represents the number of contacts that did not result in a booking.
• % Declined: Represents the number of declines to bookings
The ‘Outbound’ section contains the same headings as the ‘Inbound’ section the headings are populated when a customer is contacted via the aftersales diary.
Double clicking on the report will display the ‘Aftersales Contact Activity’ window.
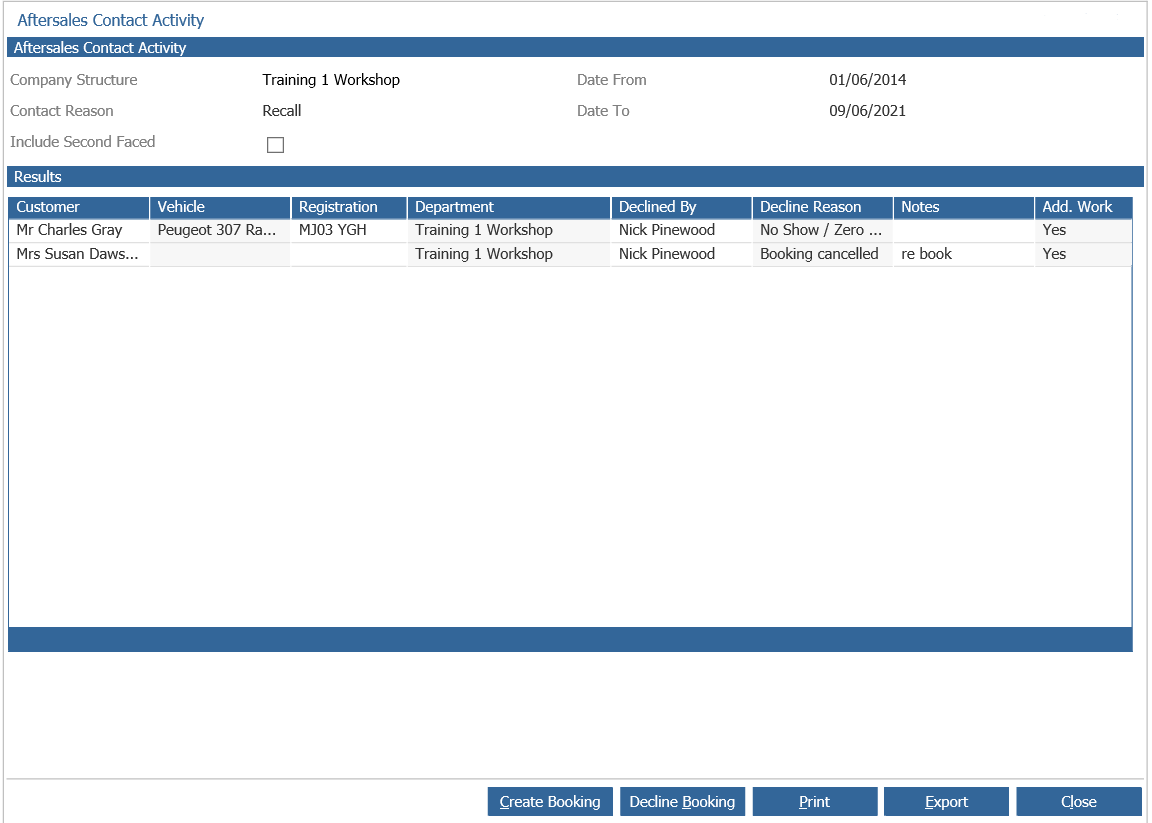
This screen displays the details of the customers who have declined a booking. Located at the top of the screen is a tick box where the report can be set to include ‘Second Faced’ contacts.
Note: Second Faced is any customer that requires a second contact following initial decline
Within the ‘Aftersales Contact Activity’ screen there is a heading called ‘Add Work’ this denotes that the declined booking contained additional operations that will have to be dealt with. To display the contact reason hover the mouse pointer over the field and the reason will display.
Located at the bottom of the screen are a series of buttons:
• Create Booking: Allows a booking to be made directly from the ‘Aftersales Contact Activity’ screen.
• Decline Booking: Is used when a customer has been contacted after an initial decline and the dealer is still unable to fulfil their request.
• Print: Allows the ‘Aftersales Contact Activity’ screen to be printed
• Export: The ‘Aftersales Contact Activity’ report can be exported in to an Excel spreadsheet.
Note: The ‘Customer Retention’ report is to be used in conjunction with the ‘Declines Inbound and Outbound’ reports within CRM.
To access the ‘Declined Inbound’ report select CRM > Aftersales Reports > Declines Inbound from the side menu. 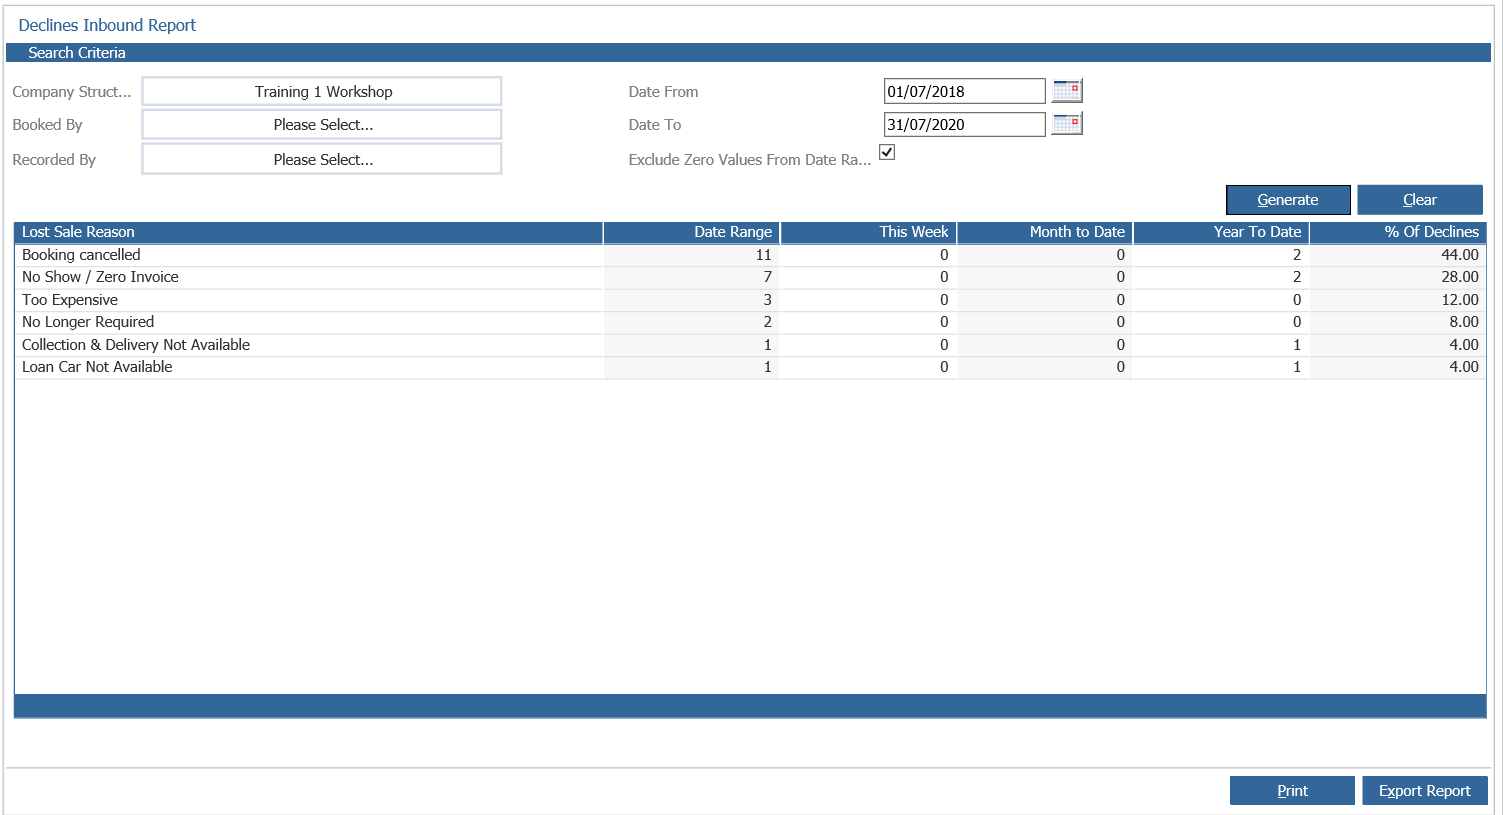
The report can be filtered by company structure, booked by or received by; a date range can also be selected, with the appropriate filters chosen select ‘Generate’ to compile the report.
The report contains the following headings.
• Lost Sale Reason: Displays the reason selected when cancelling a job / booking
• Date Range: This is the number of declines per reason over the date range selected
• This Week: This is the numbers of declines per reason so far this week
• Month to Date: This is the number of declines per reason so far this month
• Year to Date: This is the number of declines per reason so far this year
• % of Declines: This is the percentage of declines to enquiries over the selected date rage. By double clicking on a particular lost sale reason a list of the declines can be displayed.
To display the reason that the sale was lost single click on a line and select the ‘Reason’ button.
The reason displayed is the text entered when cancelling a booking / job.
The report can be exported into Excel, and if an individual line is double clicked the customers CRM record will be displayed.
The details contained within this report are taken from all inbound calls i.e. from ‘Workshop Booking New Booking’.
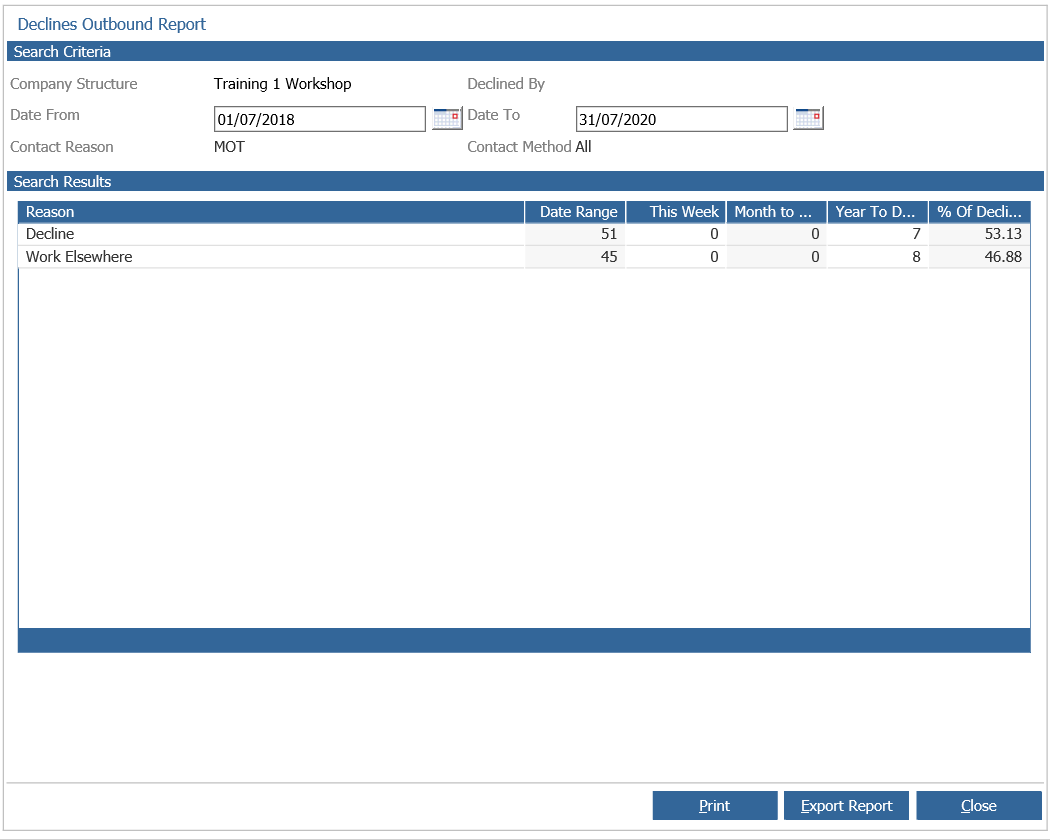
A similar report is also available by selecting CRM > Aftersales Reports > Declines Outbound from the side menu. 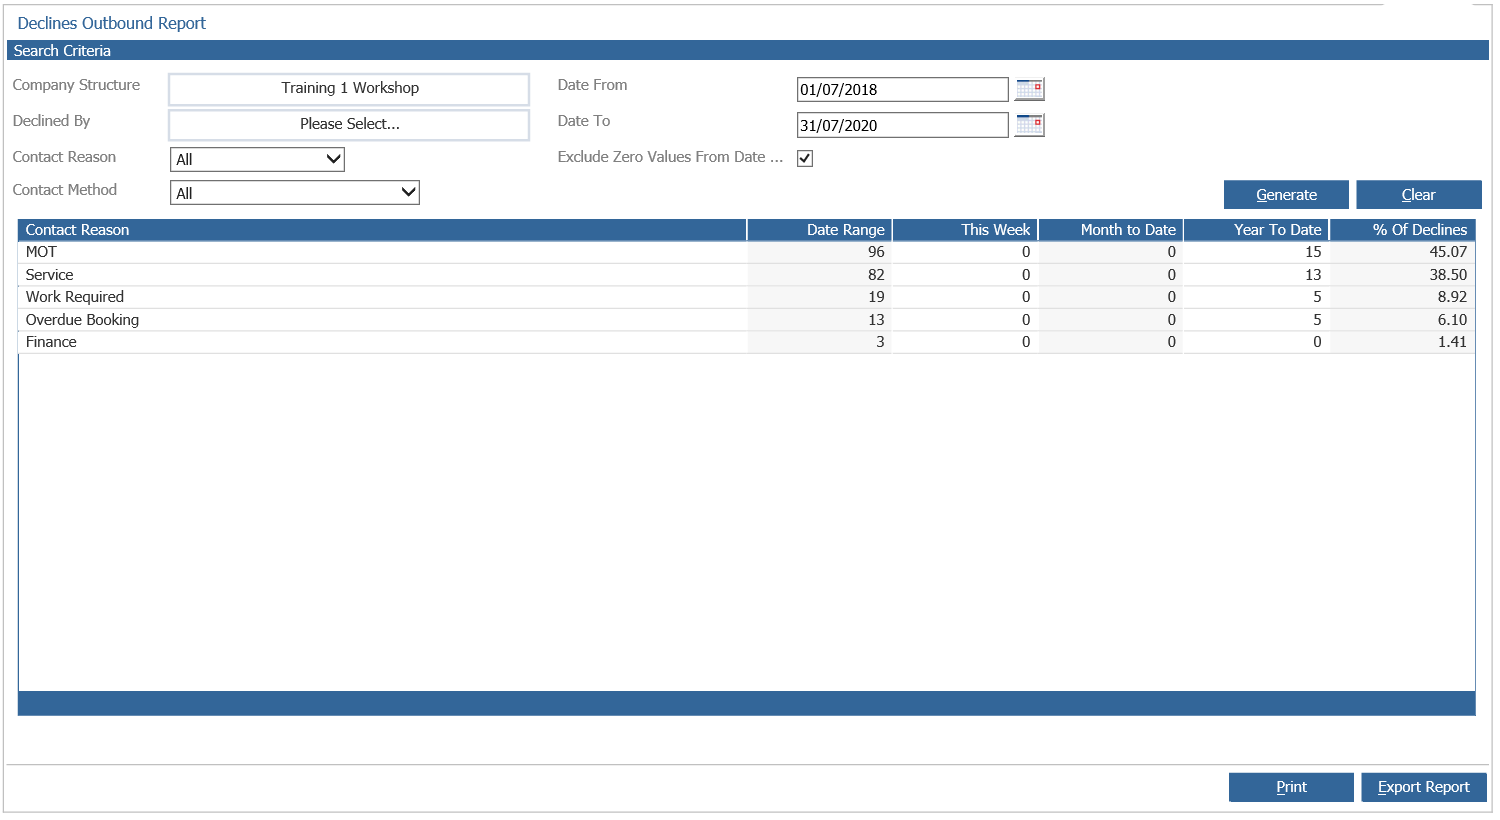
The report can be filtered on company structure, declined by and contact method. With the appropriate filters chosen select generate to compile the report.
The report contains the following headings.
• Contact Reason: Displays the reason selected when initiating the contact from the Aftersales Diary
• Date Range: This is the number of declines per reason over the date range selected
• This Week: This is the numbers of declines per reason so far this week
• Month to Date: This is the number of declines per reason so far this month
• Year to Date: This is the number of declines per reason so far this year
• % of Declines: This is the percentage of declines to contacts over the selected date rage.
To display the reasons per contact method double click on the required method. The following window will be displayed.
By double clicking on a particular reason a list of customers that declined a booking will be displayed. Single click a customer and select the ‘Reason’ button to display the customer’s motive for declining a booking.
The report can be exported into Excel. And if an individual line is double clicked the customers CRM record will be displayed.
The details contained within this report are taken from all outbound calls I.e. from ‘CRM > Aftersales Diary’.
The Lost Sale reasons come from what has been created within:
Workshop > Parameters > Customer Declines > Decline Parameters
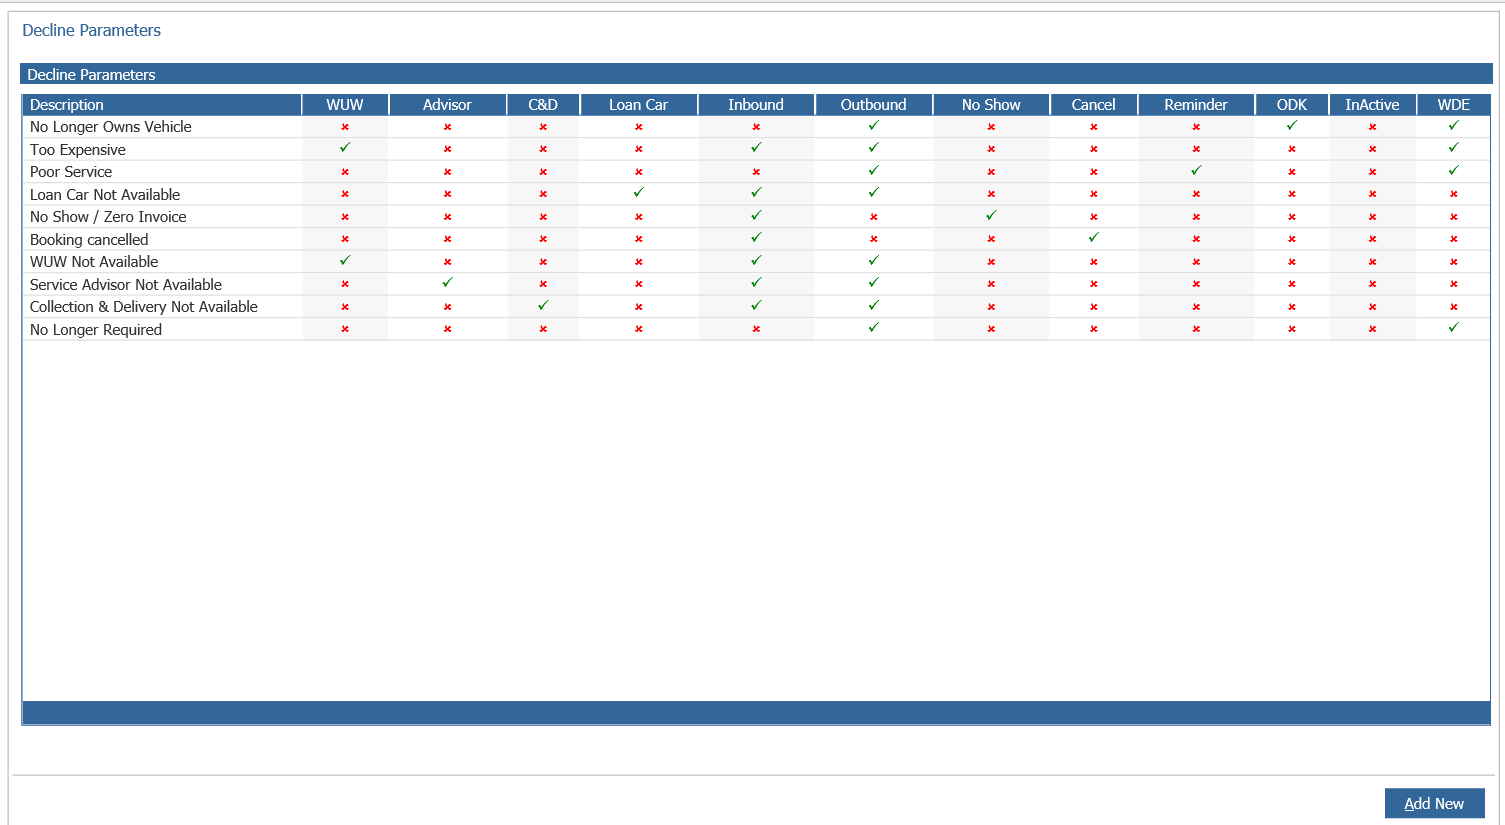
To create the decline reasons select the ‘Add New’ button.
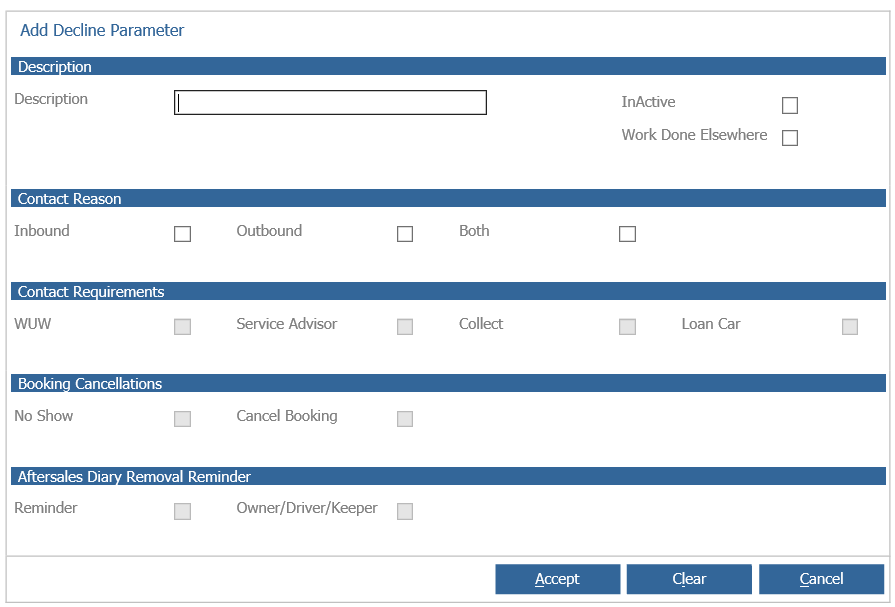
Within the ‘Add Decline Parameter’ window a number of headings are available.
• Description :
• Description: Enter the name for the decline reason.
• Inactive: Placing a tick in this field make the reason inactive.
• Contact Reason:
• Inbound: Selecting this field marks the reason as inbound to the department. i.e. workshop booking / amend job
• Outbound: Selecting this field marks the reason as outbound to the department. i.e. aftersales diary
• Contact Requirements: The fields located within this section relate directly to the ‘Workshop Diary Details’ section of the booking / amend job / invoice screens.
When a booking is created with one of the below fields selected and then cancelled the system will make available the decline reason relating to the selected contact requirement.
For example if a booking is made for a future date and the while you wait option is selected, if that booking is cancelled before being confirmed selecting the customer declines a pop up window will appear prompting for a decline reason to be selected. The decline reason that was set up as a WUW will be available in the drop down menu.
• WUW:
• Service Advisor:
• Collect:
• Loan Car:
• Booking Cancellations: The fields within this section are utilised when a job is cancelled, a zero value invoice is created or a confirmed booking is cancelled.
• No Show: If this option is selected when creating decline reason, when a job is cancelled or a zero value invoice is created this will be the default lost sale reason
• Cancel Booking: If this option is selected when creating decline reason, at the point of cancelling a confirmed booking this will become the default lost sale reason.
Aftersales Diary Removal Reminder: The below options become available when processing contacts via the Aftersales Diary.
• Reminder: When processing a contact and selecting the customer declines option this decline reason will appear in the drop down menu, if this option is selected the system will prompt to set the service reminders to ‘No’
• Owner / Driver / Keeper: When processing a contact and the vehicle no longer belongs to a customer the link between vehicle and customer can be removed. When this option is selected the customer retention report will be updated.
You can also add an email address within;
Workshop > Parameters > Parameters > General 2

Within the Decline Email Address Parameter, the recipient who's email is entered here will receive the declines and can action these if necessary.