To use the Vehicle Health Check process, please review the set up appropriate for yourselves using the below information.
If you wish to know how to follow the process please view article: Vehicle Health Check Process
If you would like to know how to set up email, please view article: Vehicle Health Check Emails
To view set up navigate to:
Workshop > Parameters > Health Check > Parameters
The ‘Department’ tab is selected by default
 • Enabled: Placing a tick in this field activates VHC process.
• Enabled in Time Management: Placing a tick in this field activates the VHC process
within the ‘Time Management’ screen
• Re-Open Access Level: This field determines at what user access level a completed
VHC form can be re-opened. This can be between 0 and 99.
• Prevent Deferral of Urgent Work: With this option enabled urgent work can either
be added to the job or declined.
• Recommended Work Lock Level: Dictates at which level you would like to lock any costings for the health check. This can be locked at Job level, where by if one person is costing a line this will lock the whole job. Or by line level which will dictate only the line being costed will be locked by a user.
• Idle Time Reason: Used to post time for Vehicle Health Check work if the technician
is not logged onto a specific job
• Print with Job Card: Placing a tick in this field allows a vehicle health check to be
printed along with a job card.
• Print with Invoice: Placing a tick in this field allows the completed vehicle health
check to be printed along with the invoice.
• Send Checks to Workshop: With this parameter selected a completed health check
will be sent to the ‘Awaiting Estimate’ screen to have the labour content added before
going to the parts department. If the field is not selected the completed health check
will go to the parts department first and then to the ‘Awaiting Estimate’ screen.
• Parts Email: Enter the address of the nominated person / persons within the parts
department who are to be notified when a health check has been completed and
requires parts to be added.
• Workshop Email: the address of the nominated person / persons within the service
department who are to be notified when a health check has been completed and
requires labour to be added.
• Email Subject: This is utilised when sending a health check to a customer when the
HTML process is not active.
• Sender Address: The address is utilised when sending a health check to customer
when the HTML process is not active, it’s also used as the sender address when
customer authorises any repairs via the VHC portal.
• Form Style: Two print styles are available, style 1 and 3, if style 1 is selected the
printed VHC form will have blue boarders and style 3 will have black boarders.
• Message: This is a free text field; text entered into this field will be printed on the
bottom of each page of the health check
• SMS Message: This is a free text field where you can dictate what text you wish to appear on the SMS message sent to customers that contains the information for their Vehicle Health Check. Please include the $U symbol for the Vehicle Health Check URL to be included.
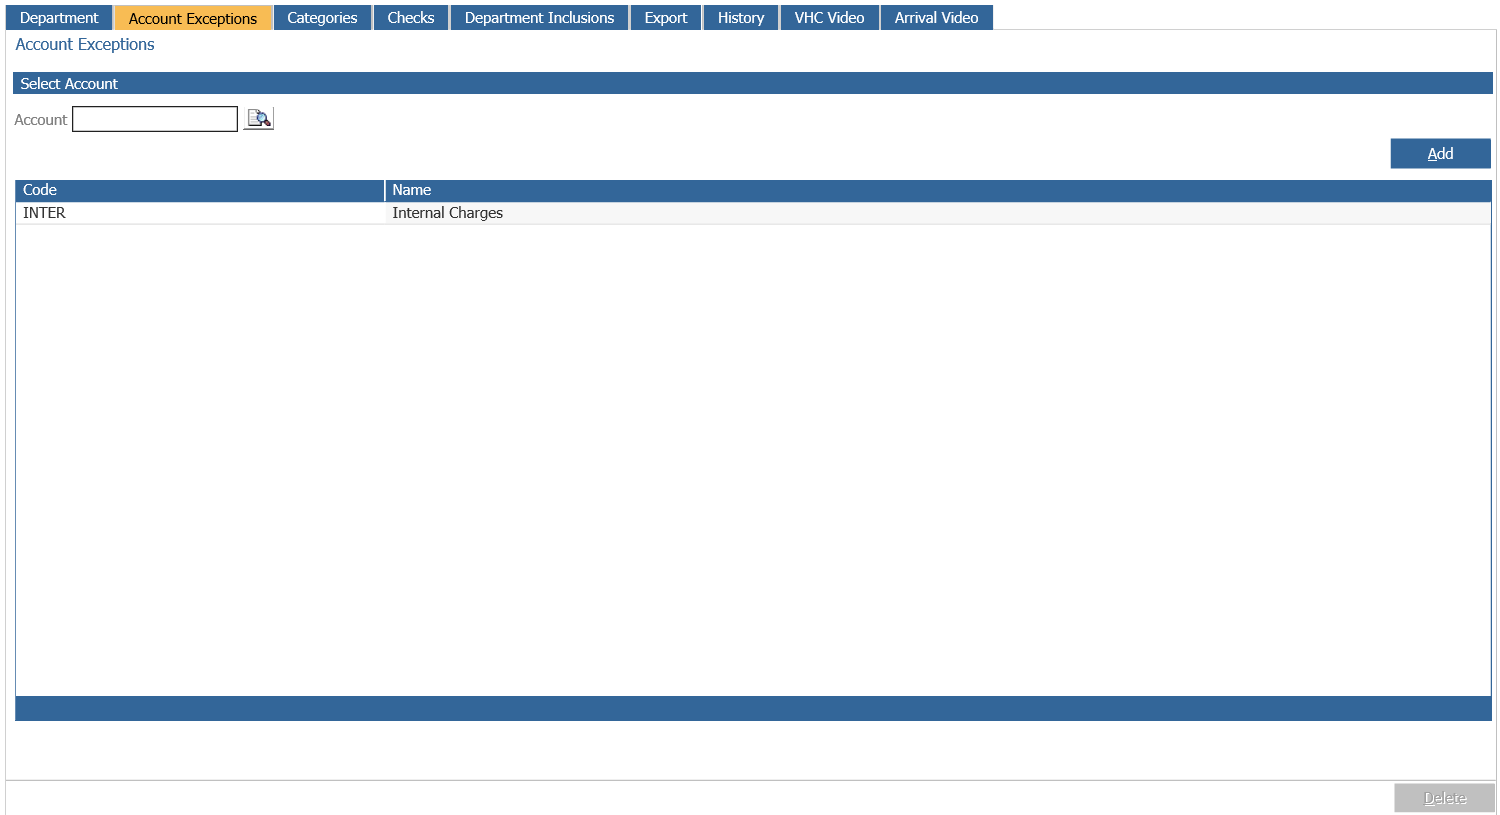
Account Exceptions
The account exceptions tab allows you to add accounts that you would not require a health check for.
To add an account that you do not wish to complete any Health Checks for, search the code in the account box, select and press Add. Once an account is added, any jobs raised with that account will not receive the prompt 'Does this Vehicle require a health check?' when receiving the job.
Categories
Note: All parameters setup in the following screens are set at Enterprise level.
Each dealer group can create their own vehicle health check firstly categories are required.
To create a category select the ‘Categories’ tab.
Enter the Category name into the Category field and select the ‘Add’ button to populate the
category list.
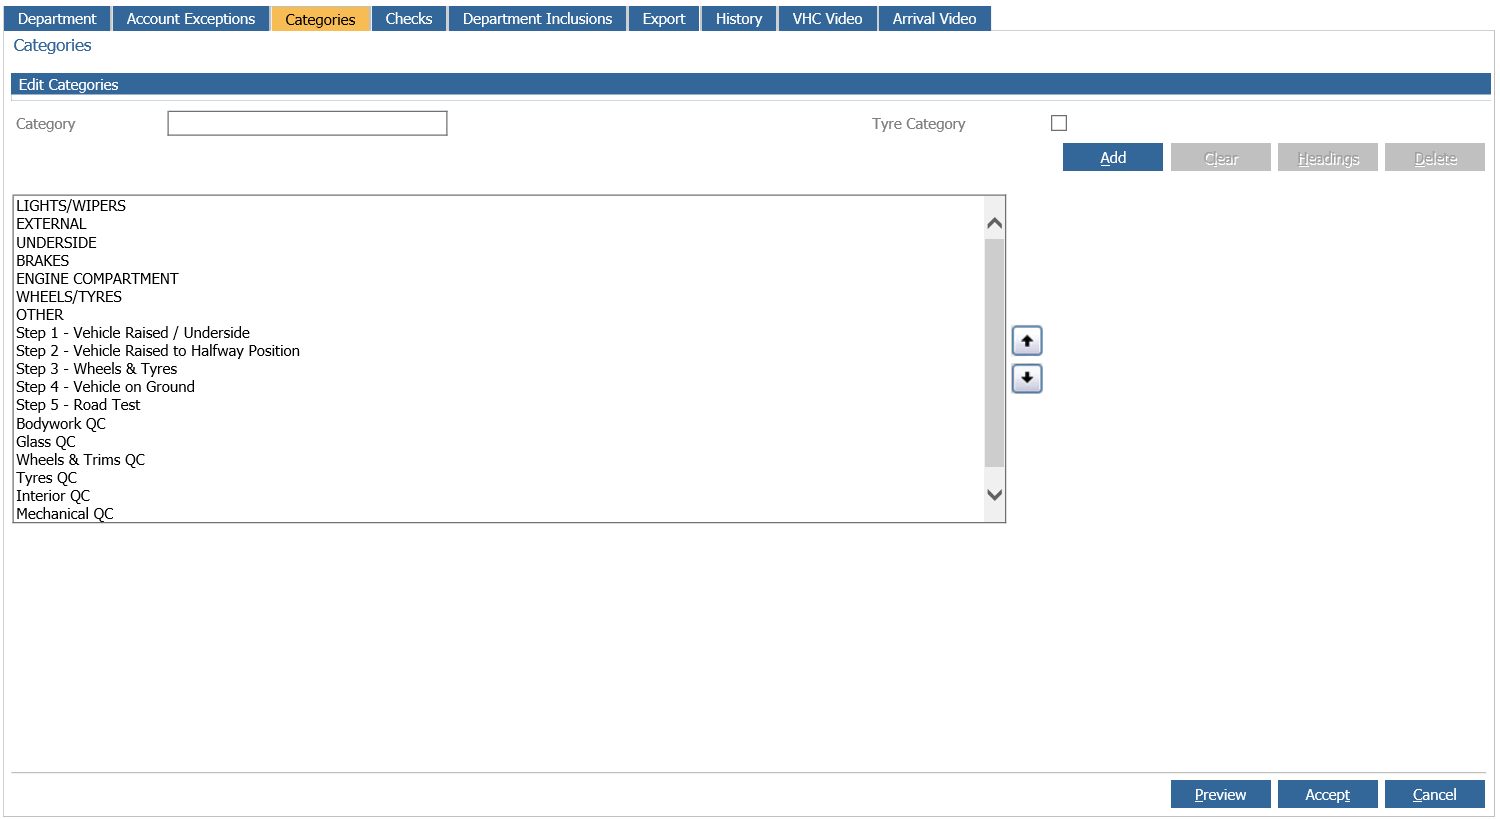
The list can be reordered by highlighting the required category and selecting the up or down
arrows.
A category can be edited or deleted by double clicking the required category this moves the
category back into the edit category section.
Make any changes as required to the category and select ‘Add’ to repopulate the list.
Alternatively select the ‘Delete’ button to remove the category and subsequent checks.
A grid format can be applied to specific categories. To apply a grid, double click the required
category to move it back to the edit category section. Select the ‘Headings’ button to open the
following window.
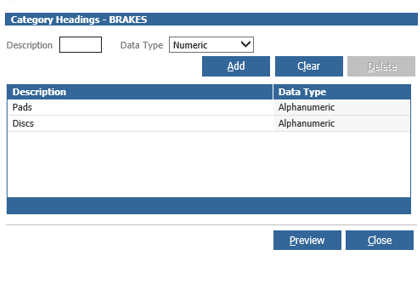
Two fields are available.
• Description: The heading description can be a maximum of five characters
• Data Type: The drop down menu contains two types, numeric and alphanumeric
select the relevant type dependent upon the description.
With the description and data types entered select ‘Add’ to populate the list. Descriptions and
data types can be edited or deleted by double clicking on the required heading, make any
changes as required and select ‘Add’ to repopulate the list or alternatively select ‘Delete’ to
remove the heading.
Select the ‘Preview’ button to display the ‘Health Check’ form. Or close to return to the
categories screen.
Before previewing the form, save any changes by selecting the ‘Accept’ button.
Checks
Specific checks are required for each category created.
Select the ‘Checks’ tab to open the following window.
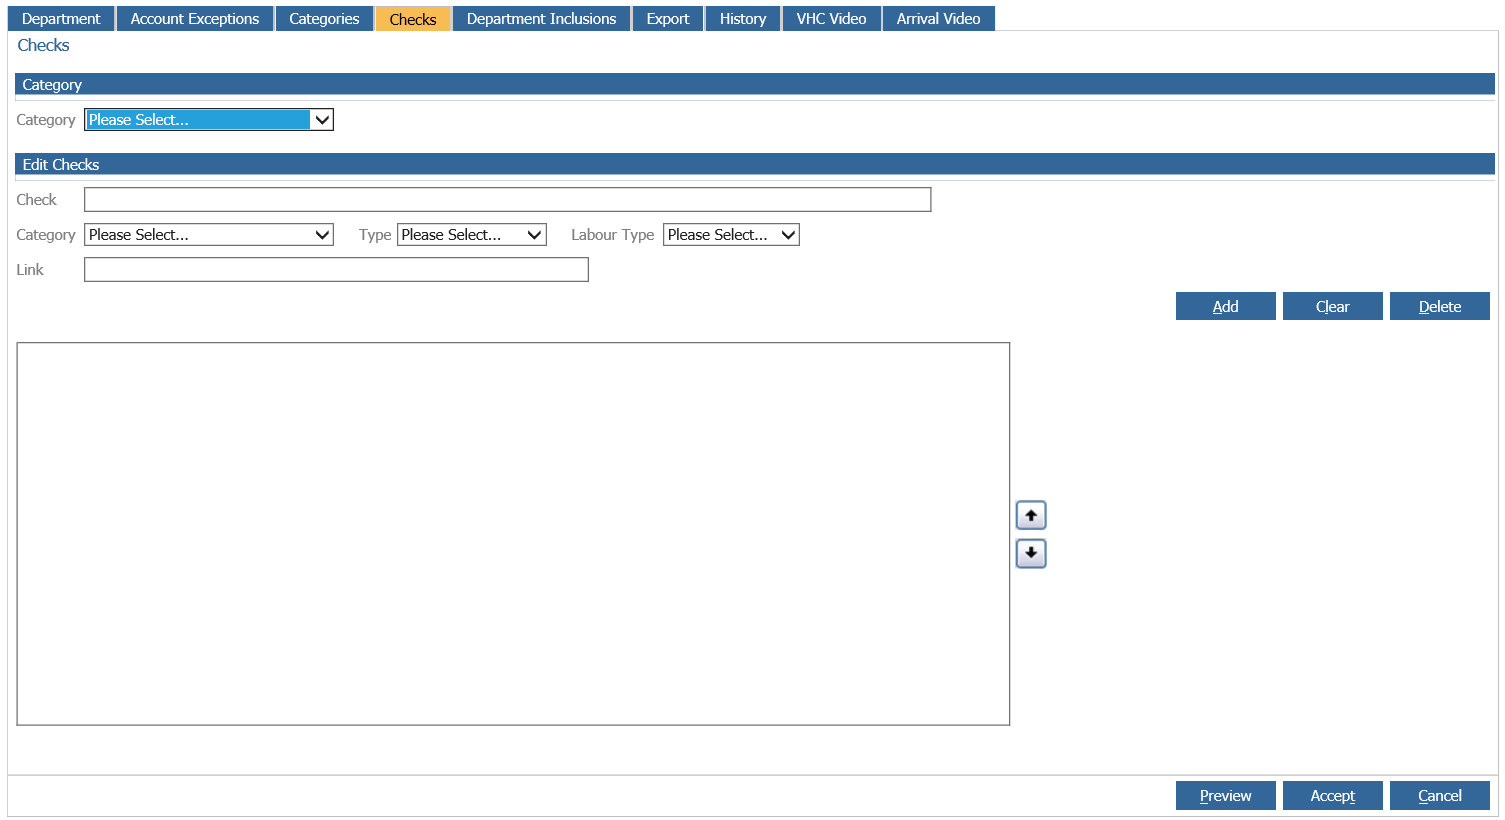
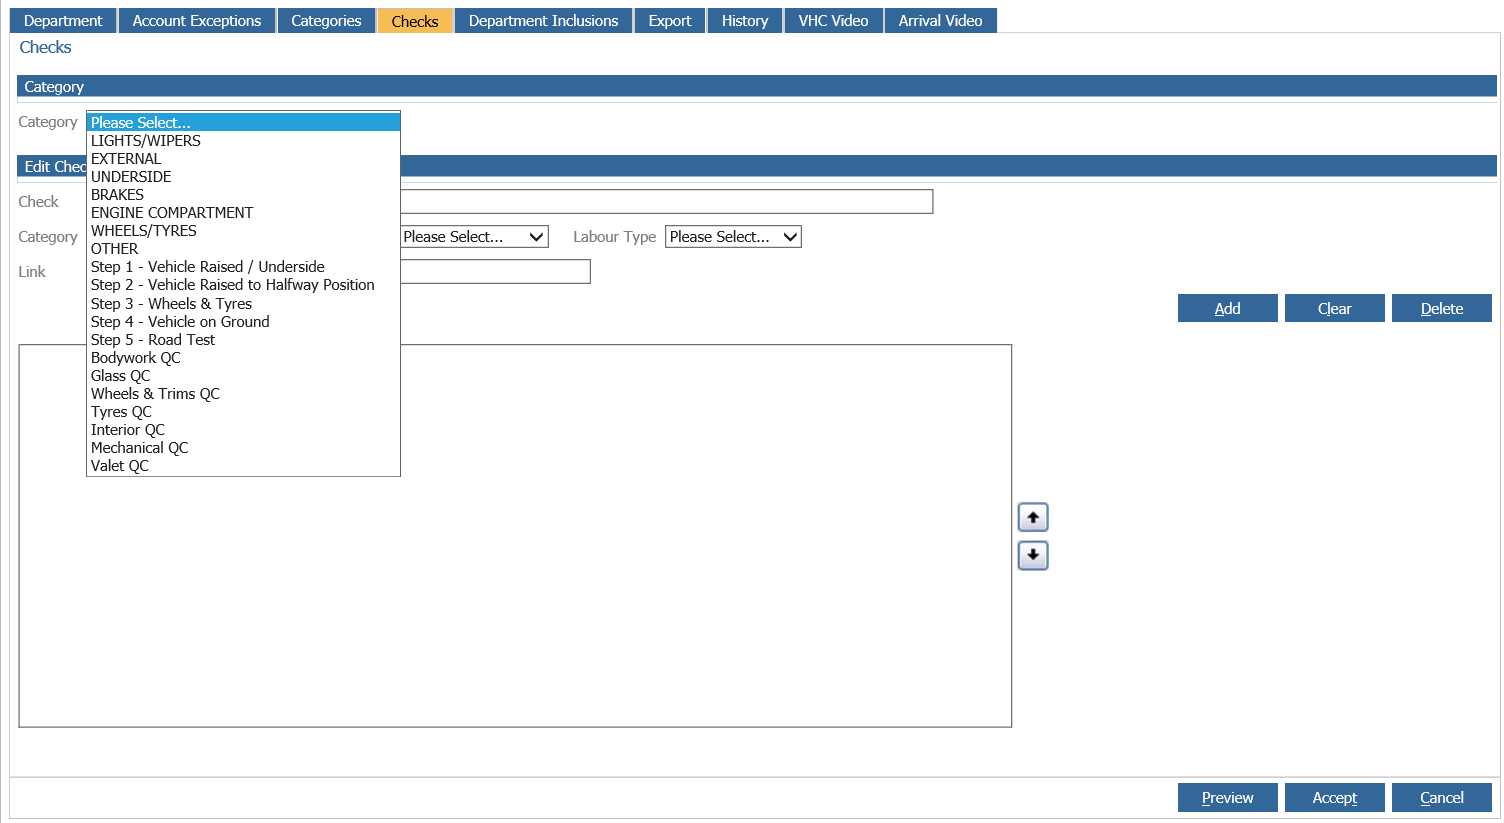
From the ‘Category’ section select the required category from the drop down menu.
With the category selected the ‘Edit Checks’ section becomes active.
Enter a specific check that technician is required to carry out, enter a labour type if required
and select ‘Add’ to populate the list.
When all checks have been added select the ‘Accept’ button to save the changes.
The link field allows a website link to be added to the check. The idea is to point customer to a
website / video explaining the area of their vehicle that need attention and the benefits of have the work done. When the link field is populated a question mark icon will be displayed
on the vehicle inspection report that the customer receives via email.
To edit a check select the category from the ‘Category’ drop down menu.
Double click on the check to be edited, the check will move into the check field.
Make any changes required and select ‘Add’ to move the edited check back onto the list.
A check can be deleted by following the same process and selecting the ‘Delete’ button.
The list of checks can be reordered by highlighting the required category and selecting the up
or down arrows.
At each stage the heath check form can be viewed by selecting the ‘Preview’ button.
Department Inclusions
Specific checks can be assigned at department level enabling creation of separate health
check sheet per workshop.
Select the Department Inclusions tab to open the following screen;
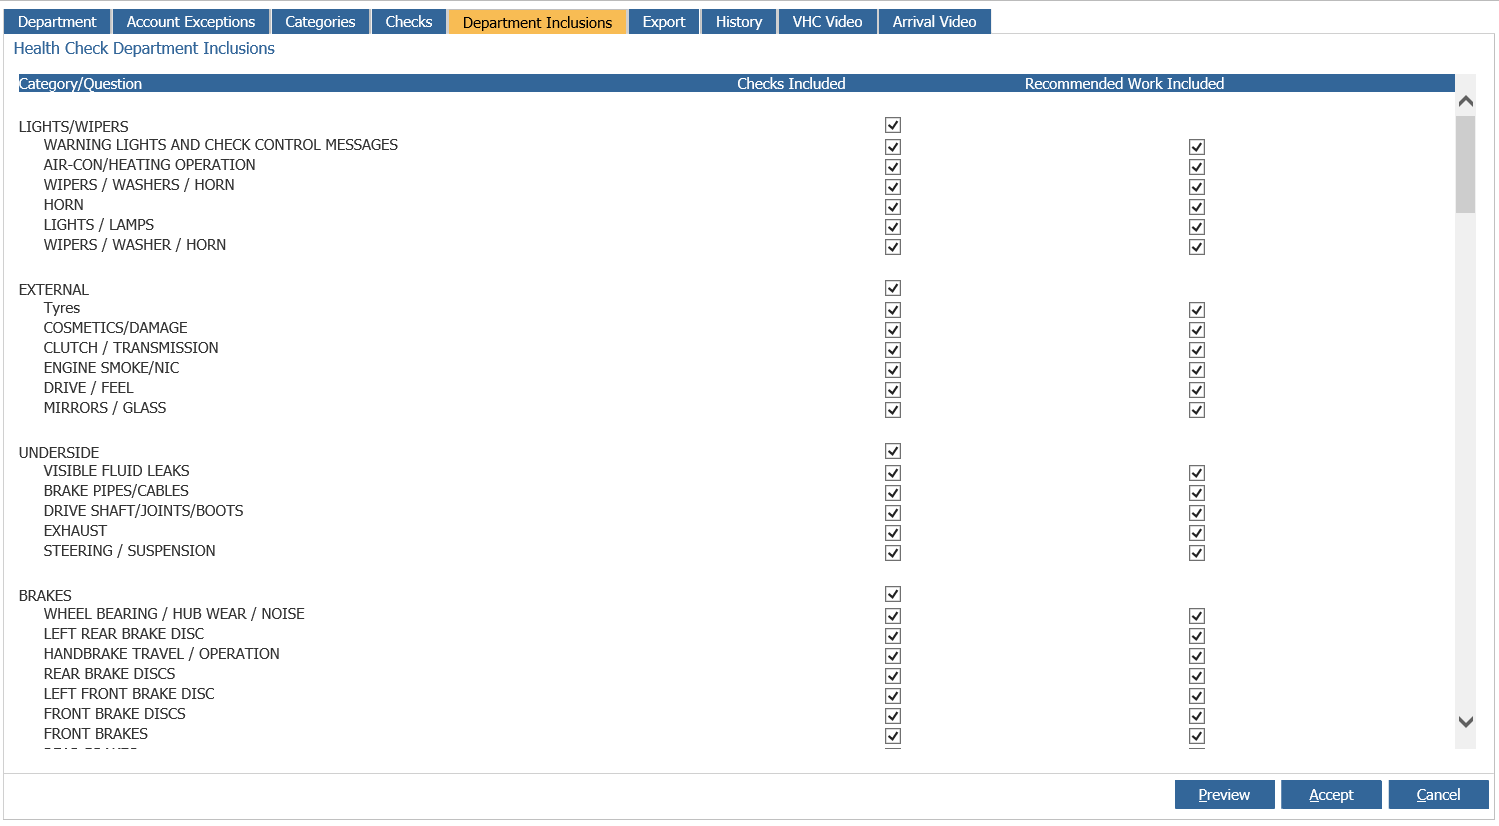
Two heading are available:
Checks Included: This enables different items to be visible in the health check form.
Recommended Work Included: If items within this area are not selected the items cannot be
marked as recommended on the health check.
For more information on how this relates to Checklists, please see the Workshop Checklists Guide.
Export
The export screen allows a selection of VHC report fields to be included in and file that can be
sent to a manufacturer. The file can either be transferred via FTP, SFTP or downloaded to the
user’s PC.
The parameter screen contains and number of fields that can be completed to allow the report
to be transferred, these details may be obtained from the manufacturer.
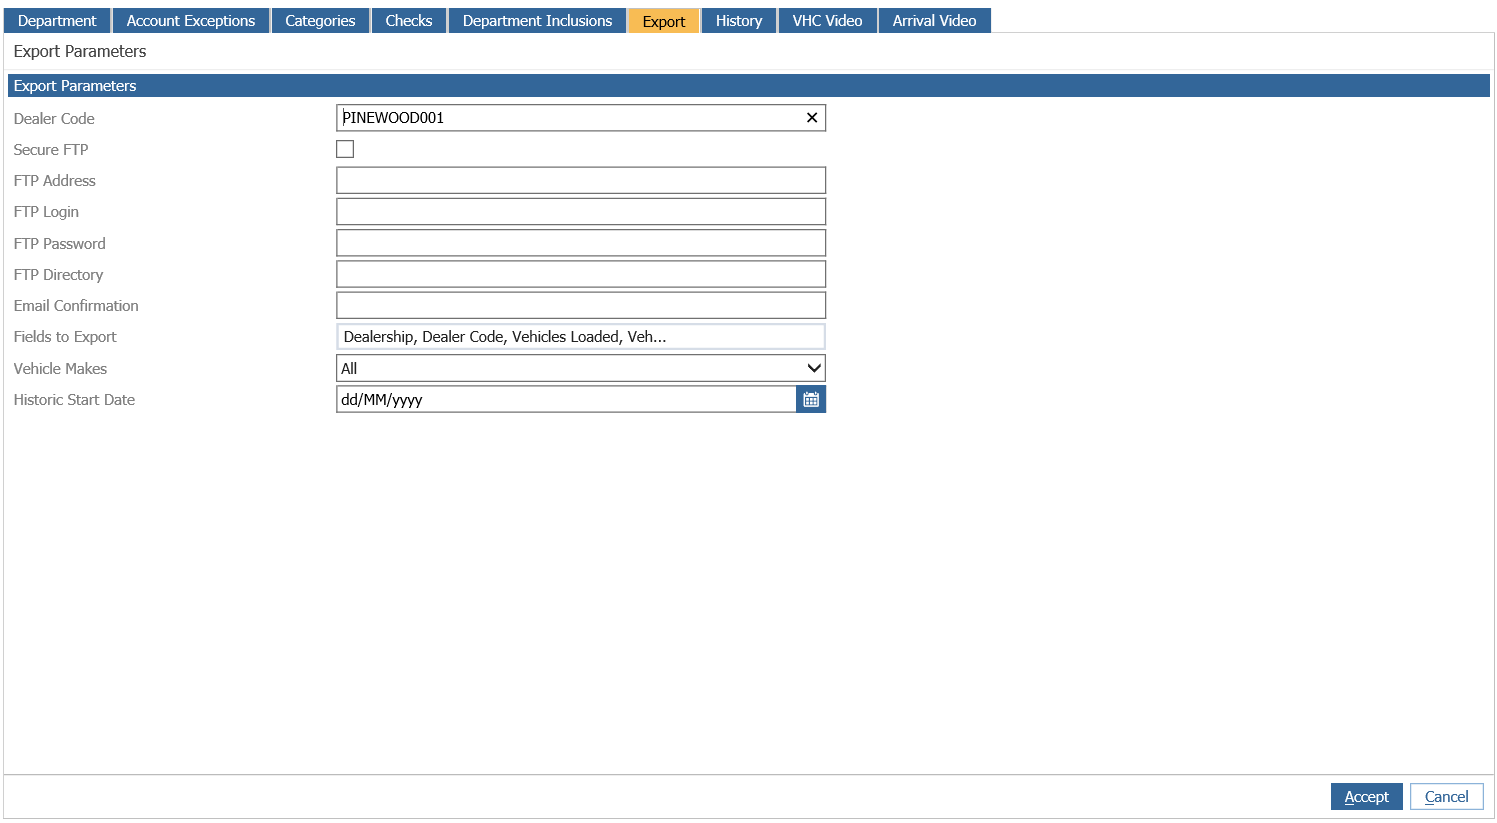
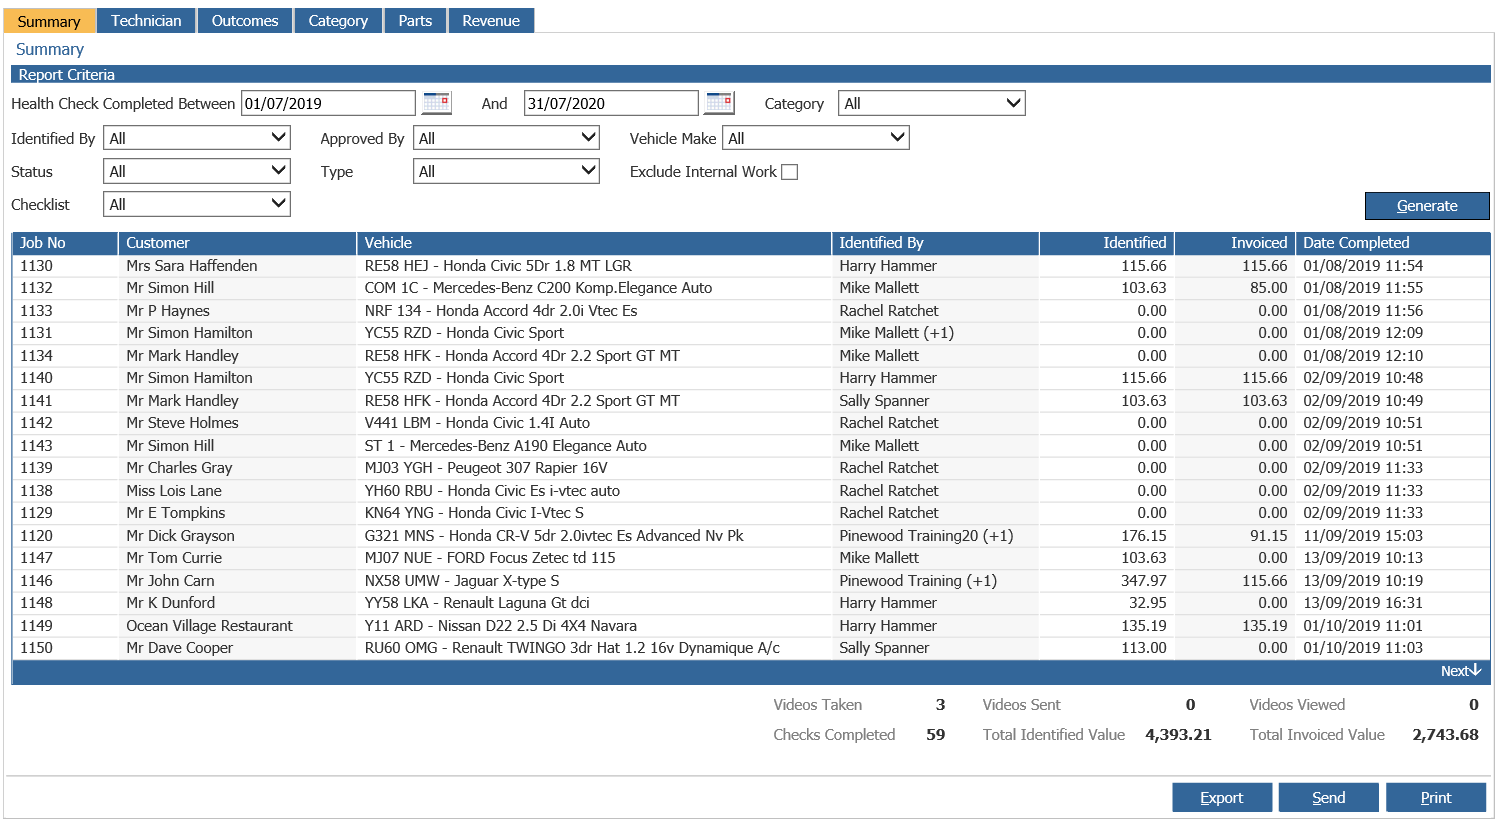
Once these parameters have been enabled the report can also then be exported from within: Workshop > Reporting > Health Check
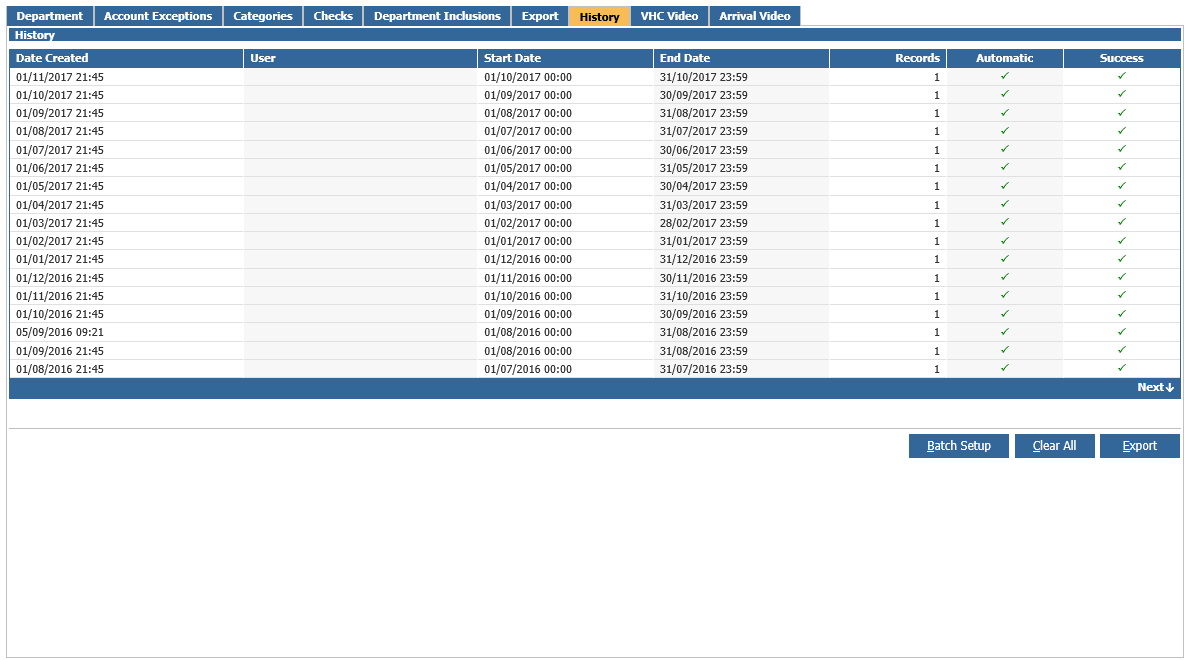
History
The History tab will show if the exported data to the manufacturer has been sent successfully.
VHC Video
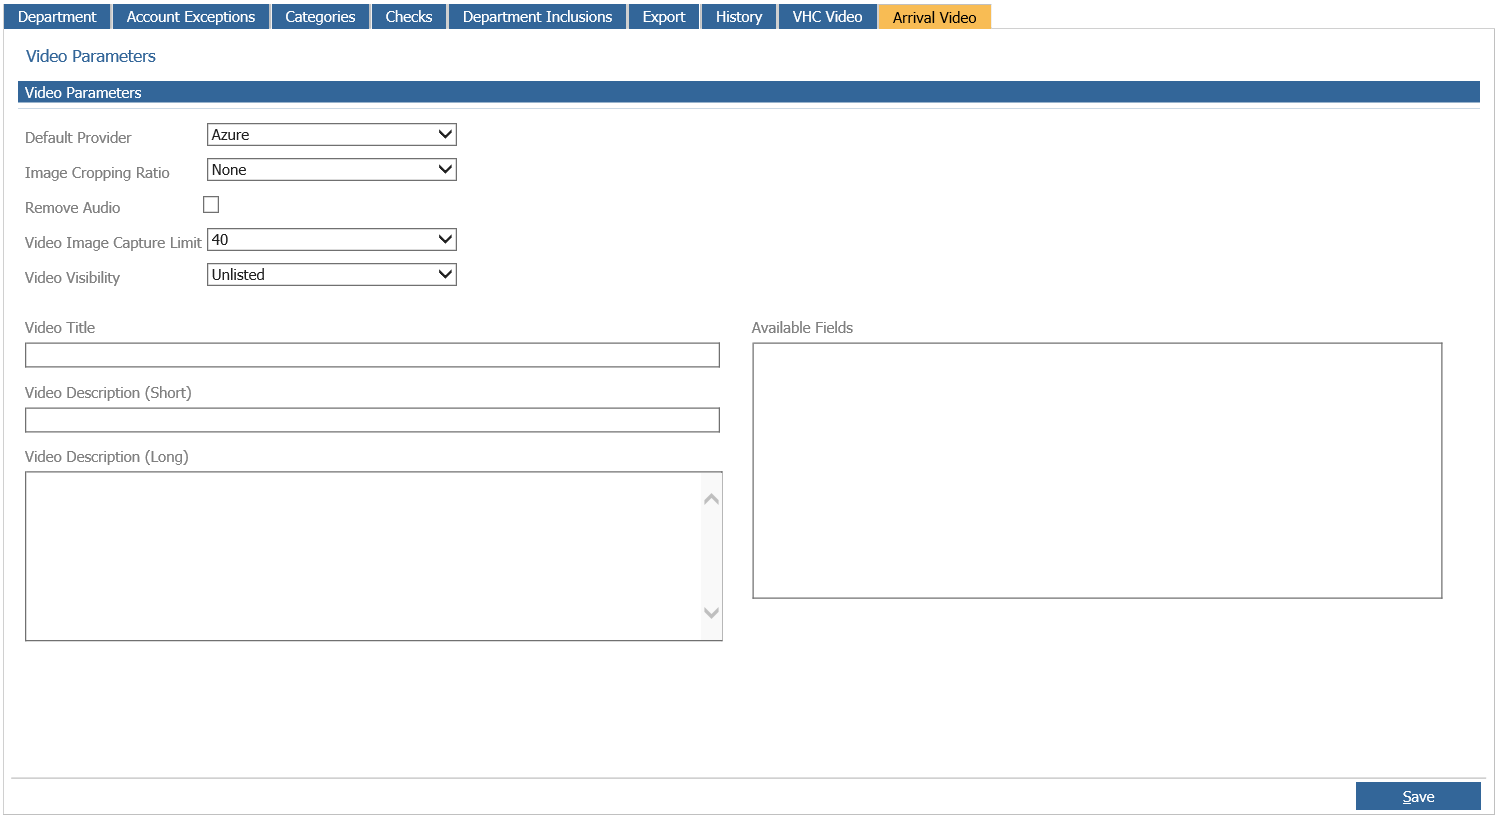
The VHC Video tab, will dictate what parameters you set for use with video integration to upload videos to the Vehicle Health Checks. If you currently do not have video upload enabled, please contact Support who can enable Azure for your site. Please advise in your email which branches you wish this to be active for.
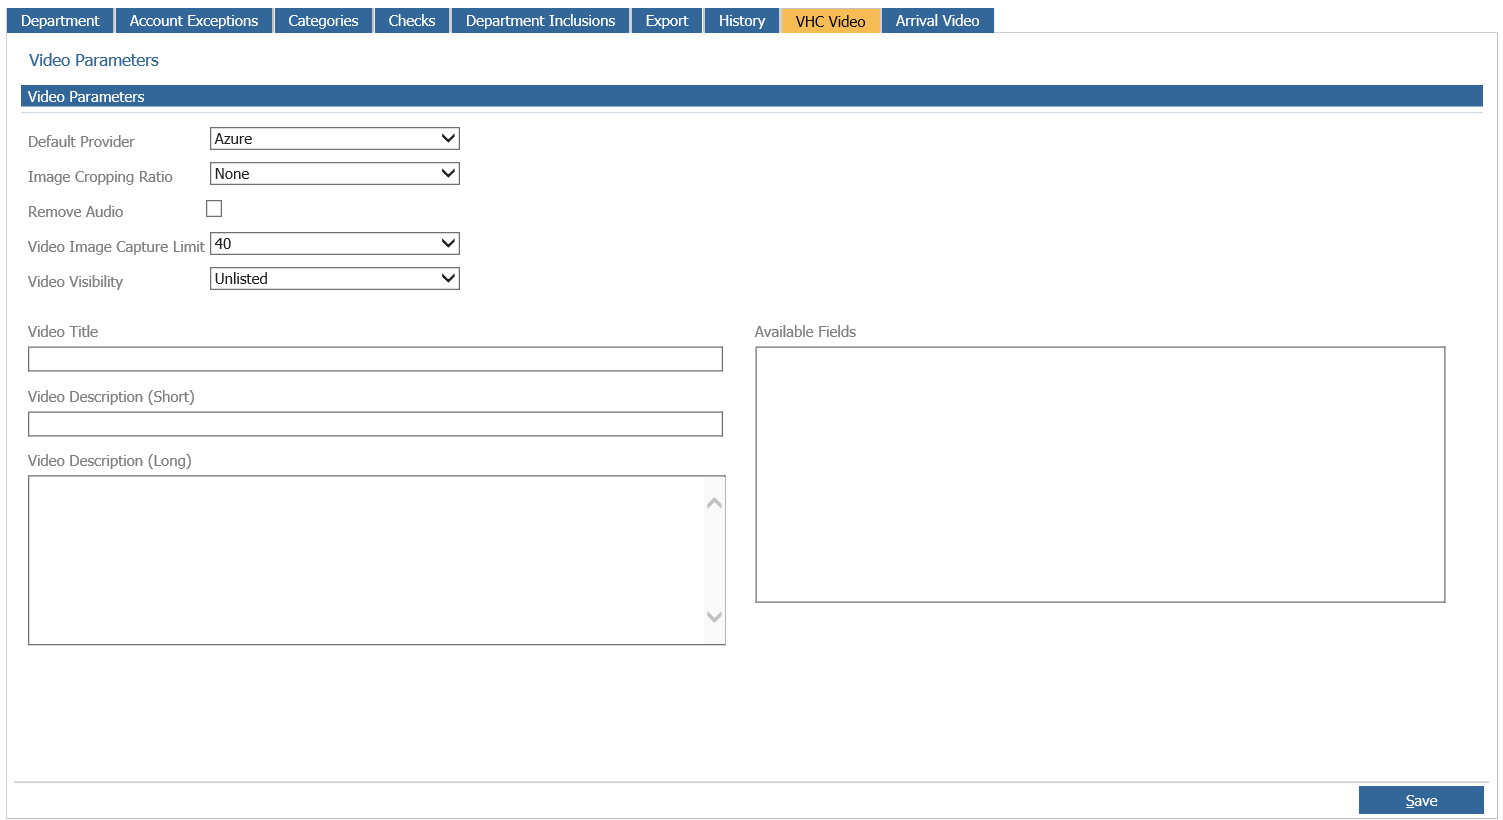
Default Provider - The Default provider used to upload videos
Image Cropping Ratio - The parameters you wish the video to be cropped to if applicable
Remove Audio - If checked this will remove the audio from the video.
Video Image Capture Limit - You can select how many images are captured from the video (this currently relates to Vehicle Stock Card videos)
Video Visibility - This dictates how the videos are visible on the video provider platform.
Video Title - If you wish to give the video a title.
Video Description (short) - If you wish to give the video a short description
Video Description (long) - If you wish to give the video a longer description
Arrival Video
This parameter screen applies to the Host+ arrival video feature. The parameters are the same sequence as for VHC Video.