Creating a health check
When a vehicle has been received into the Workshop the following window is presented.

Selecting ‘No’ will suppress the health check routine. If no is selected incorrectly go to ‘Amend
Job’ enter the job number and accept the job to prompt for a health check
Selecting ‘Yes’ create a health check for the vehicle and a print preview will be presented if you have the 'Print with Job Card' parameter enabled.
Unless you are using the Checklist feature in which case there will be no prompt, a checklist will be assigned to the operation. To find out more about this please view Workshop Checklist.
At this stage the health check form can be printed or alternatively an electronic version can be
utilised.
Note: Two print preview screens are opened the health check is first and then the job card.
The health check is now in the ‘Additional Work’ section.
Processing a health check
The health check form can be completed in a number of ways
• Manually via printed form and updated at a later stage.
• Electronically via the technician inputting the detail directly into Pinewood DMS via a PC.
• Electronically via the technician inputting the detail directly into Pinewood DMS via an iPod
or iPad
Update manual check / Input via PC
If a paper form has been created the details of this form have to be inputted into the system. This
can be done either by the technician themselves via the time management screen or by a
service advisor via the additional work screen.
Technician Updating VHC
From within the Time Management screen, the technician can select the Health Check tile.
When the technician clocks onto a job that requires a health check a message is displayed in
the bottom right hand corner of the time management screen.
Selecting the ‘Health Check’ button will open the health check form.

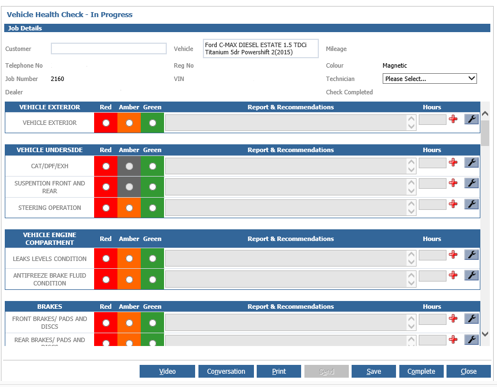
The technician can now update the form as required.
The  symbol enables the technician to add a new check under the selected option which allows
the same check to be recorded with new information.
If a form has been partially completed selecting ‘Save’ will retain any changes and leave the
form ready to be updated / completed at a later time.
Conversational notes can also be added at this stage enabling additional comments to be
viewed by others within the department.
When the health check has been updated selecting ‘Complete’ will move the form on to the
next stage.
Note: Dependent upon the ‘Send Checks to Workshop’ parameter the health check will either
move to the ‘Customer Order’ section within the Parts department or the ‘Awaiting Estimate’
section within the Service department.
Two further options are also available within the ‘Time Management’ screen
• Add Recommended Work
• Add Operations
Selecting the ‘Add Recommended Work’ option will allow the technician to enter the additional
work required in the text field at the top of the screen, then from the drop down menus the
status of the work and the category can be selected, also load hours can be inputted as well.
With the ‘Add Recommended Work’ screen complete select ‘Accept’.
The recommended work will now be in the ‘Additional Work’ section under the ‘Awaiting
Estimate tab ready for estimate / approval routine.
Recommended Work will be added to and existing estimate if one already exists.
A new operation can also be added by selecting the ‘Add Operation’ button. From the drop
down menu select the appropriate requirement and complete the operation text.
Note: The dictionary or menu pricing facility can also be utilised by selecting the suitable icon.
 Dictionary
 Menu Pricing
Complete the remaining fields as required including the ‘Load Hours’ and ‘Type.
With all of the required fields updated select ‘Accept’ to add the operation to the selected
requirement.
Input via Pinewood Tech+ App
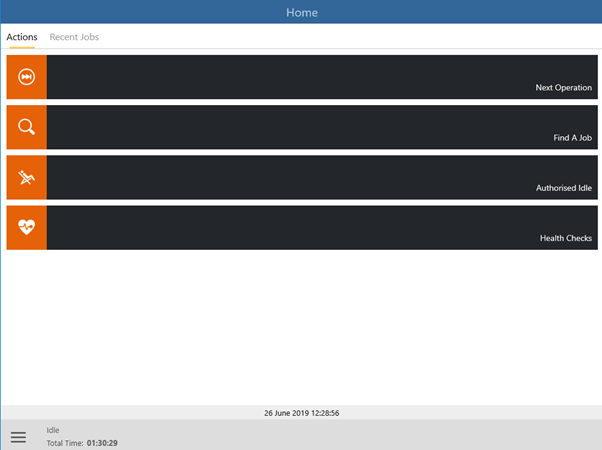
Through the Tech+ app you will be presented with the initial Log In screen.
Technicians can also select the Health Checks tile to view jobs with open Health Check to be completed.
Once a job has been selected the operations and vehicle detail can be viewed.
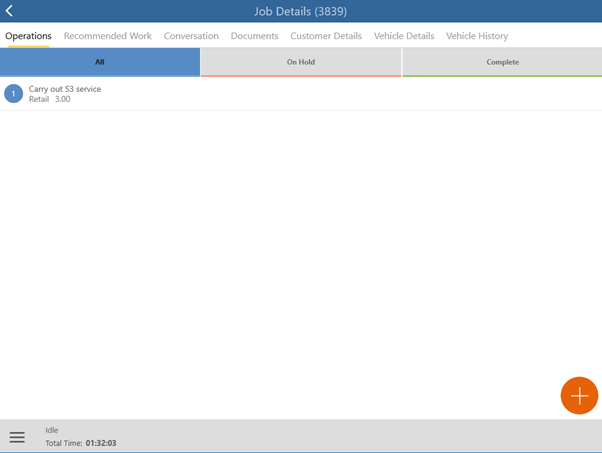
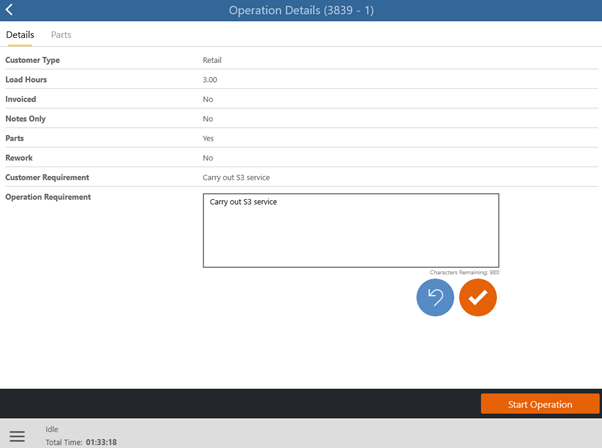
Click an operation to clock on.
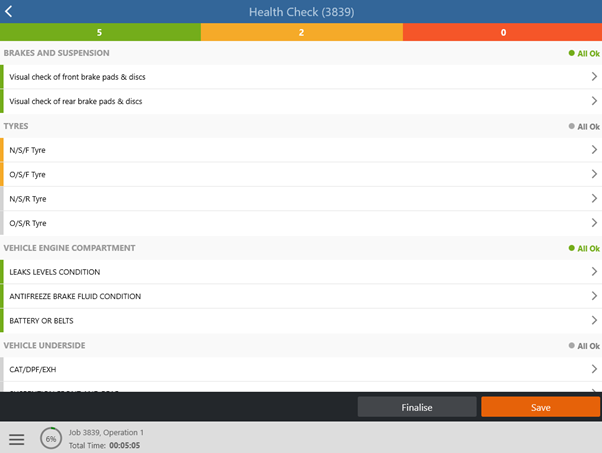
Select a health check item then select the appropriate colour for the condition of the item
checked and add any supporting text, continue through the form until all items have been
checked.
Located at the top of the form is a progress tracker indicating the number of items
unchecked, marked as red, amber or green.
You can also select the 'All Ok' text to mark all lines as green is applicable.
Select the ellipsis icon  to add video if video parameters have been enabled.
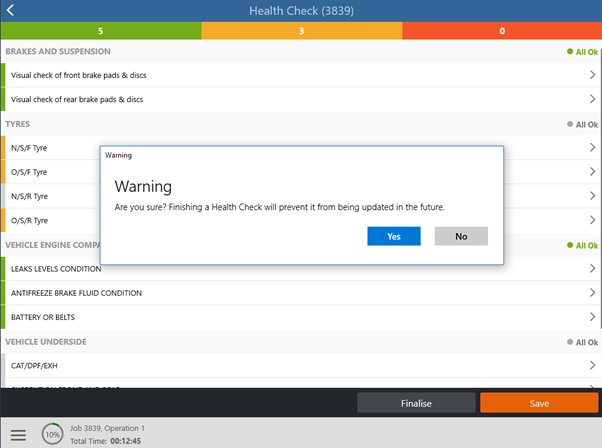
Select Save to save work currently completed or Finalise to complete the Health Check.
For further information regarding using Tech+ please view the article for Tech+
Note: Dependent upon the ‘Send Checks to Workshop’ parameter the health check will either
move to the ‘Customer Order’ section within the Parts department or the ‘Awaiting Estimate’
section within the Service department.
A manually completed health check form can also be updated in Pinewood DMS by a service
advisor.
From Within: Workshop > Jobs > Additional Work
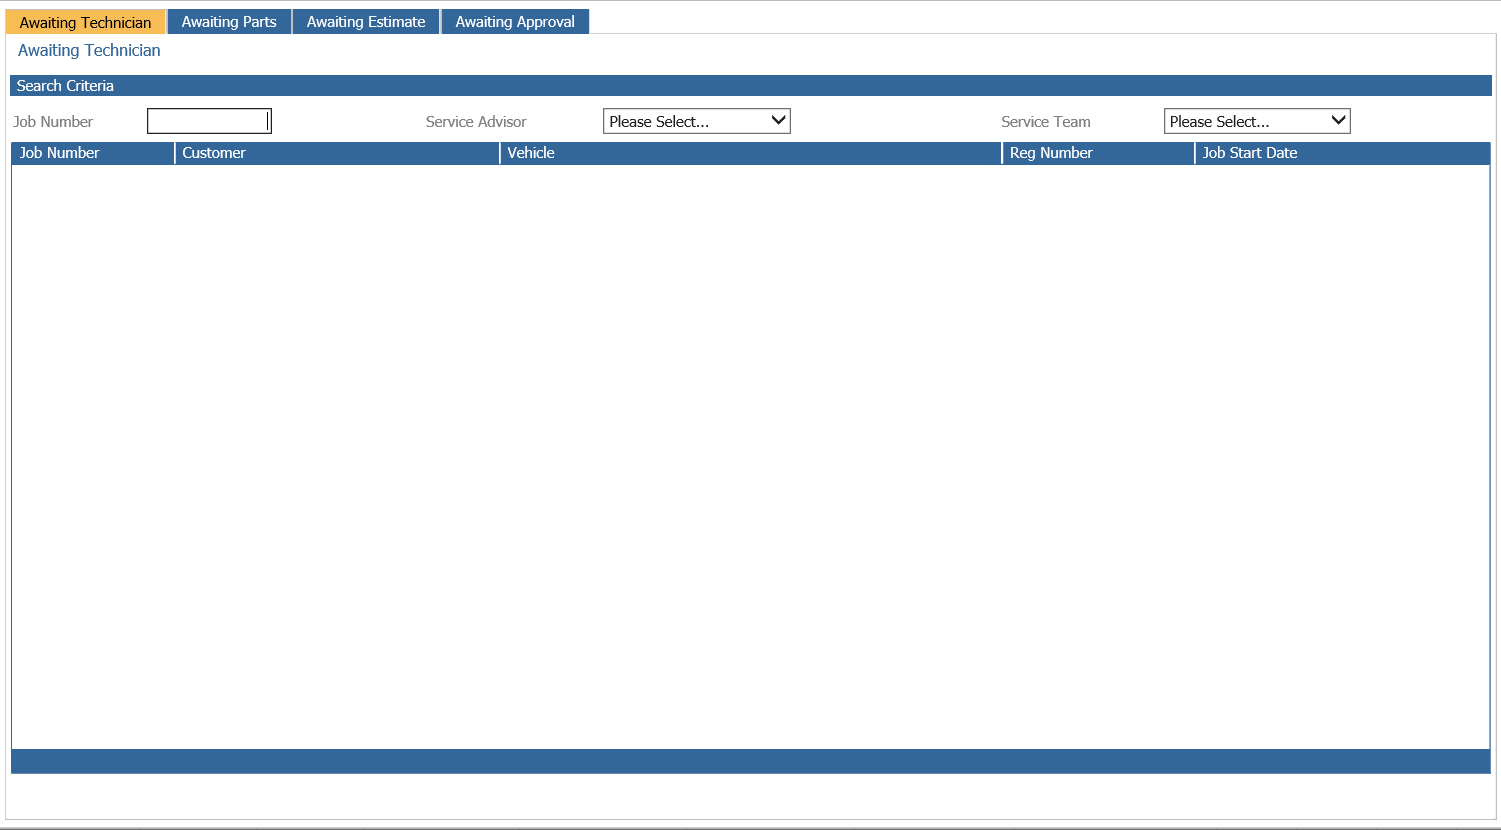
All heath checks that are in progress are retained in the ‘Awaiting Technician’ tab.
To view a health check form double click on the respective job.

The form is broken down into two sections job details and categories. The job details section
contains the customer details, vehicle details, job number, dealer details and technician
details.
Note: Customer and vehicle records can be viewed by clicking on the customer or vehicle
fields.
The categories section displays the checks to be carried out during the health check process.
Select the technician who has completed the VHC.
Complete the health check form entering the condition of each check as required, the health
check will be locked when the technician is accessing the form
If a form has been partially completed selecting ‘Save’ will retain any changes and leave the
form in the ‘Awaiting Technician’ screen ready to be updated / completed at a later time.
When the health check has been updated select ‘Complete’ to move the form on to the next
stage.
Note: Dependent upon the ‘Send Checks to Workshop’ parameter the health check will either
move to the ‘Customer Order’ section within the Parts department or the ‘Awaiting Estimate’
section within the Service department.
One of the following messages will be displayed.

Selecting ‘Yes’ will move to health check to the respective stage, select ‘No’ to return to the
health check.
Re-Open a closed Heath Check
A completed health check form can be re-opened by selecting the ‘Re-Open’ button located at
the bottom of the health check form from the awaiting parts, awaiting estimate or awaiting
authorisation screens.

Note: If the ‘Re-Open’ button I greyed out it means that the person trying to re-open the form
does not have the correct access level or part of the estimate has been processed within the
awaiting authorisation screen. Where a VHC form has been re-opened an entry will be written
into the conversational notes stating who re-opened the form.
When a form is re-opened any existing labour or parts that have been added to the estimate
will be retained and the labour hours will be displayed on the form.
Video
A video of the vehicle health check can be taken, uploaded and subsequently sent via email
to the customer.
Prior to uploading videos the video parameters will have to be completed within the vehicles
module and a HTML template will have to be created within the CRM module.
Once the video has been taken and is available on a PC select the video button located at the
bottom of the health check form to open the Video Player widow, then select the upload
button.
Alternatively if the Tech+ app is being utilised the video can be uploaded directly from
the app.

Select the  button to browse to the video located on the PC. Once located select the
upload button to complete the process.
Sending the Email
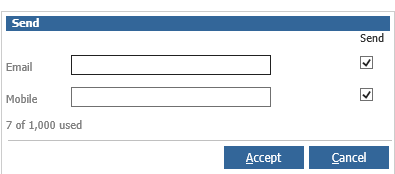
A copy of the vehicle health check form can be sent directly to the customer via the Email
button located at the bottom of the health check form. When the email button is selected and
HTML emails are not enabled the following screen will be presented.

Check / amend the customer email address and add any supporting narrative as required
then select accept. The VHC form will be an attachment on the email received by the
customer.
If HTML emails are enabled the following window is presented. To view set up reference for the HTML email, please see article Vehicle Health Check Email.
If you have entered text within the SMS Message parameter box within the Health Check Parameters screen, you will also have the option to send this as an SMS link.
You can choose whether to send one option or both from this pop up.
Check / amend the customer email address as required, upon selecting accept a copy of the
HTML email will be sent to the customer with the VHC form attached. The customer contact
history will be updated with a copy of the vehicle health check form and HTML email.
If a video has been uploaded then the HTML email will contain a link to the video that the
customer can click on to view the video and details of the health check including the cost of
any work identified. The customer can then select the authorise button to approve the
identified work, when the authorise button is selected two emails are sent one to the dealer
and one to the customer displaying details of the work authorised.
Note: If the service advisor diary is being utilised then the service advisor associated to the booking will receive the approval notification and a copy will also be sent to the departmental email address held in the company structure.
When reviewing the VHC estimate details a video icon is present only if the VHC has been
emailed to the customer.
 Select the
  icon to view the Arrival & VHC videos.
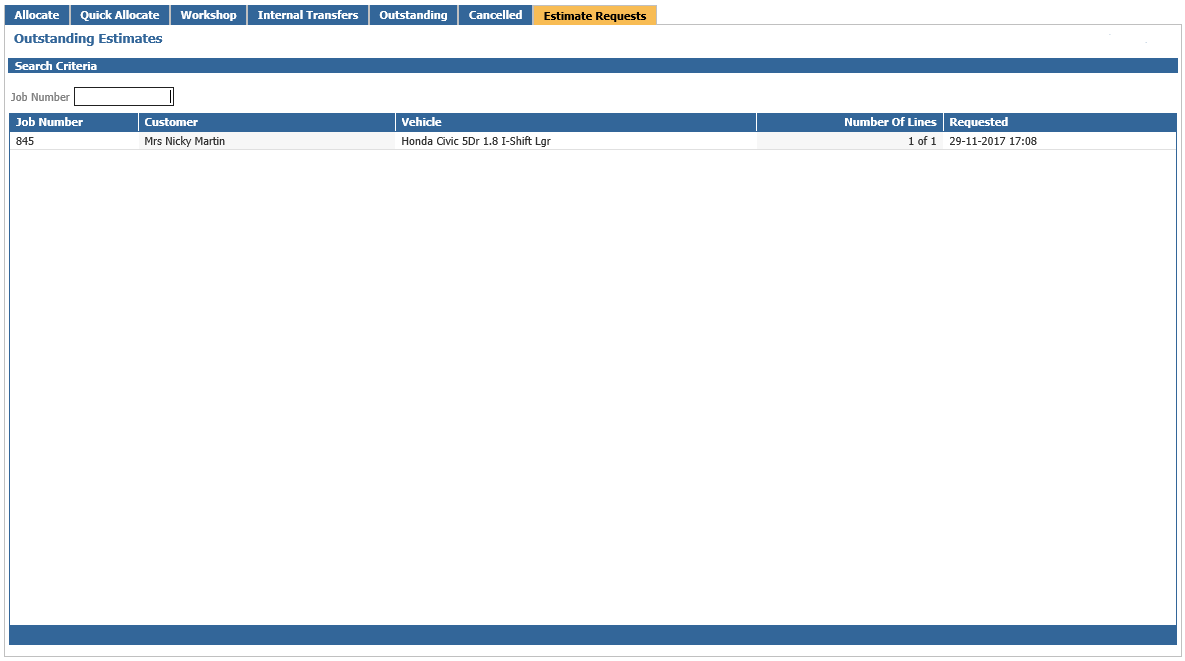
Parts Estimate
Select Parts > Customer Orders > Customers Orders from the side menu.
Select the ‘Estimate Requests’ tab to view a list of outstanding estimates.
Note: An outstanding health check estimates notification is also visible within the workshop
issues screen.
To update the estimate with parts double click on the required job.

A number of buttons are available within this screen.
• Conversation: Conversational notes can also be added at this stage enabling
additional comments to be viewed by others within the department.
•Health Check: Select this button to open the completed health check form
• Job Details: Select this button to view the job that the vehicle has been booked in
for.
• Complete: Select this button when all parts have been added to the health check.
• Close: Select this button to close the current screen.
Note: Urgent work identified will be displayed in red.
To add parts to the health check double click on the respective line within the description
section.
The following window will be displayed.

To add parts to the estimate enter the part number or description into their respective fields
and select the search icon.
The ‘Search for a Part’ screen will be displayed.
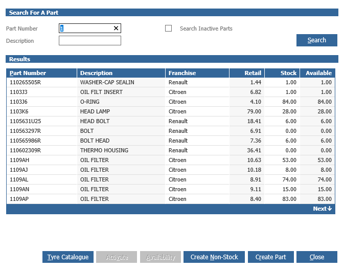
Double click to select the required part.
The quantity field is automatically populated with a quantity of one this can be changed as
required. The issue price and discount field can also be amended if required.
Beneath the quantity field are three radio buttons.
• Available: Indicates that the parts selected are available from stock (Populated
automatically)
• Same Day Order: Indicates that the parts are not in stock, however they can be
supplier on the same day.
• Order: Indicates that the part required is not in stock and would have to be ordered
in.
The ‘Notes’ field is a free text field where the parts advisor can add a message for the service
department. i.e. “Parts available from local factors”.
Alternative parts can be associated to parts that are on the estimate, to do this search for the
alternative part then select the alternative to drop down menu and choose the part to which
the alternative should be associated too.
E.g. if a premium price tyre with part number 195/65/R15-premium has been added to the
estimate then a budget tyre with a part number of 195/65/R15-budget can be added to the
estimate but it’s an alternative of the premium tyre. The price on the estimate will be premium
tyre but the alternative will be available to select if the customer wants it.
Note: Alternative parts are displayed in blue.

If a part does not have a record on the system, the details can be typed directly into the part
number and description fields, the price can also be populated in this way.
Select ‘Add’ to populate the list of required parts.
When all parts are added to the estimate select complete. When the last line has been
updated the following message will be displayed.
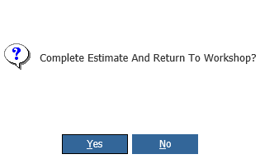
Select ‘No’ to return to the parts estimate and select ‘Yes’ to complete the process and return
the estimate to the service department.
Workshop Estimate
Select Workshop > Jobs > Additional Work from the side menu.
Select the ‘Awaiting Estimate’ tab to view a list of outstanding estimates.
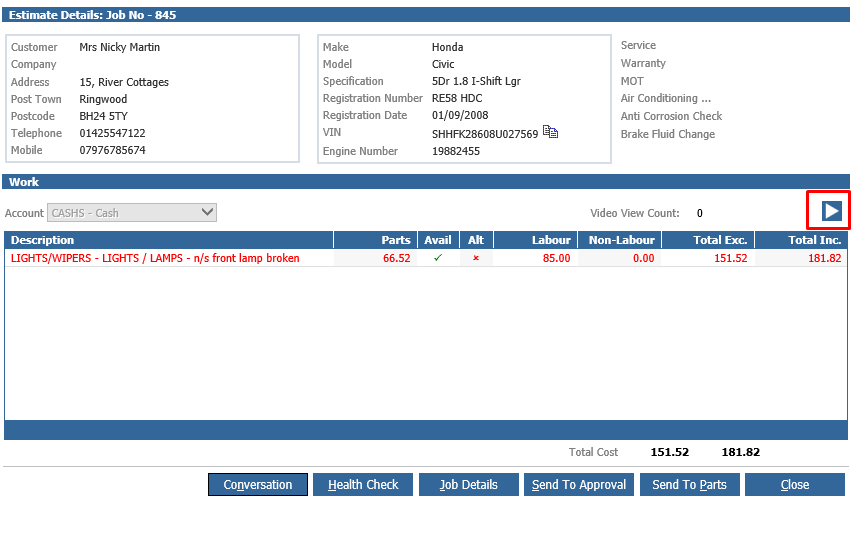
To update the estimate with labour double click on the required job.
The ‘Estimate Details’ window will be displayed.

When reviewing the VHC estimate details a video icon is present only if the VHC has been
emailed to the customer.
Select the  icon to view the Arrival & VHC videos.
If alternative parts are associated to a line a tick will be visible in the ALT column.
A number of buttons are available within this screen.
• Conversation: Conversational notes can also be added at this stage enabling
additional comments to be viewed by others within the department.
• Health Check: Select this button to open the completed health check form
• Job Details: Select this button to view the job that the vehicle has been booked in
for.
• Send to Parts: Select this button to return the estimate to the parts department.
• Close: Select this button to close the current screen.
Note: Urgent work identified will be displayed in red.
To add labour to the health check, double click on the respective line within the description
section.
The following window will be displayed.

A number of buttons are available within this screen.
• Complete: Selecting this option completes the process.
• Save: Selecting this button saves any changes made to the ‘Labour Cost’ screen
• Send to Parts: Selecting this option returns the estimate line to the parts department
• Close: Selecting this option close the ‘Labour Cost’ window without saving any
changes.
To view parts added to the estimate click the  price field.
Alternative parts will be displayed in blue text.
Notes added by the parts department can be viewed within the notes field.
Non labour lines can be added to the ‘Labour Cost’ screen by entering a value into the ‘Non
Labour’ field and selecting the appropriate ‘Non Labour’ type from the drop down menu.

Add ‘Invoice Hours’ into the appropriate field, the labour rate can be amended at this stage
also a fixed price can also be applied to the estimate.
When completing the last line on the estimate the following message is displayed.
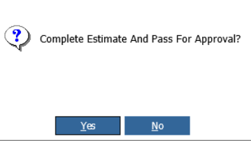
Select ‘No’ to return to the estimate or select ‘Yes’ to send the estimate for approval.
Estimate Approval
Select Workshop > Jobs > Additional Work from the side menu.
Select the ‘Awaiting Approval’ tab to view a list of outstanding estimates.
To gain approval for an estimate double click on the required job to open the following
window.

When reviewing the VHC estimate details a video icon is present only if the VHC has been
emailed to the customer.
Select the ![]() icon to view the Arrival & VHC videos.
icon to view the Arrival & VHC videos.
If alternative parts are associated to a line a tick will be visible in the ALT column.
A number of buttons are available within the ‘Estimate Details’ screen
• Conversation: Conversational notes can also be added at this stage enabling
additional comments to be viewed by others within the department.
• Health Check: Select this button to open the completed health check form
• Job Details: Select this button to view the job that the vehicle has been booked in
for.
• Add All: Select this button to add all work found during the health check to the
current job.
• Decline All: Select this button to decline all work found during the health check.
• Defer All: Select this button to defer all work during the health check, a window will
be displayed where the reason and follow up date can be selected.
• Close: Select this button to close the ‘Estimate Details’ screen.
The account field allows separate accounts to be selected including INTVM when adding
authorising additional work.
Note: Urgent work identified will be displayed in red.
To approve a job double click the respective line in the ‘Description’ section to display the
following screen.

Parts can be viewed in this screen by selecting the price field, if the price in the parts field is in
blue text this indicates that alternative parts are available.
When clicking into the parts price field where alternative parts available the following window
will be displayed.
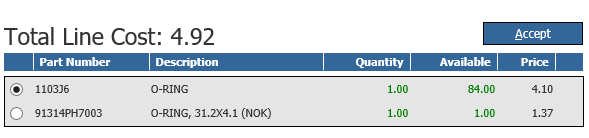
After a discussion with the customer the alternative part can be selected if required and the
total line cost will be updated accordingly.
The alternative part will be used when add estimate parts is selected within the parts
department.
Below the fixed price fields the total cost of the operation is also displayed.
Alongside the ‘Action’ field are three radio buttons.
• Add: With this button selected the additional work will be added to the current job
when ‘Accept’ is selected.
• Defer: If the customer does not require the work carrying out today but wants the
dealer to notify them in the future that the work is required the defer option selected.
When defer is selected a work required reason and lead time has to be selected from
the drop down menu. The defer process populates the Aftersales Diary within CRM. If alternative parts have been selected prior to the line being deferred these parts will
be retained for the future booking / job.

• Decline: If the customer does not required the work to be carried out the decline
option is selected.
Located at the bottom of the ‘Approval’ screen are three buttons.
• Accept: Confirms the action taken.
• Return for Estimate: Returns the estimate back to the ‘Awaiting Estimate’ stage.
• Close: Select this option to close the ‘Approval’ screen.
When repairs are authorised the job will be updated accordingly.
It is imperative that the requirements and operation added to the job via the health check
process are not removed and reinstated at a later stage.
Parts Issues
To add parts to an approved operation select Parts > Sales > Workshop Issues from the
side menu.
Enter the job number as required select the appropriate operation number and the ‘Add
Estimate Parts’ now button becomes active.
Selecting the ‘Add Estimate Parts’ button will display parts linked to the operation one by one.
Select ‘Accept’ to populate the ‘Parts List’, when all parts are added select ‘Issue’ parts.
Invoicing
The invoice routine remains unchanged, however where additional work has been added to a
job using the estimate routine it is imperative that these lines are not removed and later re-added.
To display all work deferred on the invoice select the ‘Follow Up’ button before finalising the
invoice.
Health Check Form Amendment
A completed health check form can be amended prior to the invoice being completed.
To amend a health check form select Workshop > Invoicing > Produce Invoice from the
side menu.
Select the ‘Health Check’ button to open the completed form.
Amend the form as required and select save. Once the invoice is produced the health check
can no longer be edited.
Follow Up
Within the invoice screen a ‘Follow Up’ button is available, selecting this option displays the
following window.

The lower section of this screen displays all future work required. It is also possible to add
additional work required, CSI follow up and Parts Awaited.
Adding Deferred Work to an Open Job
A deferred item can be added to the open job selecting the follow up button within the invoice
screen highlighting the line to be added and selecting the Add to Job button.
This will add a new operation to the job and if the line contains parts information the flag for
parts option will be selected.
