The nominal ledger consolidates all transactions from the sales ledger, purchase ledger and cash book and combines these with the activities from the Vehicles module to produce the reports necessary for the overall management of the business.
The nominal ledger will produce the Profit and Loss, Balance Sheet and Trial Balance reports together, with the required VAT analysis.
As well as Manufacturer Composite reports, bespoke Management Reports may also be produced in the system.
The nominal ledger consists of two levels allowing consolidated reporting up to Enterprise level.
These two levels are known as Master and Transaction levels with values being held at the Transaction level. They consist of a number of accounts, which represent all of the financial activity of the business. This is divided into two areas, the Profit and Loss – which details the income and expenditure of the business in both monthly and year to date totals. The Balance Sheet – which shows the financial position of the business as a summary of all of the assets and liabilities.
The nominal ledger set-up must be completed before using the system for the first time.
Plan the layout required for the ledger and if necessary take advice from external auditors. It is important to consider reports that may be required for the manufacturer such as dealer composite and any dealership management reporting requirements.
To access the Nominal Ledger parameters, select:
Accounts > Nominal Ledger > Ledger Parameters.
Once this option has been selected from the left hand menu, select the current accounting period on the pop up screen.

To view the Parameters Tab for the Global Accounts Tables, please view article Nominal Ledger Parameter.
Analysis Codes
Select the Analysis Codes tab along the top of the screen.
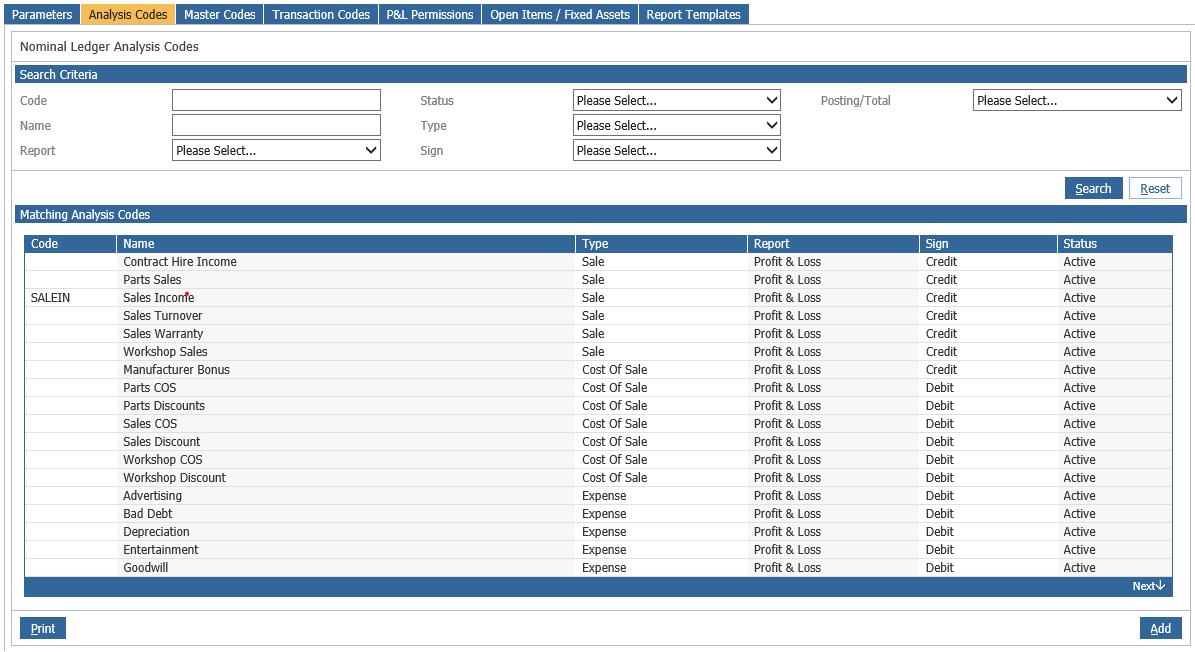
The screen above is a search screen for existing analysis codes. Every nominal code must be linked to an analysis code. When the system is live, selectively created analysis codes will assist in sorting costs and sales easily when the Trial Balance is exported. If the Trial Balance is exported to include analysis codes, the spread sheet can be sorted in code order grouping together Stationery Costs for example.
The analysis code fields are identified as follows:
Code – This is the code and may be used for additional reporting criteria, either to group specific codes (e.g. advertising, cleaning) across the Enterprise or for user definable export for unique reporting requirements.
Name - This is a description of what the nominal code is used for
Type – The Type must be chosen from a pre-determined selection, for use by the system, a Narrative, Sale, Cost of Sale, Expense, Total, Asset, Liability, Tax, Dump Account or Statistics.
Report – Report is used to determine whether the code is to be included within the profit and loss or balance sheet reports.
Sign – In the Sign option each category must be assigned a debit or credit status. In the profit and loss section of the nominal, sales accounts should be identified as credits and expense codes as debits. For the balance sheet section assets are debit and liabilities are credits.
Status – Status will determine whether the code is an active account for use in the current ledger. No postings can be made to an Inactive account, but this may be changed to active status for future use. The Retired status is no longer in use.
Posting / Total – This is broken into three types below:
Narrative – this is used as a heading (e.g. Sales Department)
Posting – used for posting transaction values to
Total – any total account has a level between 1 and 99 (see Master Codes)
Select ‘Add’ on the bottom right of the screen to create a new code.
Enter the Analysis Code and description and then select the required field options from the drop down boxes.
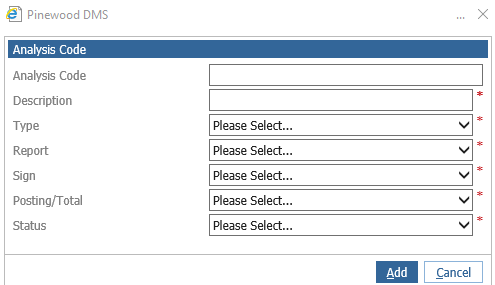
Click ‘Add’ to save the new code.
Master Codes
Master Codes form the overall structure for the nominal. Click on the Master Codes tab to see a search screen. Enter the new nominal code that is to be created and click the search button on the right-hand side of the screen to ensure that the nominal code is not already in use.
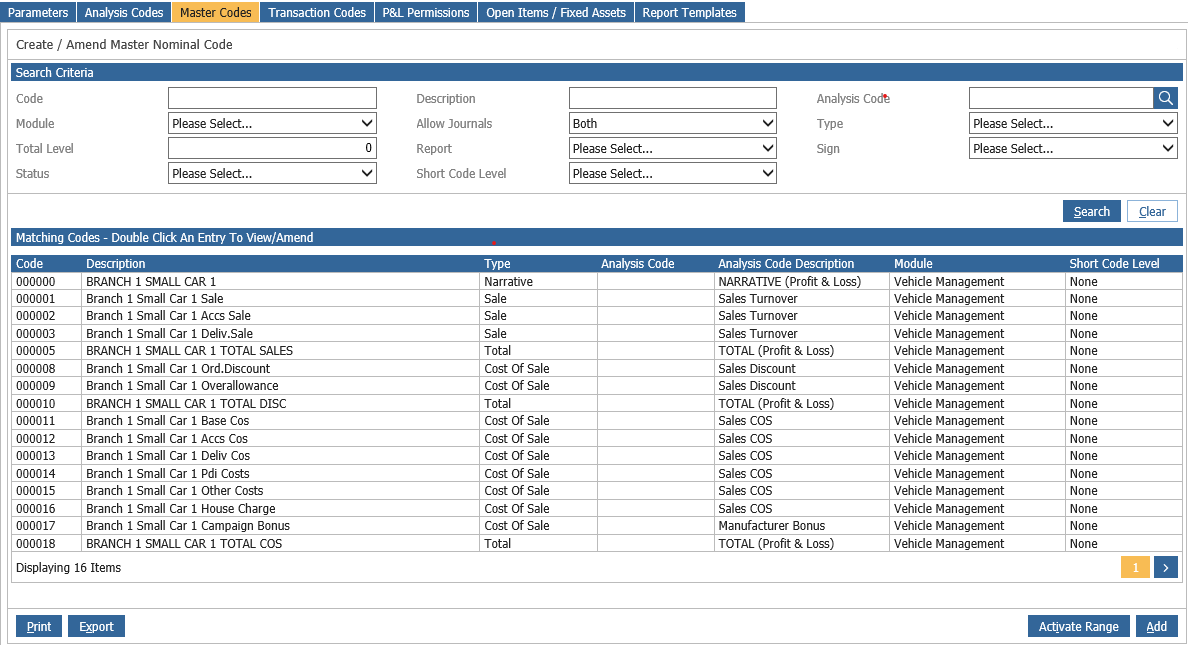
It is also a good idea to search for the first four or five digits of the nominal code that is to be added to ensure that it is being entered within the correct section of the Nominal Ledger Account Plan and is included within the correct totals.
Select ‘Add’ to create a new master nominal code.
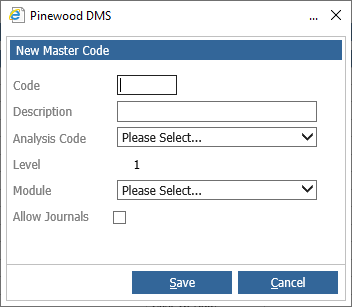
Input the 6-digit code using alpha and/or numeric characters and the description you wish to use.
Select a Category that has previously been created. Choose a Module to attach to the code from a pre-determined list.
Un-checking the ‘Allow Journals’ option will prevent the posting of nominal ledger journals to a code. This will ensure that only system-generated postings are made against the code.
The nominal should be created so that journals are not allowed against the main control accounts (e.g. sales ledger debtors, vehicle stock accounts). If a valid journal is to be done against one of these codes, then the Master Code can be amended to temporarily allow journals and then be changed back once the journal has been posted.
The Total level determines how many posting codes are to be included in the total value. T1 will sub-total all codes between this and the previous T1 or higher total level. If there is no T1 or higher level above, then it will total all codes above itself.
T2 will similarly total the values up to the previous T2 or higher total level. T2 will include all the posting code values already included in the T1 total. T99 is the highest total level.
All total codes will total every posting nominal above them if the same or a higher totalling level does not occur further up the report, meaning a hierarchy of totals can be built up.
A narrative or posting nominal does not require a totalling level.
The ‘Activate Range’ option allows the activation of inactive Master Codes. These will then become available for allocation and activation in the Division on the Transaction Codes tab.
Transaction Codes
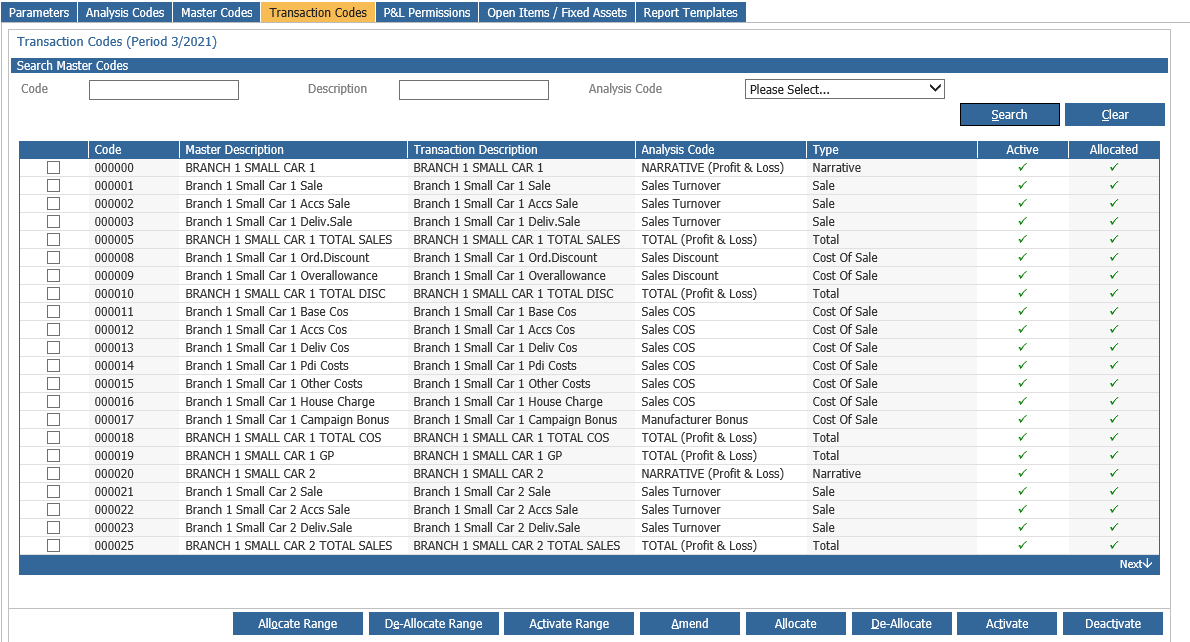
Once the master nominal code has been created choose the transaction codes tab, enter the master nominal code and double click the displayed code.
To Amend a description on a Nominal Code, select the code and select the Amend button;
You are also able to double click on the line to amend the description.
Using the check boxes on the side you are now able to select a singular code or multiple codes
and use the Allocate or De-Allocate button. If Codes are active and or allocated, a green tick will appear in the relevant column.
Allocate Range
This will offer the option to allocate a range of master nominal codes to a division at transaction level.
De-Allocate Range
This will offer the option to set a range of nominal codes to not allow postings to the codes at divisional level and will make the codes invisible in nominal ledger reports. If the selected codes have been entered into parameters or have had postings against them, they cannot be deallocated.
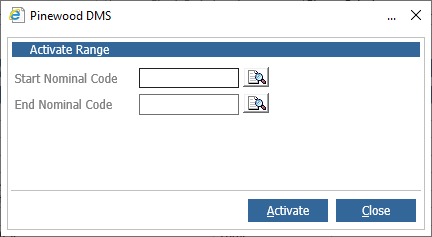
Activate Range
This will offer the option to set a range of nominal codes as active to allow postings to the codes at divisional level and will make codes visible in nominal ledger reports.
Amend
Double click on the required code, or single click and click 'amend'. Then on the Transaction Codes tab, search for the code, double click on the Code to open up the transaction code popup to over-key the description on the transaction account.
Allocate
This will offer the option to allocate a single master nominal code to a division at transaction level.
De-Allocate
This will offer the option to set a nominal code to not allow postings to the code at divisional level and will make the code invisible in nominal ledger reports. If the selected code has been entered into parameters or have had postings against it, they cannot be deallocated.
If the change is not made at Transaction account level, it will not display the amended description on the Trial Balance, Profit & Loss and Balance Sheet reports.
P&L Permissions
It is possible to restrict users from viewing all areas of the Profit & Loss report, for instance, you can now set up access for department leaders so they can only view and print their relevant cost centres within the P&L.
Multiple ranges of nominal codes can be assigned to individuals, so for example, a user could be given access to codes 000001 – 100000 and 300001 – 399999, so that the financial values and codes in between will not be displayed on the report.
These ranges can be set for a User or for a User Group. If both are applied, the ranges of codes displayed will be the combination of these. Where totals are included, the value displayed will be the true figure calculated from the full report.
The permissions are applied across the Master Nominal Ledger, so the restrictions affect all businesses the user is allowed to view.
To set Profit & Loss Permissions, select the tab within nominal ledger parameters.
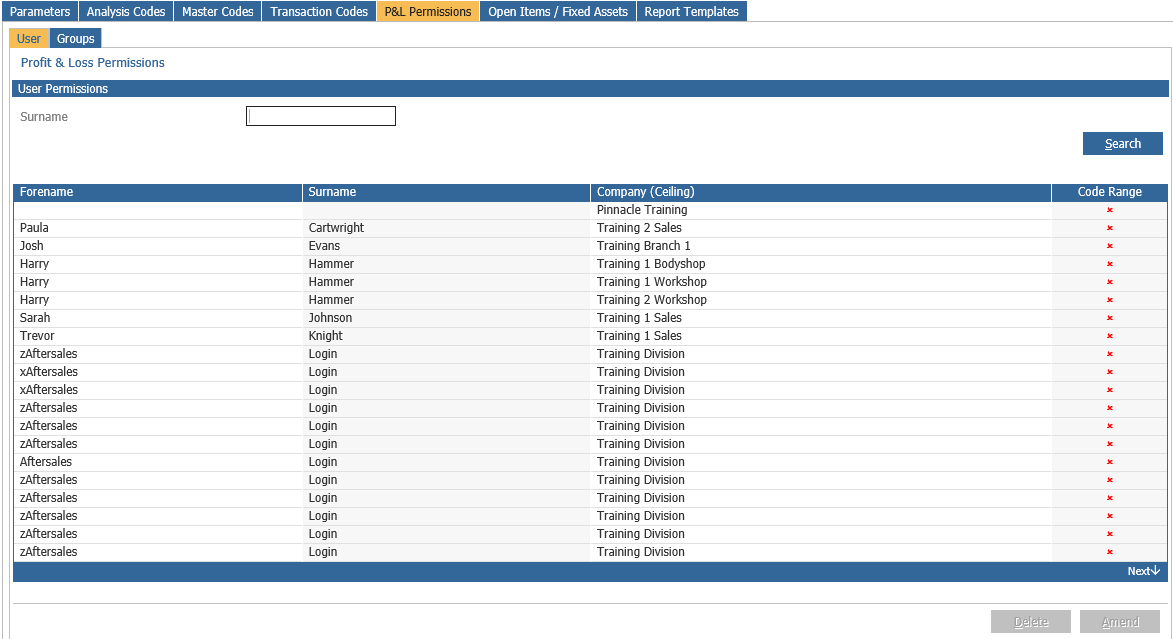
User P&L Permissions
Select the User tab on the Permissions box and double click on a User to display the nominal code range selection box.
To allocate a nominal code range, either enter the nominal codes required in the ‘From’ and ‘To’ fields or use the search icon alongside these fields to search for a nominal code by description or start of the nominal code number.
When the range has been identified, click ‘Add’ to display the range in the bottom part of the screen. Multiple ranges can be added.
The ‘Group Permissions’ button displays the user group that the selected user is attached to.
Click ‘Close’ to save the selected ranges against the user and you will see a tick against the user name, to indicate that P&L Permissions have been set for that user.
Group P&L Permissions
Select the Group tab on the Permissions box and double click on a Group to display the nominal code range selection box.
Allocate a nominal code range in the same way as allocating against an individual user as above.
The ‘User Permissions’ button displays the users who are attached to the selected group.
Click ‘Close’ to save the selected ranges against the group and a tick appears against the group name, to indicate that P&L Permissions have been set for that group.
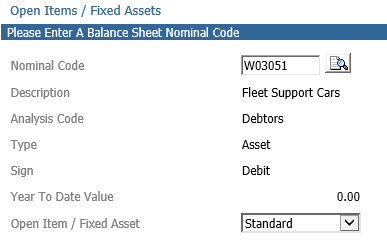
Open Items/Fixed Assets
Open item accounts are ‘schedule’ accounts which can be set up against balance sheet nominal codes.
Accounts can be defined as ‘Open Item’ in nominal ledger parameters and appropriate references defined. This will allow the set-up, processing, reconciliation and clear down of account schedules.
Open item nominal codes can also be set against the control codes held for any vehicle miscellaneous cost or vehicle bonus to assist reconciliation.
Balance Sheet accounts can be set up as open item accounts in the nominal ledger parameters screen via the Open Items/Fixed Assets tab, within which, an account number can be keyed and then activated as an open item account.
To set up an account, key in the account code, tick the ‘Open Item’ field, key in an appropriate ‘Reference Prefix’ (maximum 10 characters) and click Accept.
A warning popup will be presented advising that the reference prefix cannot be amended once it has been saved. As such, caution should be exercised when adding the prefix to ensure that the keyed value is both appropriate and correctly typed.
The balance on the account must be zero before it is changed into an open item nominal account.
Open item entries will be processed for nominal codes that have been activated in the following routines:-
Nominal Ledger Journal Entry | Journal
Automatic Journal | Journal
Reversing Journal | Journal
Contras (N/L Sundry Payments & Receipts) | Journal
Purchase Ledger | Post Invoice (Invoice & Credit Note)
Sales Ledger | Sundry Posting (Invoice & Credit Note)
Cash Book | Receipt
Cash Book | Payment (Sundry)
Stock Management – Preparation Cost | Misc Cost Posting (Stock number as prefix/ref)
Stock Management – Bonus Income | Vehicle Bonus Posting