The parameters must be set up before any accounts can be created and the system used. Parameters define the template used when creating master sales ledger accounts, e.g. the terms in days, accounting group and customer types held in these parameters and will be used as the default for all accounts unless specifically changed.
To access the Sales Ledger parameters, click on:
Accounts > Sales Ledger > Ledger Parameters
Once this option has been selected, the following screen is displayed.

Sales Ledger parameters are controlled at two different levels – the Transaction parameters govern the transaction level accounts (held at Division Level within the company structure) whilst the Master Parameters dictate system defaults applicable to the master level accounts (held at the Enterprise Level within the company structure).
The two options are displayed as tabs at the top of the screen. The system defaults to display the Transaction Parameters first. These parameters define the template used when Sales Ledger accounts are being created on the system.
Transaction Parameters
To begin completing or amending the sales ledger account Transaction Parameters, select the ‘Amend’ option from the bottom right hand side of the screen.
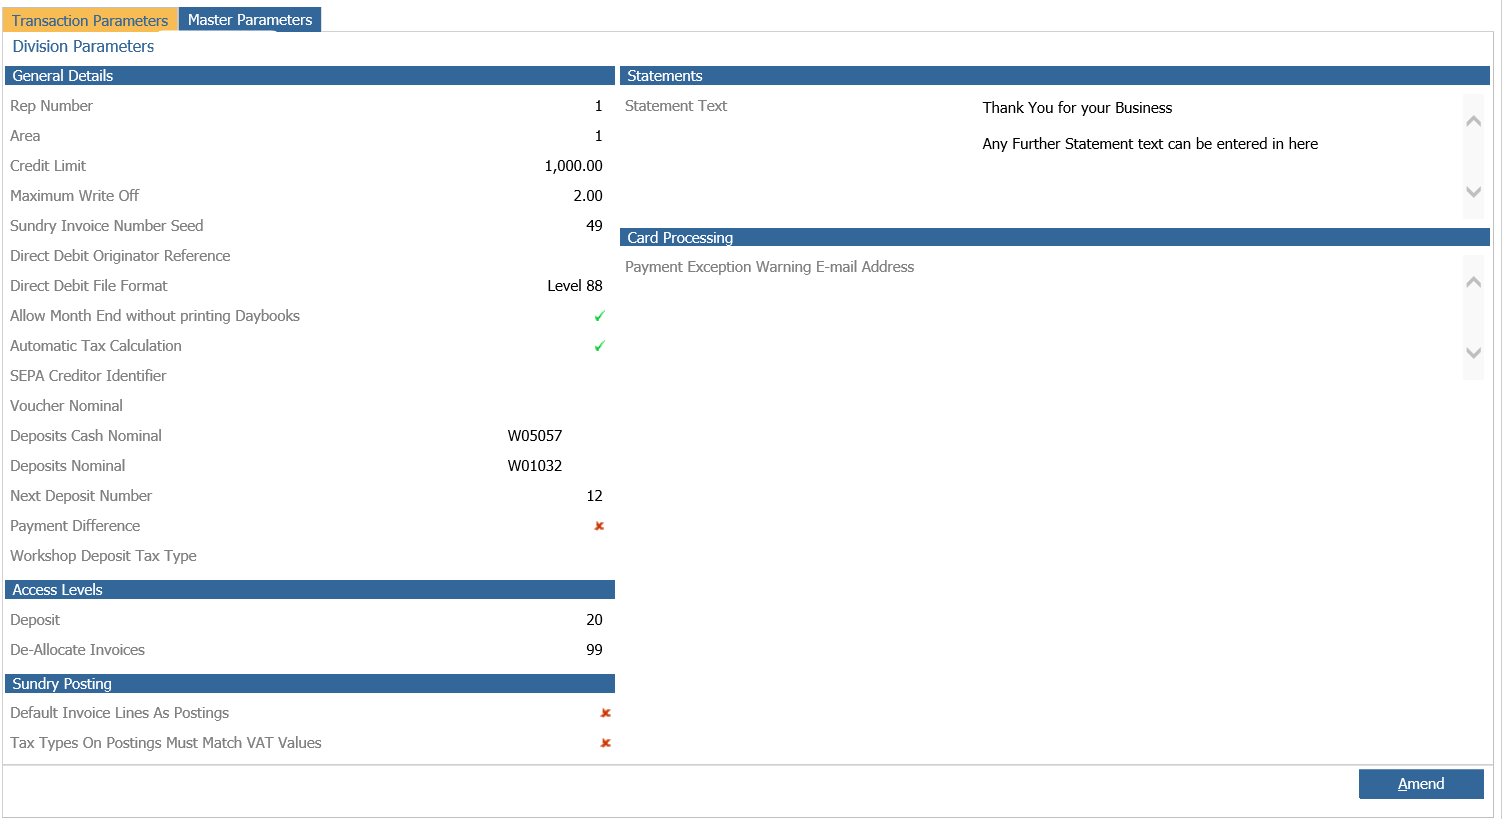
Rep Number - Displays the number that will be applied to a sales ledger account as a default value at the point the sales ledger account is created – this default can be changed at the point of account creation. Rep Numbers can be used to differentiate accounts via the Sales Ledger Reporting routines by grouping specific accounts together.
Area – Uses the same functionality as Rep Number to provide further reporting analysis. Credit Limit – This will be applied as a default to every Sales Ledger account created – this value can be changed as required.
Credit Limit - This will be applied as a default to every Sales Ledger account created – this value can be changed as required.
Maximum Write Off - Used to control the value of transactions that can be written off from the sales ledger. If you attempt to write off a value that is higher than the value specified in this parameter, you will be unable to do so.
Sundry Invoice Seed – Used to set up the first sundry invoice number to be used by the system. This value will be increased sequentially with each sundry posting raised automatically once set.
Direct Debit Originator Reference - If Direct Debit facilitate are being utilised, the DD reference is entered here.
Direct Debit File Format – The required format should be selected from the drop down list.
Allow Month End without printing Daybooks - If this field is ticked, the Month End process will not force the printing of Sales Ledger Daybooks but will still clear them down as part of that process. These will not be available to print once the Month End routine has been completed.
Automatic Tax Calculation – Automatically calculates the VAT element of a sundry invoice total value. This can be over keyed during invoice processing if there are non-VAT items in the total. Statement Text - Will be displayed at the bottom of sales ledger account statements. This can be changed by system users with sufficient system access levels to the sales ledger parameters.
SEPA Creditor Identifier – If SEPA Creditor facilitate are being utilised, the identifier reference is entered here.
Voucher Nominal - Once a Nominal is added within this parameter, this will enable the payment type of Voucher to be used within Parts and Workshop Modules.
Statement Text – This is used to allow you to input text that you want to be displayed on your companies statements at the bottom of the statement invoice.
Payment Exception Warning Email Address – Used for reporting issues that have occurred in the daily payment file processing. An email is sent to the email address entered and as a result, the Credit Card Payment Exception Report should be checked to view any suspended transactions.
Once the parameters have been completed, select the ‘Save’ option from the bottom of the screen to confirm the changes. Alternatively, the ‘Cancel’ option can be used to exit from the screen without any of the entries being saved.
Master Parameters
To begin creating or amending the Master Parameters, select the tab from the top of the screen:
Once selected, the screen below will display. From this screen, the default template for master level sales ledger accounts can be specified, along with certain processing rules applicable to the workshop and parts modules.
Select the ‘Amend’ option from the bottom right hand side of the screen to begin entering or amending sales ledger Master Parameters.
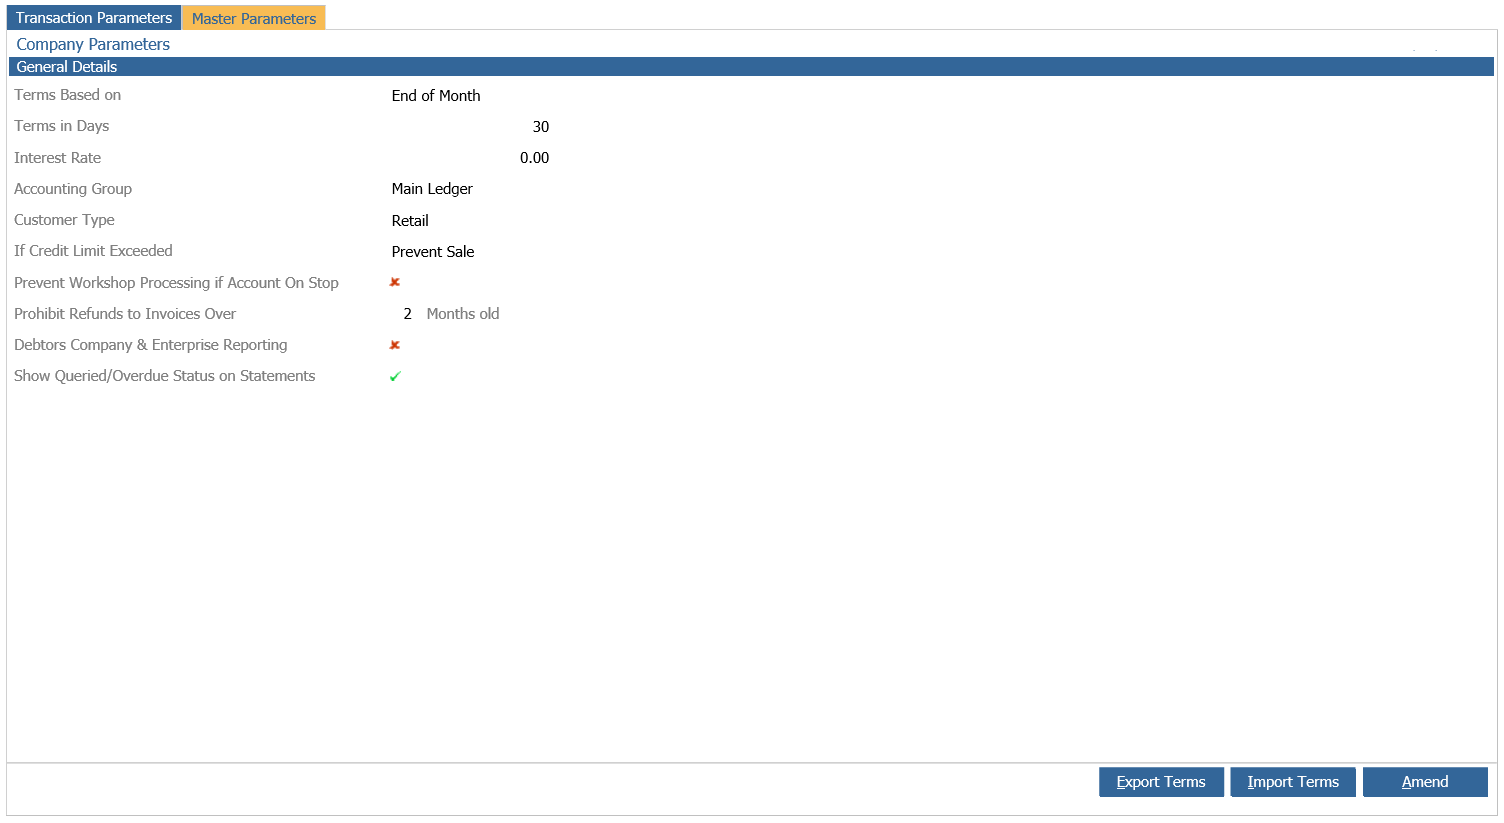
Terms Based on – should be specified. This parameter works in conjunction with the ‘Terms in Days’ parameter as explained above. Terms based on end of month or transaction date will determine how the statement balance is reported – using either a date range or calendar months.
Terms in Days - will be applied as the default to each Master account you create, but can be amended on individual accounts if required. This parameter works in conjunction with the ‘Terms based on’ field, to calculate when a sales ledger account will be reported as being overdue. The account will be flagged as overdue on the day after this date.
Interest Rate – will be applied as the default to each Master account you create, but can be amended on individual accounts if required. This normally is not needed.
|
The Account Groups available for selection were previously created within the nominal ledger parameters, and are used for reporting purposes as well as specifying the nominal postings taking place when the sales ledger account is used, |
Accounting Group – will be applied as the default to be used when a master account is created. This can be selected via the drop down menu adjacent.
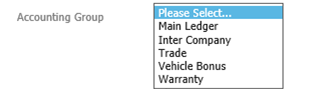
The Account Groups available for selection were previously created within the nominal ledger parameters, and are used for reporting purposes as well as specifying the nominal postings taking place when the sales ledger account is used,
Customer Type – will be applied as the default to be used when a master account is created. This is selected in the same way as the default accounting group, via the drop down menu adjacent
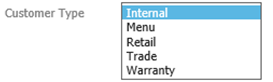
The Customer Type determines which nominal codes (held against the Product Groups for the sales ledger, workshop and parts department) will be used when invoices are raised onto the account.
If Credit Limit Exceeded - Select the option required from the drop down menu as shown below to dictate what happens when the credit limit is exceeded:

Prevent Sale
Prevents an invoice from being raised against an account that has exceeded its credit limit.
Warn But Do Nothing
Warns you at booking, receiving and invoicing stage within Workshop module and at enquiry and invoice stage within Parts module. Invoices, however, can still be raised.
* Stop Account (No Longer An Option)
Prevents an invoice from being raised against an account that has exceeded its credit limit and places the sales ledger account on stop.
Prevent Workshop Processing If Account On Stop – Tick this to prevent a Workshop booking being made, a workshop job being received, a part being added to a Workshop job or a Workshop invoice being produced if the sales ledger account is on stop. A warning will appear in Workshop to advise of why these processes are not possible.
Prohibit Refunds To Invoices – Select a period of time, in months, and if a Parts invoice is older than this period, the system will prevent the use of the credit routine.
Show Queried/Overdue Status on Statements – Choose to display status against individual invoices on the statements.
Once all of these parameters have been completed as required, select the ‘Save’ option from the bottom of the screen to confirm the changes. Alternatively, the ‘Cancel’ option can be used to exit from the screen without any of the entries being saved.