Vehicle Duties gives the ability to handle Customs Charges for vehicles sales.
Customs charges will be added on to the Vehicle Offer and can be amended at both the Offer and
Order Stages.
To activate this feature, please email support.portal@pinewood.co.uk.
A new option has been added in Vehicles > Parameters > Duties, this option must be activated in the
side menu option in the Administration Module before being visible to Users. Once this is activated,
users can create the Duties, these give the ability to add Customs Charges for vehicle sales.
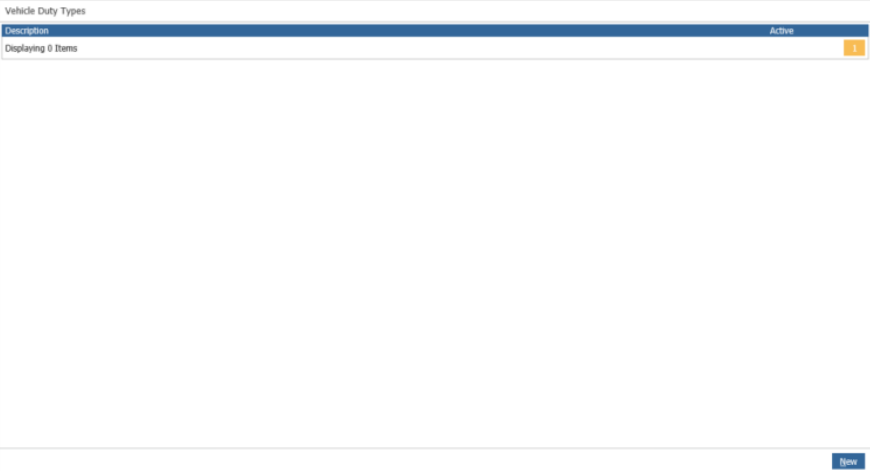
To create a new ‘Duty’ go to Vehicles > Parameters > Duties, you will see the screen display as below:
Click the ‘New’ button to create a new Duty, you will then enter the Description, select if the Duty will be
active, select the Tax Type and set a Control Nominal. If you wish for this to use GRNI, there is the option to then select a Purchase Ledger Account.

If this option is selected it will use the home currency on the Purchase Ledger Account. A Nominal Code
will be entered, this can be searched for using the search option, or type the code into the field. Available
codes will include the Vehicle Creditor Code and Open Item Codes.
Following on from adding the Nominal Code in the previous step, you will now need to complete the
Type of Sale Mappings. This is found in the same window and will only appear after completing the first
step in Duty creation. See below:
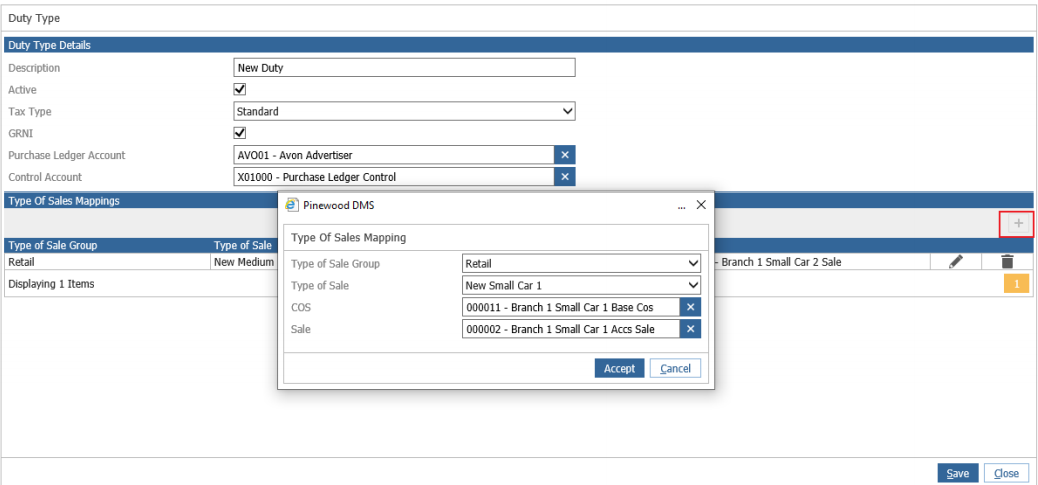
To begin adding the Type of Sales Mappings, click the plus symbol shown above. This will prompt the
“Type Of Sales Mapping” popup to open.
You will then need to select the Type of Sale Group before selecting the Type of Sale. A Cost of Sale
and a Sale Nominal code must be assigned to the Mapping. Once created, you can choose to amend
the mapping by selecting the pencil icon on the right-hand side, you can also delete Mapping by
selecting the delete option adjacent to this.

Select the ‘Save’ button to complete the creation of the Duty, the Duty will now appear in the screen.
You can double click, previously created Duties, to edit the details against them.

Following the creation of the Duty, this can be added against an Offer or an Order. Users will do this
through the New Vehicle Configurator option, when creating the Offer/Order. These can also be added
or amended through the Vehicle Customer Order screens.
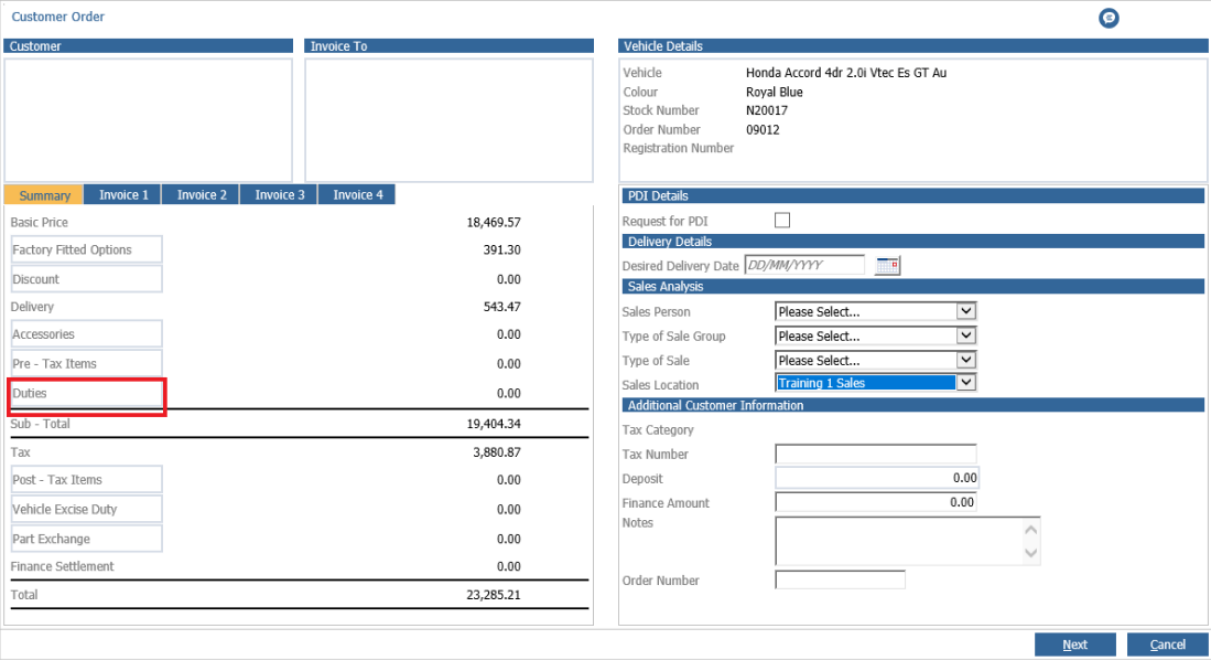
Select the ‘Duty’ option and click ‘New’ to add a Duty to the Offer/Order. The Duty Type will be selected
here, this example shows the previously created Duty being used, this will pull through the Tax Type
selected when creating the Duty. Select the Invoice number that the Duty will appear against, at this
stage, the Duty should go against Invoice 1. Enter the Retail value, this will automatically calculate the
Tax and Total values.
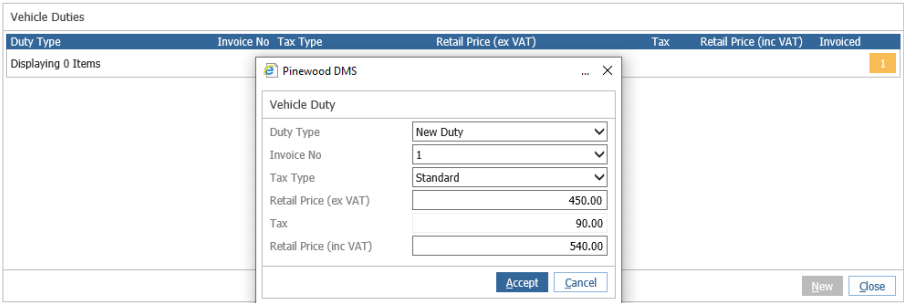
Multiple Duties can be added to the Offer/Order, they can also be edited by double clicking the line in
the Vehicle Duties box or deleted by selecting the delete button.

Once the duties have been added select the “Close” button and these will be added to the offer. If you
need to amend the duty you can go back into this by drilling into the line and updating it. Once you have
added the duty to the offer you can then convert this to an order and the duty will pull through. Within
in the customer order screen you can still add or amend the duties, you can move the duty across to
invoice 2, 3 or 4.
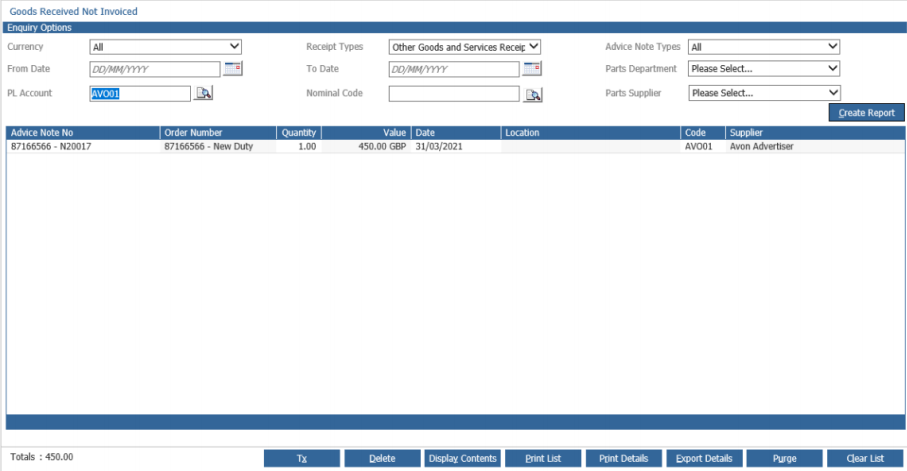
If your Duty is set to go to a GRNI Account, you will be able to see this on the GRNI report and be able
to process this from within the Purchase Ledger.
Once the vehicle invoice has been processed, the posting for the Duty will then take place, the posting
will go against the Nominal Codes and the Tax Types that have been setup within the parameters,
however if no nominals have been set for a Type of Sale these will show against the Dump Account,
below is how the posting may look.
If your duty is set to go against GRNI the VAT rate set will be used to calculate the VAT when it is
passed through to the Purchase Ledger Vehicle popup. The reference we will be the VIN and the Duty
description for this entry. If no VIN is present Stock Number and Duty description will be used.
If the duty is set to go against an Open Item, the posting details will show the VIN of the vehicle and
Duty description; if no VIN is present, we will use the Stock Number and Duty description.
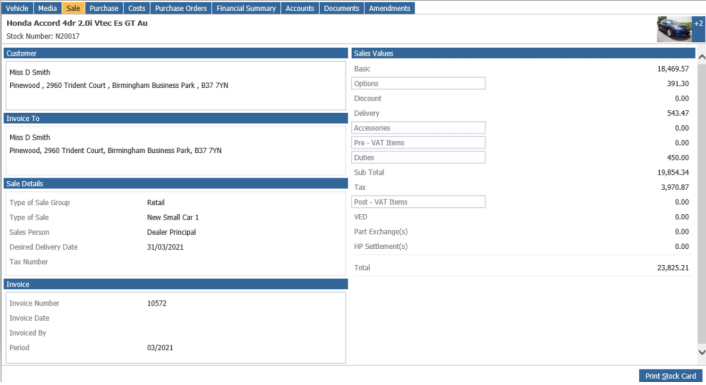
The Duty will be visible in Vehicles > Reporting > Stock Card, under the Sale tab. Clicking the ‘Duties’
field will open the same popup as when adding the Duties to an Offer/Order, in a read only view.
When printing the Stock Card you will now see the Duties have been added to the Sale and Financial
summary sections on the print.
Once an Offer/Order has been created and the Customer has signed the documentation, if you then
add/amend or delete the Duty; this will trigger a re-sign of the document, if no amendment has been
made the original signed document will remain against the offer/order.
The profit from the duties has been included into the profit report within DataPoint. Duty values have
been added to the Sale and Cost Totals only.