📝 Purchase Ledger Parameters

Ellie
Ellie
  • Updated

To access the Purchase Ledger parameters navigate to;

Accounts > Purchase Ledger > Ledger Parameters.

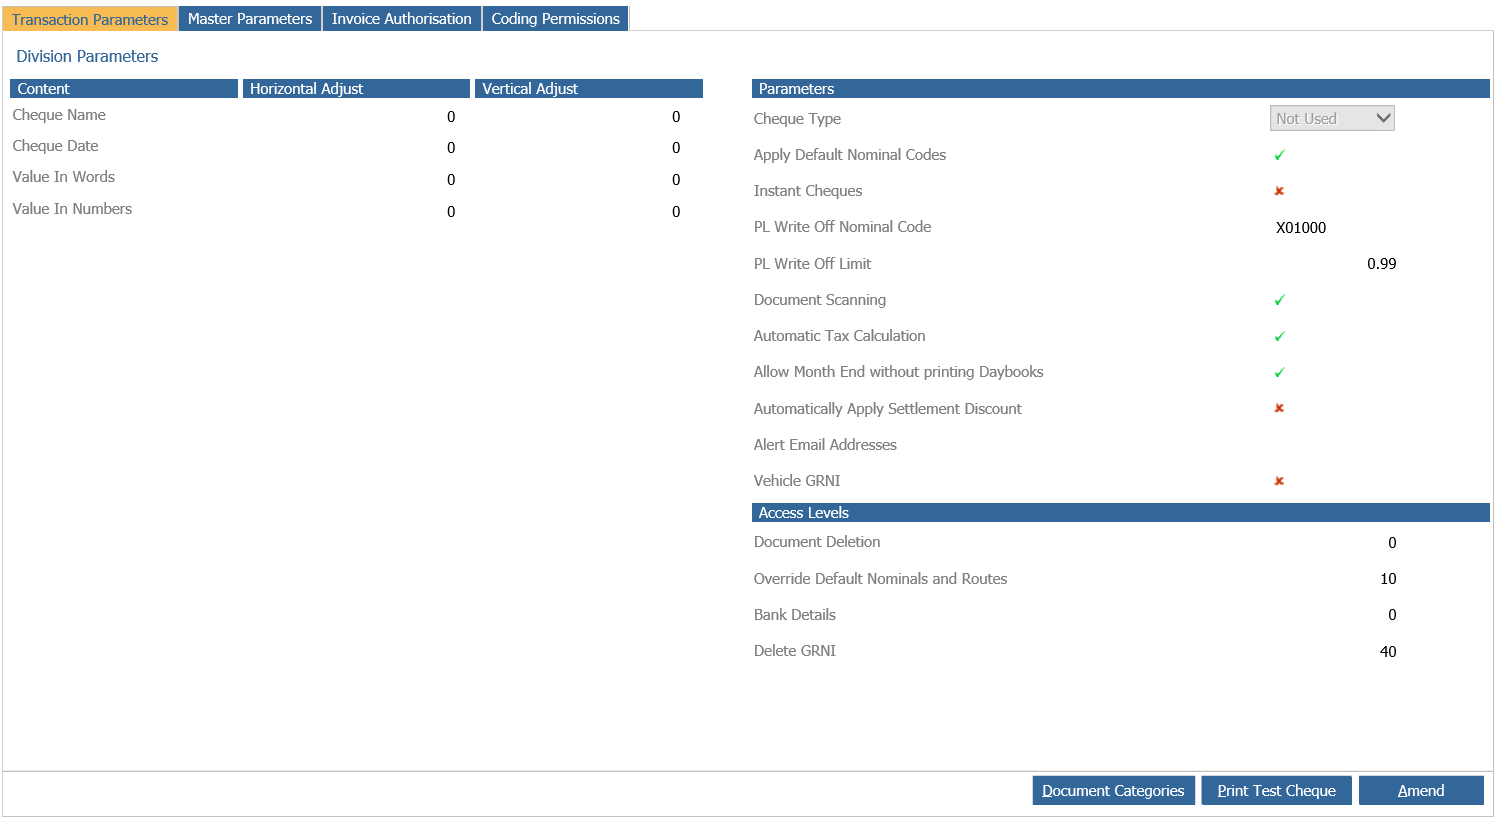
Once this option has been selected from the left-hand menu, the following screen is displayed
mceclip0.png

Purchase Ledger parameters are controlled at two different levels – the Transaction parameters govern the transaction level accounts (held at Division Level within the company structure) whilst the Master Parameters dictate system defaults applicable to the master level accounts (held at the Enterprise Level within the company structure). The two options are displayed as tabs at the top of the screen. The system defaults to display the Transaction Parameters first. These parameters define the template used when Purchase Ledger accounts are being created on the system.

 Transaction Parameters

 Select the ‘Amend’ option from the bottom right hand side of the screen to begin entering or amending purchase ledger Transaction Parameters.

 If pre-printed cheques are to be used, the fields on the left hand side are used to adjust the positioning of the payment details on the cheque. Once these have been entered, the ‘Print Test Cheque’ option at the bottom of the screen can be used to print out a test cheque, allowing for fine adjustments to be made. 

Cheque Type – used to select the cheque format, dependent upon the banking system used by the dealership. Select the format required from the drop down menu.

The remainder of the parameters on the right hand side of the screen govern the template information that will be carried into each Purchase Ledger Transaction.


Apply Default Nominal Codes - This allows you to specify default nominal codes to be used when purchase ledger invoices are being processed. The process of applying default nominal codes to a purchase ledger account is explained in the Purchase Ledger Master and Transaction Account article.


Instant Cheques - If ad hoc pre-printed cheques are to be used, place a tick in this parameter. This also would print the Purchase Ledger Remittance immediately after posting the Purchase Ledger payment via the cashbook, without having to request the remittance print separately even if pre-printed cheques are not being used.

PL Write Off Nominal Code – If a Purchase Ledger payment is posted as unallocated cash and then allocated in the ‘Allocate Payments’ routine, if there is an underpayment and when prompted click ‘Discounted’ rather than ‘Part Pay’, the system posts the value to this write off code.

PL Write off Limit - The maximum value to be allowed for write-off from the purchase ledger, via cashbook payments. Once completed, the system will not allow you to write off a value from the purchase ledger via cashbook payments or ‘Allocate Payments’ routine that exceeds the value specified.

Document Scanning – Controls the ability to scan documents into the purchase ledger, allowing digital copies to be shared amongst users responsible for authorizing payments. This functionality requires a scanner to be installed to allow digital copies of the paper invoices to be created as a .pdf document.

Document Deletion Access Level -  This is the access level required to delete documents.

Automatic Tax Calculation – This will calculate the vat content of the total purchase invoice amount entered during the Purchase Invoice Processing routine. This value can be overwritten during the processing routine if incorrect.

Allow Month End without printing Daybooks - If this field is ticked, the Month End process will not force the printing of Purchase Ledger Daybooks but will still clear them down as part of that process. These will not be available to print once the Month End routine has been completed.

Override Default Nominals and Routes Access Level - Any user who has an access level lower than the one set here will not have an option to change the Route, the Default Route will be applied without choice.
If your access is the same or greater than this access level, then you will be presented with the default route when posting an invoice but you will also be able to select an alternative route.

Bank Details Access Level – Purchase Ledger access level required to amend bank account details on Purchase Ledger Accounts.

 
Automatically Apply Settlement Discount - allows you to automatically apply settlement discounts when paying Purchase Ledger Invoices. 
Where a discount has been set against an invoice, that discount will be taken if the banking date of the payment in the system is prior to or the same as the invoice due date.  
 
Alert Email Addresses - This field allows the user to specify one or many email addresses (semi-colon separated) to which an alert email will be sent when any field in the ‘Bank Details’ section of a Purchase Ledger Transaction account is amended.
The email will contain details of the account that has been amended along with details on which fields have been changed, what the old values were and what those values have been changed to. The content will be laid out in the manner shown below:
This change is designed to alert appropriate users to amendments made to supplier accounts which could potentially result in payments being made to incorrect bank accounts
 
Vehicle GRNI - enabling this parameter will allow a Vehicle Stock Number to be selected in the Purchase Ledger - Post Invoice screen. 
Document Categories – Added to allow the categorisation of scanned documents when being linked to Purchase Ledger invoices.

Print Test Cheque – Allows a dummy cheque and remittance to be printed for checking the alignment of pre-printed cheques.

Amend – allow changes to the parameters.

Cancel – cancel any changes without saving them.

 Once all of these parameters have been completed as required, select the ‘Save’ option to confirm the entries. Alternatively, the ‘Cancel’ option can be used to exit the screen without any of the changes made being saved.

 Master Parameters

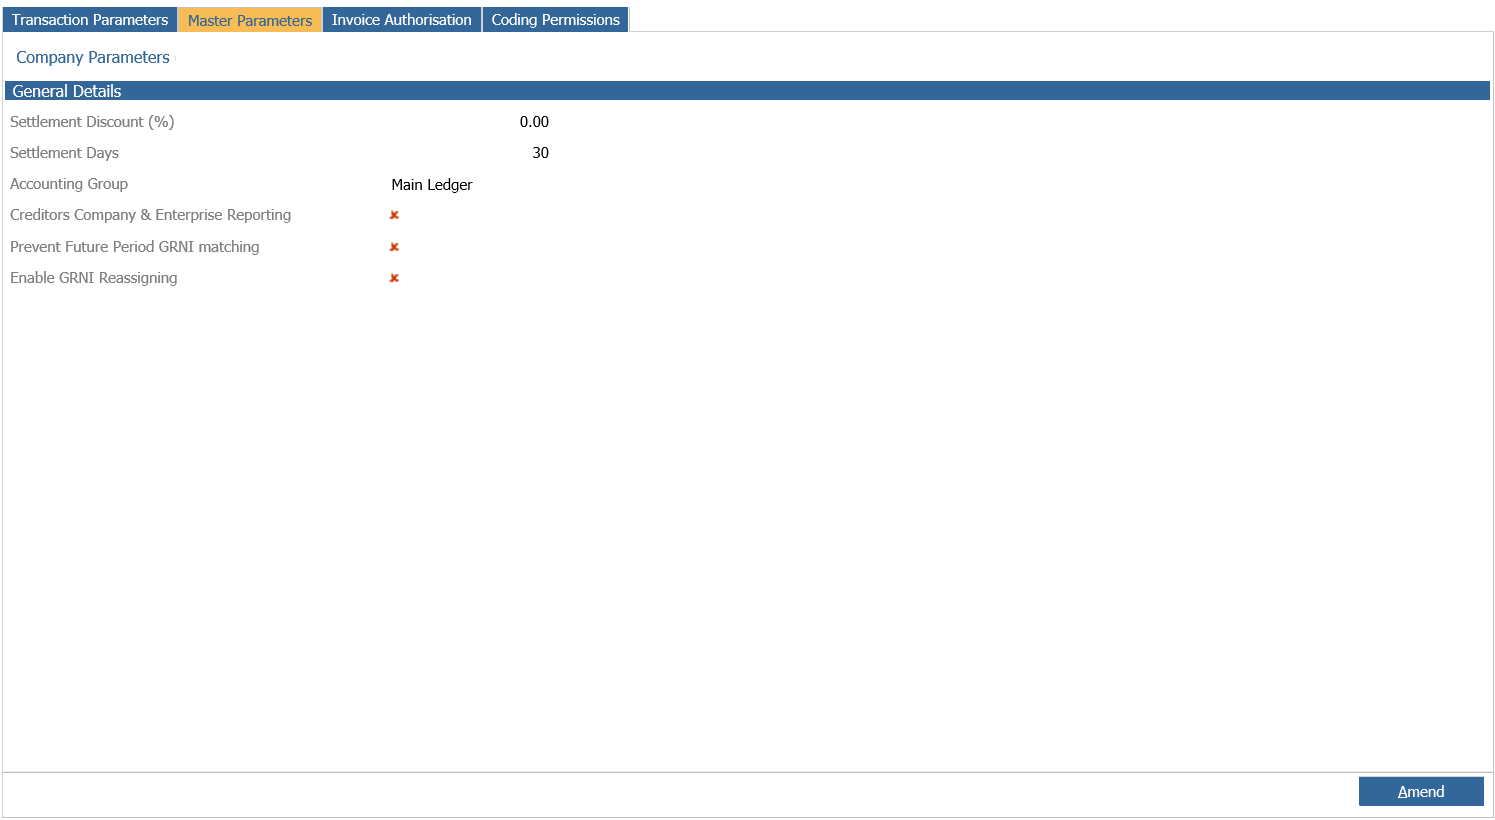
 To create or amend the Master Parameters, select the tab from the top of the screen.
mceclip3.png

From this screen, the default template for master level purchase ledger accounts can be specified.

Settlement Discount (%) – If this is offered on Purchase Ledger invoices in exchange for early payment, the settlement discount usually taken can be entered as a default.  The system will apply any discount entered here to every purchase ledger invoice processed automatically – although the value can be changed on an invoice by invoice basis. 

Settlement Days and Accounting Group - values entered will automatically be applied to each account created as defaults, although they can be changed as required. As with the Sales Ledger, the Accounting Group on purchase ledger accounts is dual purpose – separating the accounts into groups for reporting purposes and also specifying the nominal codes that will be used when processing on the account takes place.

Creditors Company & Enterprise Reporting - Enabling this parameter will allow the Aged Credit Report to be viewed and Divisional, Company and Enterprise Level. 

Prevent Future Period GRNI Matching - With this option selected when you post an invoice against a purchase ledger account you will see the screen will have changed if you have more than a single period is open.

When the advice notes screen is displayed, any greyed out entries are those which were posted in a future period and if you hover over those entries you will get a message explaining why this item is not available to be selected.

This item was posted into a future period and cannot be matched against this invoice.

Please note that the posting period is not available for Expense and Sub Contract Purchase Order items received prior to this release and matching these items will not be disabled by this functionality. Extra care should be taken until any of these existing items are matched against invoices.

Enable GRNI Reassigning - Once enabled, users will be able to see the 'Find GRNI' button. This is only applicable for certain countries. 

 
Invoice Authorisation
These parameters allow you to set up a list of users or groups that an invoice can be automatically passed between to get authorisation for that invoice to be paid. This will offer more granular control over the authorisation process. 
mceclip2.png
 

Enabled: If this is selected then the new authorisation process is active.  With this unticked the existing process will remain in operation. 

Override Access Level: This is the access level required to allow a user to override the authorisation route and mark an invoice as approved. 

GRNI Tolerance %: This defines the allowed percentage difference between the net invoice value and the accrued GRNI value that we are willing to accept either at this divisional level or at account level.  

GRNI Tolerance Value: This defines the allowed difference between the net invoice value and the accrued GRNI value that we are willing to accept either at this divisional level or at account level.  

When an invoice is posted where the value is within the allowed tolerances, the user is not required to select a route and the invoice will be automatically approved. These tolerances work for both under and over values.  

Both of the above values are used together. We convert the percentage based on the net invoice value to an amount and use whichever value is lower, as the allowable difference.  This allows you to handle very large or very small invoice values with small or large tolerances. 

NOTE : As mentioned above, these GRNI tolerances to be specified at account level The Purchase Ledger transaction account now has an additional section with the below details. 


At account level you can set to use the ‘default tolerances’ (Division Level defined above).  When this option is not selected, you can specify tolerances specific to this account.  This allows values of 0.00 to be set where you do not want to allow any tolerances.  

Set Up – Routes

Below the 4 parameters you have the option to add or amend an authorisation route, which is a list of users or list of groups of users who will be passed the invoice in order to authorize it and confirm it can be paid.  

Routes can be useful when you have invoices that are associated to certain departments or purchase routines and confirmation of the invoice value is required by those users. 

When you add a route you will be presented with a screen to allow you to create the route.  Our example below is pre-filled to be more effective

Under the Route heading you have the below options:

Code: This is a five-character short code that must be set.  Useful to allow you to quickly pick the correct route. 

Description: This is a long description that must be added to accurately describe the route you are creating.  

Active: Sets the route to active and makes it available during the invoice posting routine. 

Under the Users heading you have the below options: 

User / Group: This drop-down box allows you to set the route to use either a single user or a user group

Name: This search field allows you to select the name of the user or group you want to set the authorisation against having defined which in the first box. 

Action: This drop-down box allows you to set the user or group to have to authorise the invoice or to just receive notification that an invoice has been posted via this authorisation route. 

Then select the add button to add the user/group.

Having added a user or group to a route you can remove them by selecting the red cross at the far right of the user/group line. 

Each user/group will be given a rank and the invoice authorisation will be passed from Rank 1 to Rank 2, to 3 and so on, once each rank has authorised the invoice.  The up and down arrows on the far right hand side allow you to move users/groups up or down the rank as required. 

If a user is listed against a ‘Notification’ step, then that user will receive an email when the invoice reaches that rank and the process them moves on to the next rank automatically.

The Rank 1 user or group will receive an email to say that an invoice requires authorisation and once authorised the next rank will receive an email to let them know that they are required to authorise this invoice.  

When all ranks have authorised an invoice its status will be automatically set to ‘Approved’ and is then available to be paid

Coding Permissions 

Coding range permissions have been added to Purchase Ledger (can set all codes, a range or multiple ranges).

A coding permissions tab has been added within: Purchase Ledger > Ledger Parameters Similar to the Purchase Order screen. If you search for a specific user, drill into their record then a window will appear where you will be able to amend the nominal codes the user will have access to when coding a purchase ledger invoice (can select a range or all nominal codes). To remove a range, user needs to double click on the range row within the window. Note: Cannot specify the purchase order values in this screen like you can in Purchase Ordering permissions.

mceclip4.png