
Information regarding credit balances and individual transactions can be located via a Purchase Ledger Enquiry within the account required. Select enquiry from the left hand menu to access this.
Search fields are displayed by the system to search the Purchase Ledger for the account required:
A Purchase Ledger account is searched for via a complete or partial Account Code, a complete or partial account name, telephone number on the account and Postcode can be used as search criteria too. Select the ‘Search’ option on the right hand side of the screen.

To access the Purchase Ledger account, either double click on the line representing it, or single click on the line and then select the ‘View Transactions’ option from the bottom of the screen.
Upon accessing the Purchase Ledger account, the following screen is displayed:
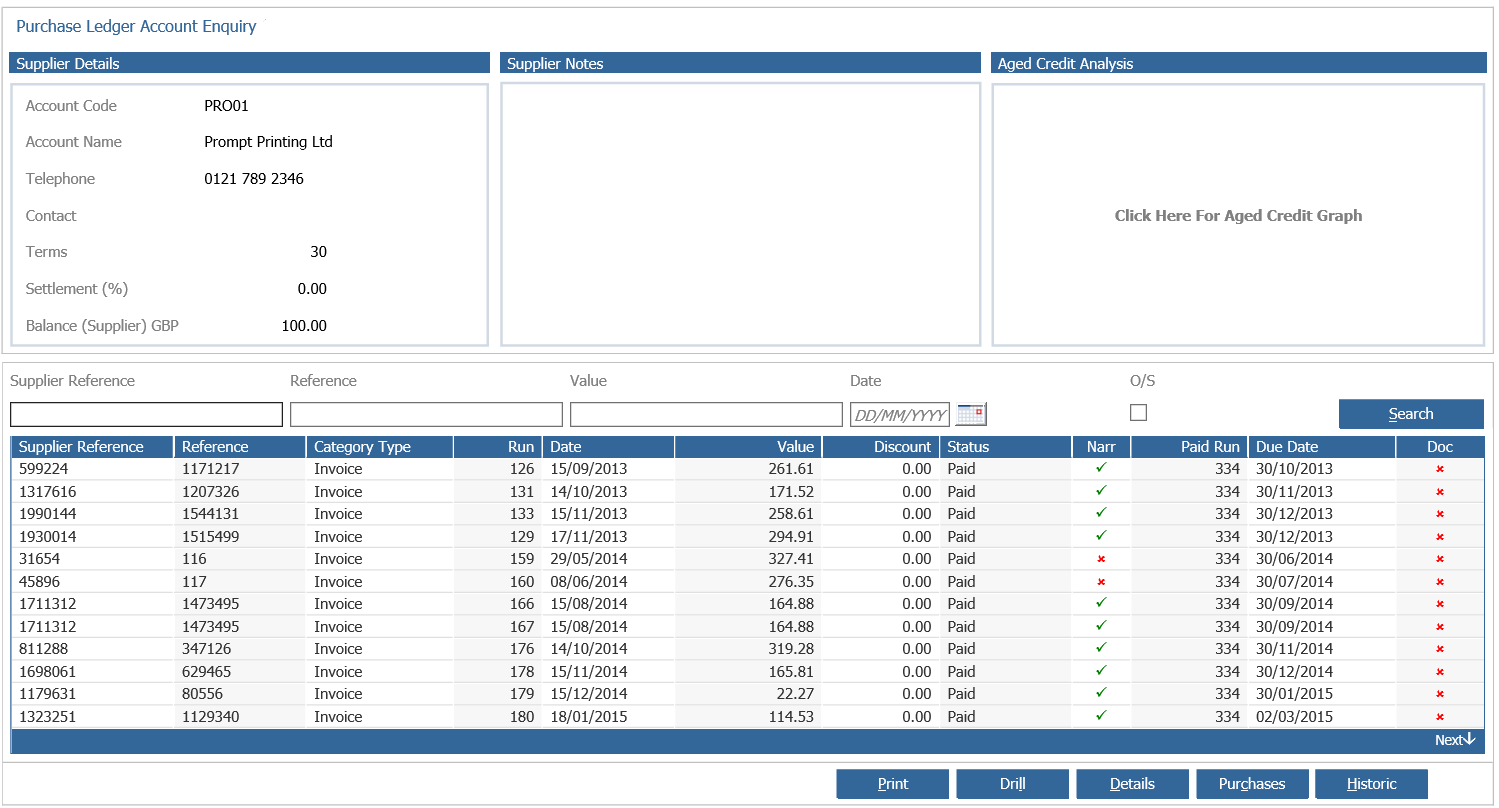
The ‘Supplier Details’ displays a summary of the details held on the Transaction account, including the current creditor balance, the terms in days applicable to payment on the account, and any default settlement value. This is a link field; clicking in the surrounding box allows you to access the Account Detail screen, allowing the details of the transaction account to be interrogated.
The ‘Supplier Notes’ field can be updated to store information relevant to the purchase ledger account as a whole – narrative can be held against individual transactions. To update this field, click in the link field and enter notes as applicable. Once completed, select ‘Save’ to store the changes made or ‘Cancel’ to exit without saving. Notes stored will display on the Sales Ledger transaction account.
The ‘Aged Credit Analysis’, provides immediate access to a graphical representation of aged credit on the purchase ledger account. When the link field is clicked, the report is generated and displayed as a bar chart.
The lower section of the screen displays the individual transactions that form the account balance. Transactions can be searched for using the four fields that run across the middle of the screen – the Supplier Reference Number usually refers to the supplier invoice number, whilst the Reference can be completed to a format decided at the point of processing the invoice onto the Purchase Ledger. The value and date fields are self-explanatory. Select the ‘Search’ option to narrow the display of transactions to include only transactions which meet the search criteria.
Each transaction on the purchase ledger account is displayed as an individual line on the enquiry screen. The line contains the Supplier Reference and Reference (as discussed above) and the Type of transaction – either an Invoice or a Credit Note. The ‘Run’ column displays the run number of the transaction, automatically allocated by the system when the transaction is posted to the account. The Run number can also be used to interrogate the nominal ledger for the postings generated by the entry on the account – this process can be performed via a Nominal Ledger Enquiry (for more information, please refer to the Nominal Ledger Enquiry section of this guide). The Date and Value of the transaction are also displayed, along with any discount on the invoice value. The Status of the transaction is shown – set to ‘Approved’ in the case of transactions that are to be paid or to ‘Queried’ in the case that the invoice is being queried with the supplier. The status of a transaction can also be changed from this page – this process is discussed below.
If any Narrative has been entered against the transaction, a green tick is displayed in the ‘Narr’ column. Any paid transactions will have a ‘Paid Run’ number against them, relating to the cashbook payment raised. The Due Date of each transaction is also displayed. The ‘Doc’ column shows whether or not a scanned copy of an invoice has been uploaded for viewing purposes.
Additional detail is available on each transaction by using the option buttons that appear across the bottom of the screen. Highlight the transaction required with a single click. The option buttons may then be selected as required.
The ‘Print’ option is used to print the transaction account in its entirety.
When the ‘Source’ option is selected, a new window is displayed containing the Branch and Department responsible for entering the invoice onto the Purchase Ledger and the name of the user and the date posted are also displayed. With this facility, queries with the transaction can quickly be traced back to the source. Select ‘Close Window’ to close this window and return to the Purchase Ledger Enquiry screen.
The ‘Drill’ option is used to view the nominal ledger postings that have been generated by the transaction. The following screen is displayed:
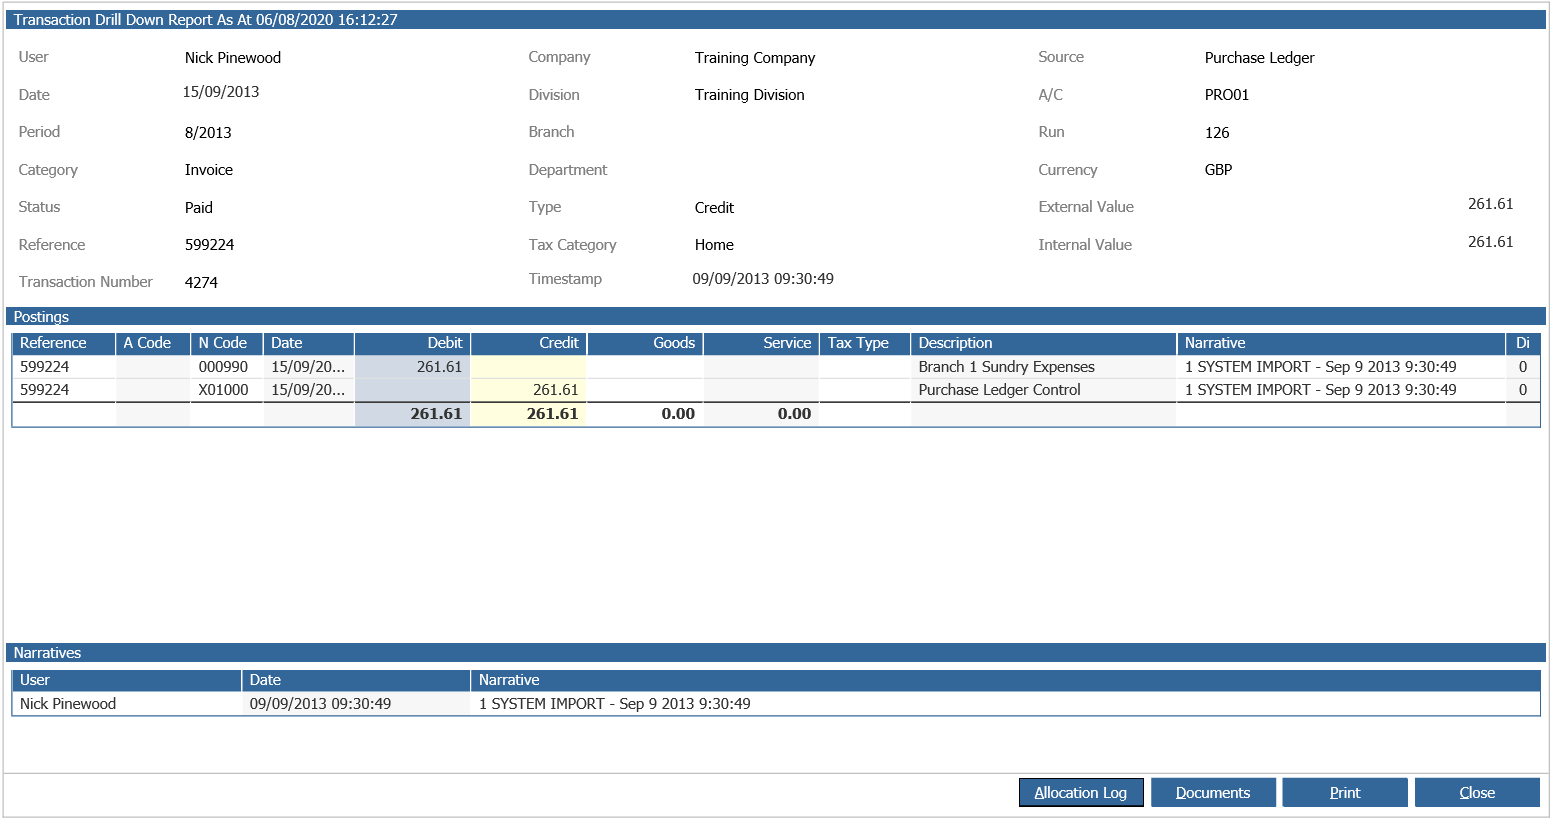
Transaction Detail displays the person responsible for the transaction entry, the date and system period of the posting. The Company and Division are also specified, along with the reference of the posting. The top right hand side of the screen displays the source of the transaction, the Purchase
Ledger account number, the run number, the status of the transaction (either ‘Approved’ or ‘Queried’), the transaction Category, Type, the VAT inclusive value and the system timestamp – accurate to the second for the time of the posting.
The ‘Postings’ section, displays the nominal ledger postings that have been generated by the transaction. The nominal postings are dictated by the product groups and accounting groups that are set up within the nominal ledger parameters. The nominal code, transaction reference and the Date/Time of the posting are displayed. The debit and credit columns display the nominal ledger entries. Where VAT on a purchase forms part of the postings, a pre-VAT goods value is also displayed. The description of each of the nominal codes is displayed with any narrative entered against the transaction.
The ‘Allocation Log’ will allow the search for allocated transactions and will show which transactions were matched against each other. The ‘Documents’ option will show any purchase ledger documents that have been scanned and linked to the transaction within the system. The ‘Print’ option is used to print the nominal drill down screen for the transaction. The ‘Cancel’ option is used to close the window.
On the main enquiry screen, the ‘Narrative’ option is used to view existing narrative against an individual transaction, or to add narrative to a transaction. A new window is opened allowing the entry of narrative into the field visible at the top of the window. Click on the ‘Save’ button to confirm the changes. Any previous narrative entries stored against the transaction are displayed in the ‘History’ section in the lower half of the window.
The ‘Documents’ option will show any purchase ledger documents that have been scanned and linked to the transaction.
The ‘Status’ option is used to change the status of individual transactions on the purchase ledger account from Queried to Approved or vice versa. When a transaction is selected and the status button clicked on, a window is presented allowing the status of the transaction to be changed as required. Changing the status of a transaction from Approved to Queried makes the completion of narrative mandatory.
Select the ‘Accept’ option to confirm the changes made.
The ‘Purchases’ option allows purchases to be viewed for a particular Purchase Ledger account for the past twelve months. This information is presented in a new window as a bar chart.
The ‘Historic’ option allows viewing of archived transactions from the purchase ledger account. Transactions are automatically archived at the point that the month end is run, providing they are at a status of either paid or allocated.
When this option is selected, a new window is opened allowing the search for the archived transaction required:

Historic transactions are searched for using the same search criteria as live transactions, by completing the fields at the top of the screen. Once the archived transaction has been located, the same viewing and drill down options as for live transactions are available by using the relevant buttons at the bottom of the screen.