Question
How do I create a new selection?
Answer
To begin the process of creating a selection within Pinewood DMS, select the following options from the left hand menu.
CRM > Selections > Search
Once this option has been selected, the system will display the screen which is used to build
the report required. The screen is complete with two tabs at the top – the default ‘New Selection’
tab is used to build a new selection; the ‘Saved Selection’ tab is used to access a selection
previously generated and saved on the system.
As shown below, the new selection screen is split into three sections, each of which must be completed in order for the report to display the information required by the user.
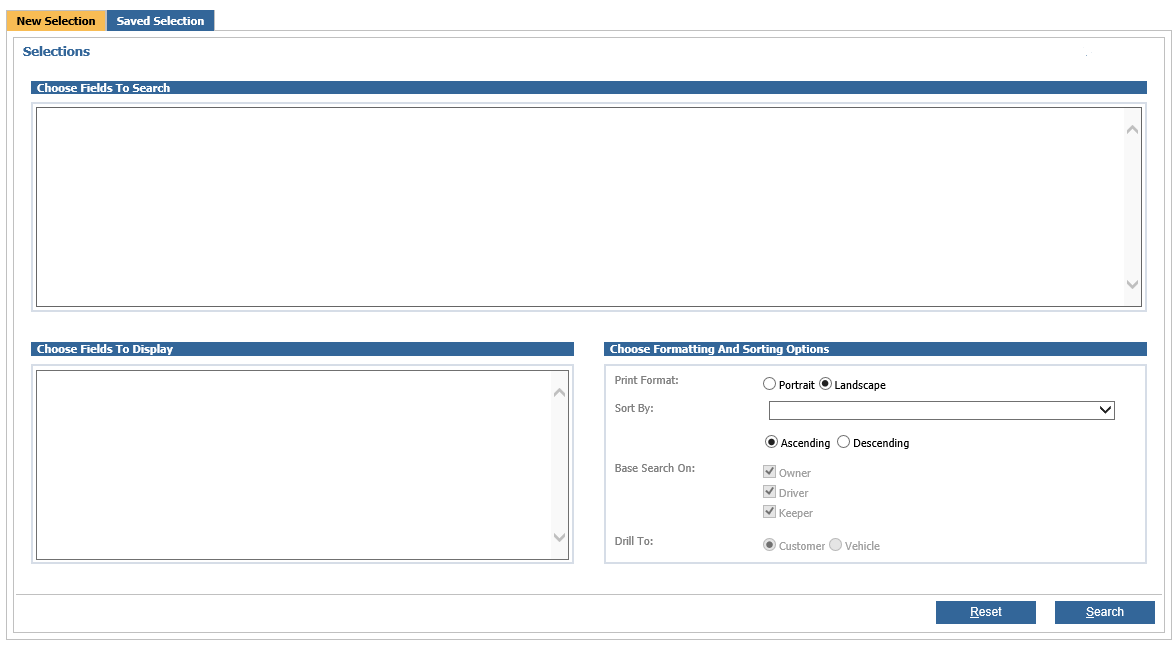
The top section of the screen, ‘Choose Fields to Search’ should be completed first. The
information searched upon is very much dependent upon the intended use for the generated
data. Click in the link field to display the following page:
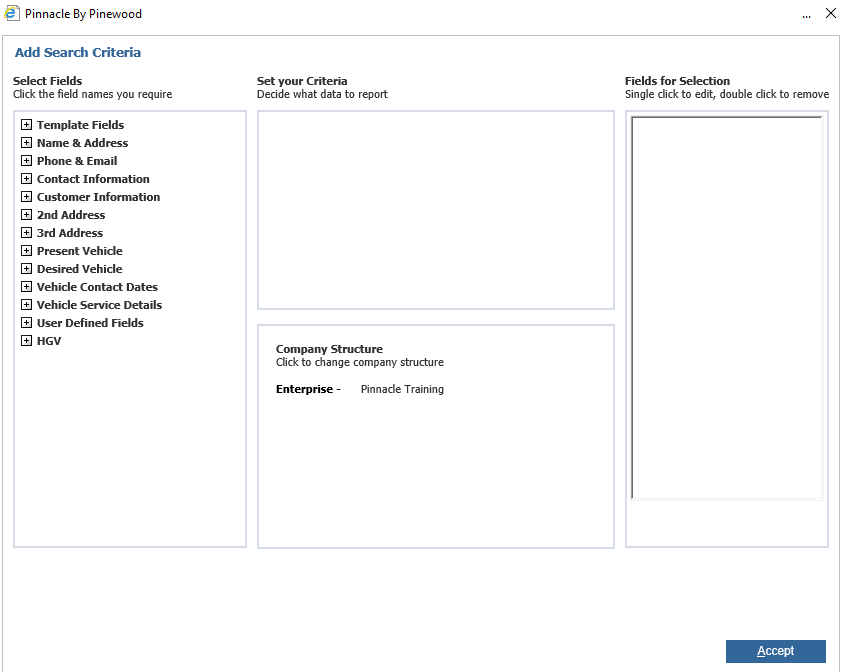
The fields the search must be based upon can be selected from the ‘Select Fields’ section on
the left hand side of the screen – once the field required has been selected, the box on the
middle of the screen is used to set the criteria upon which the user wishes to report. The field
selected will appear in the ‘Fields for Selection’ section on the right hand side of the screen.
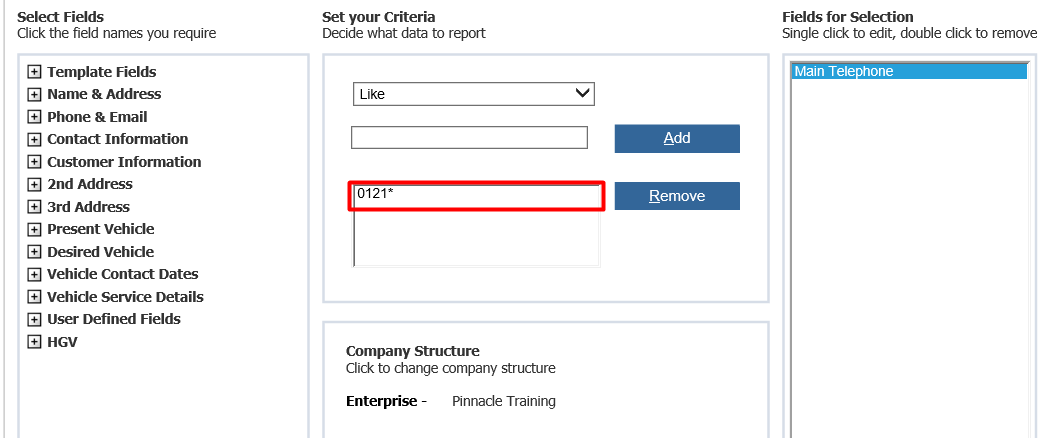
Firstly, set the criteria using the drop down menu. The selection options are hard coded into
the system and cannot be changed by users. The table below provides a guide for the data that
will be returned by the selection dependent upon the search option selected.
Not Like: Displays every field containing information that is not like the data entered.
Like: Used to pick up variations in spelling in fields– for example ‘Ford’ entered would display all
entries containing the consecutive letters F,O, R, and D – regardless of the order in which they were had been typed in the field. If you wish to do a partial search in the Selection, using the 'Like' option, a * or % can be used to find everything before if the * or % is entered before or after if they are entered afterwards to return partial searched results. For example, if you wished to search for all main telephone numbers beginning 0121, a search can be done as below:
Not Between: Used to exclude a particular value or date range from the search.
Between: Used to include only a particular value or date range.
Less Than: Will display only dates/values earlier or lower than the date/value specified by the user.
Greater Than: Will display only dates/values later or higher than the date/value specified by the user.
Not Equal To: Displays all records that contain information that is not identical to the data specified by the user.
Equal To: Displays all records that contain information that is identical to the data specified by the user.
Once all of the criteria have been selected as required, the user can enter the information being
searched for – for example a surname, a date range or a registration number. Once this has
been entered, select “Add” to confirm the criteria.
NB: if a search is required to display all records on the system, a search on ‘Not Equal to
BLANK’ is advisable. Select the field from the left hand menu; select the ‘Not Equal To’ option
from the drop down box and then click “Add”. The system will automatically complete the word
BLANK, and will look for all records on the database where the field specified is populated.
As many fields as required can be searched upon by the user – typical selections may include
such criteria as:-
• Customer desired vehicle like a vehicle in stock or coming into stock.
• Customer desired vehicle not equal to BLANK – therefore capturing all customers on
the database who have a desired vehicle recorded.
• Customer surname not equal to BLANK and Last Workshop Visit between 12 and 24
months ago – therefore allowing a site to maximise previously missed potential
revenue.
Before proceeding, the user should also specify the level of the company structure at which the
search is to be performed. This can be done by selecting the Enterprise, Company, Division,
Branch or Department as required from the box containing the company structure – this is
visible in the middle box at the bottom of the screen which displays like this.
The level of the company structure at which a selection may be run is dictated by the user level
of the logon being used.
Once the criteria have been completed as required and the level of the company structure at
which to search has been specified, selecting “Accept” returns the user to the previous screen.
The ‘Choose Fields to Search’ section will be completed with the fields specified by the process
above:
The user can now progress to the ‘Choose Fields To Display’ section on the bottom left hand
side of the screen – click on the link field to open the screen up.
Once the ‘Choose Fields to Display’ section has been selected, the following screen is
displayed.

The fields to be displayed by the selection can be added from the ‘Select Fields’ section on the
left hand side of the screen. The purpose for which the selection is intended will often dictate
the fields required for display – for example, if a list of customers is to be generated for the
sales team to contact during a telethon event, the fields to display would not need to include
address details – but all telephone numbers and email addresses would perhaps be required
instead.
NB: If the selection is to be used to form a mailshot via attachment to a letter, the fields to
construct the address details and content for the letter would be chosen when the letter is
created – they do not need to form part of the ‘Fields To Display’ selected at this stage of the
process.
To add the fields required, simply select the heading beneath which the field is stored by clicking
on it.
Once the required fields have been selected from the ‘Select Fields’ section on the left hand
side of the screen, they populate the ‘Fields for Selection’ section on the right hand side of the
screen.
Within this section, the order in which the fields will display when the selection is run can be
manipulated by using the up and down buttons.
When the current report size displays in red, the report is too large to be printed on A4 directly
from Pinewood DMS.
If the report is to be exported, Excel can be used to adjust the size of the report to enable this.
Once the fields to be displayed have been selected and put into the order as required, click on
the “Accept” button to return to the previous screen. The ‘Fields to Display’ section is now
populated with the fields specified by the process above.
The final section of the selections screen can now be completed. The ‘Choose Formatting and
Sorting Options’ section is used to dictate the style in which the report is to be displayed.
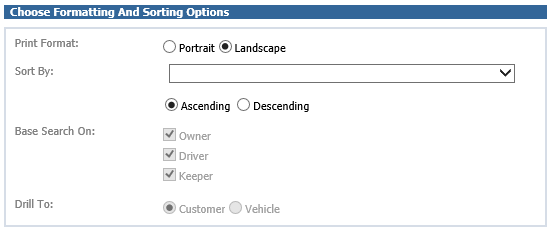
The Sort By Field can be used can be altered to change the order in which the date will be displayed - e.g. alphabetically by surname. Ascending will display A-Z. Descending reverses the order of display.
Base Search On - each vehicle can be attached to up to 3 different customer records via the Owner, Driver and Keeper link. For certain marketing activities, users may wish to limit the records displayed to one of these three.
Focus Search on - users can focus the search on the customer or the vehicle records via the selection of this option.
Once all of these fields have been completed, select “Search” to run the selection. (You are able to proceed without changing any of these) The system displays the results as indicated below at the top of the following page.
Each of the column headings in the blue bar across the top of the screen can be used as a filter
– selecting the column required will group the results into order by this column:
For example, selecting ‘Surname’ will sort the results displayed into alphabetical order by
surname.
Each CRM record displayed within the selection can be accessed by double clicking on the line
required. If the results displayed do not match the requirements of the user, the “Back” option
can be used to return to the search criteria so that changes can be made. The “Print” option
can be used to print the report (remember that if the current report size exceeds the maximum
report size, not all fields will be printed). Finally, the “Save” option can be used to store the
report on the system to be accessed again at a later date. When clicking Save you will get an option to save results or selection criteria, or both, as well as entering a name for the selection.