Question
How do I update the Contact Diary?
Answer
To begin updating the contact diary, first select the contact to be updated from either the
Appointments or Activities section at the bottom of the screen with a double click.
Once the record has been selected, a new window opens displaying the Main page of the CRM
record for the customer:
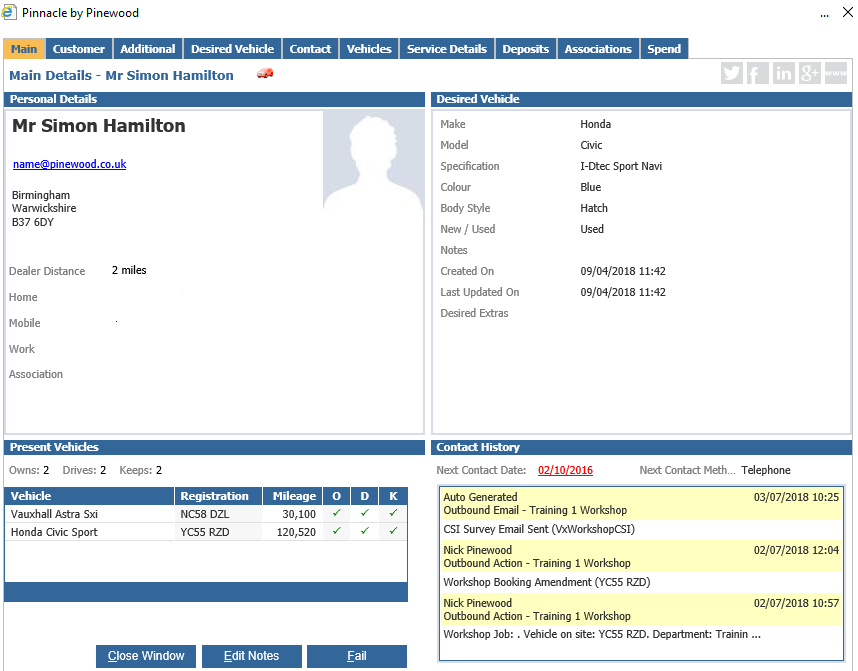
This page is used as the default because it displays a valuable overview of the content of the
CRM record – any section required can be viewed by selecting the tabs at the top of the screen
or the relevant link fields.
The first two update options appear immediately, on the first screen visible, as below:

Fail = used to indicate to the system that contacts with the customer has been attempted but failed on this occasion. This will automatically remove the customer as a due contact for the current day, and create an entry on the following day. It also add an entry to the Daily Sales Activity report within CRM reporting, allowing Leaders/Managers to assess the number of times users are selecting the fail option.
Edit = this function can be used to change the notes stored against the future contact. When
this option is selected, a new window opens to allow the new notes to be entered by the user.
Enter the new notes as required and select “Save” to confirm the changes. Alternatively, use
the “Close Window” button to exit the screen without any changes being saved.
To update a contact, select the contact from the diary page to open the CRM record. Once the
CRM record is open, select the Contact tab from the top of the screen.
Contact details of the most recent contact should be entered into the section on the top left hand side of the screen. The section on the right displays the contact history stored against the record; the bottom of the screen displays the detail of the future contact that was shown within the Contact Diary.
To begin updating the contact tab, select the “Add Contact History” option from the middle of the
screen. Once this has been selected, the most recent contact with the customer can be recorded
using the fields available for completion on the left hand side of the screen.
The Salesperson box will default to the user operating the system. By clicking in the box enables
a search for an alternative salesperson for the contact.
The Contact Category enables the user to select the department that the contact is related too.
Select a contact reason from the dropdown followed by a contact method. The contact reasons
are driven by the CRM parameters.
The customer’s current vehicle can be selected if applicable to associate the contact to that
vehicle.
Select inbound or outbound, followed by the customer status.
Complete the contact notes with the details of the contact made with the customer.
By clicking the upload document button, a previously scanned document can be uploaded
and saved against the CRM record. The document can then be viewed by clicking the paper
clip icon next to the contact in the contact history field.
Once all of these fields have been completed as required, select the “Save” option to confirm
the entry to the contact history. If the contact type selected has been specified as a Sales
Opportunity within the CRM parameters, a screen appears prompting the user to
record the Sales Activities carried out for this contact.
The Sales Activities that are available for selection depend upon the contact reason selected when the contact history was updated; these are specified within the Contact Methods in CRM parameters. The Lost sale option can be controlled by an access level set in CRM Parameters > Enterprise. If the user does not have sufficient access they will be presented with a pop up informing them “You do not have sufficient permissions to action this lost sale” if this is the case they will have to forward the next contact to a user that can action the contact as a lost sale.
When selecting the Introduction Source within the Vehicle Type section of the Sales Opportunity
screen, a pop up window will display to record the Introduction Source. The Introduction
Sources are driven by the CRM parameters and produce a report of the reasons for the
customers contacting the dealership. To select an Introduction Source, double click on the
relevant description as provided by the customer.
Once selected, the screen returns back to the Sales Opportunity pop up window allowing the
user to complete the process by clicking “Accept”.
The next step in the process is the completion of the future contact diary, allowing a sales team
member to remain in close contact with the customer through the buying cycle.
From the calendar section at the top of the screen, click on the date the next contact with the
customer is to be scheduled for. Clicking on the date required marks a black border around the
box – indicating that any information inputted to the ‘Next Contact’ section on the bottom left
hand side of the screen is relating to that date.
Any time specific future contacts scheduled for the day selected appear in the ‘Appointments’
section on the right hand side of the screen, to assist users to not double booking appointment
times.
Once the date has been selected, complete the ‘Next Contact’ section on the bottom left hand
side of the screen.
Completion of the contact reason defaults the contact method, dependent upon the information
stored within the CRM parameters. Select a contact time if required, along with a Salesperson.
The salesperson selected defaults to the name held against the user logon completing the
contact within the system. However, you are able to flag contacts into a different
salesperson’s diary if required.
Complete the Contact Notes with the detail of the planned contact and if required select
activities that the user proposes to carry out by selecting the available options displayed. Please
note the future contact activities will only appear if the customer is a sales opportunity and the
activities available are set against the contact method selected. If “Demo” is ticked on selecting
Save the Demonstration Diary will open enabling a vehicle to be selected.
The updated future contact now displays at the bottom of the Contact tab.
In addition to future activities if the “Handover Diary” is activated and a customer order has
been raised as part of the sales opportunity process, the user will have the option to select
‘handover’ as an activity for the future contact.