The ‘Prevent Auto Payments’ box in the Purchase Ledger Account Maintenance screens should not be ticked for suppliers who are to be paid within the Automatic Payment routine.
To identify which accounts will be paid via this routine, print the ‘Payments Due’ report within Purchase Ledger Reporting. Reconcile this report against supplier statements and change the status to ‘Queried’ for any invoices that are not to be paid. If a supplier account is to be excluded from the Automatic Payment run, the ‘Prevent Auto Payments’ flag can be set against the supplier or there is an opportunity within the payment run itself to hold these accounts.
Once the Payment Due report has been reconciled, select the: Cashbook > Purchase Ledger Payments option from the menu.
Select the required accounting period from the company structure screen, complete the posting date and double click on the required bank account from the pop up screen.
Click ‘Accept to continue. The Purchase Ledger Payment Options screen appears.
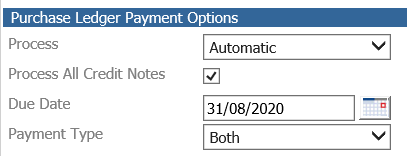
Select the ‘Automatic Payments option. If all credit notes are to be deducted from the payments regardless of the credit note date, select the ‘Process All Credit Notes’ box otherwise leave un-ticked. Select to ‘Hold Payments for Selected Suppliers’. This will allow certain suppliers on the ‘Payment Due’ report to be excluded from the automatic payment run. Click ‘OK’ to continue.
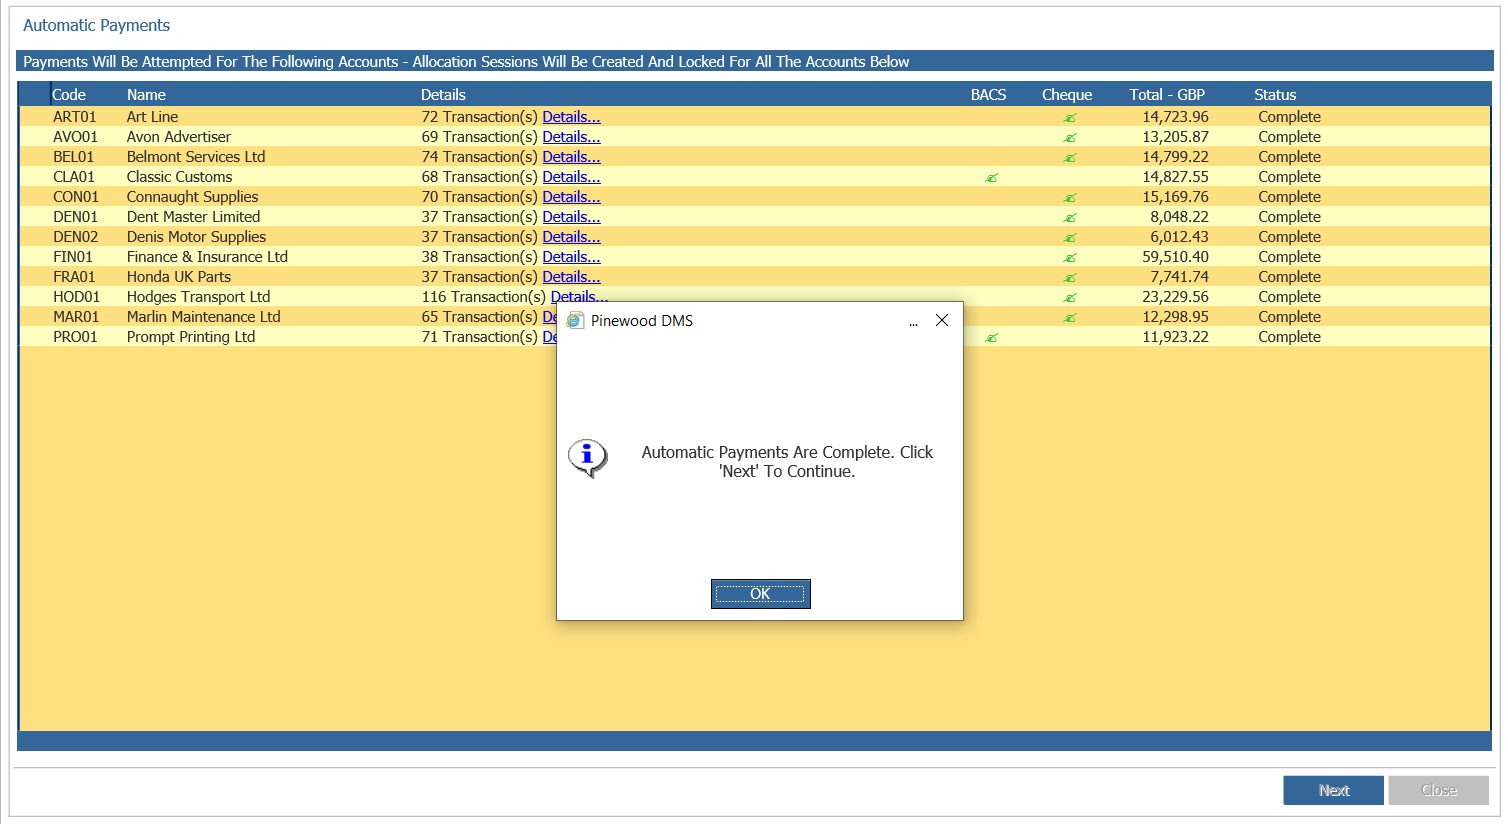
A screen will display all of the suppliers that are due to be paid. This should match the suppliers on the Payment Due report. If any of these suppliers are to be excluded from the payments run, put a tick in the ‘Hold’ column against that supplier.
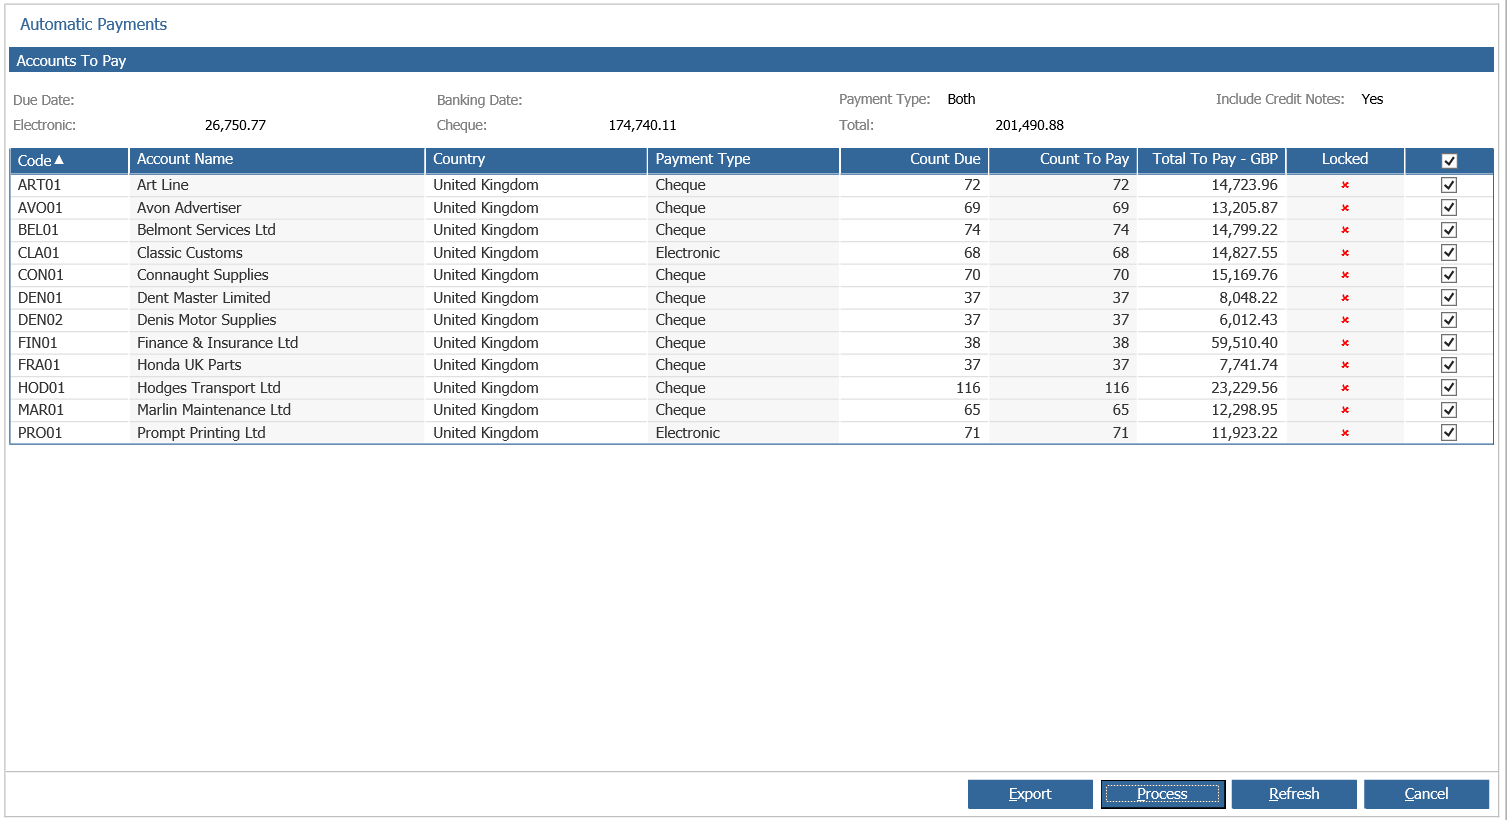
Click ‘Process’ to continue.
Confirm the due date for the payment run.
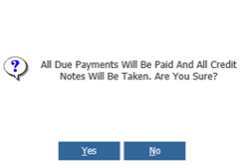
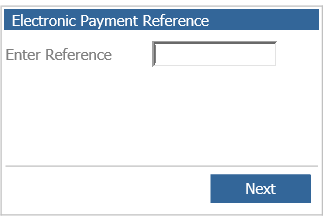
Note: Any transactions that are due before this date, and are not queried or logged, will be included in the payment run and all due credit notes will be taken if the previous credit note option is left unselected. Click ‘Yes’ to continue, and enter a reference for the BACS payment in the pop up screen
A list of accounts included in the run, are displayed. This screen will also display which accounts are to be paid by cheque and which by BACS.
Click ‘Next’ and then ‘Process’ to continue. Up to this point, clicking ‘Cancel’ will stop this process. A final screen appears for confirmation that the process is continuing.
Click ‘Yes’ and wait until all payments are completed. If the list of suppliers to be paid is longer than one page, it is advisable to click ‘Next’ to get to the last page of suppliers so that the status can be viewed for the end of the suppliers list, confirming that the process has completed.
Click ‘OK’ and then click ‘Next’ to continue.

The value of the payments that have been posted displays on screen. Enter the number of the first cheque to be used and click ‘Next’. Subsequent cheques will increment from this number.
Cheque numbers will be allocated against the transactions and will display on screen.

You will be asked if you only want to print cheques:

Selecting yes will print just cheques and selecting no will print cheques and remittances.
Cheques and Remittances will now be printed for the cheque payments unless the ‘Print Remittances’ field against the supplier account in Account Maintenance has been de-selected. If using pre-printed cheques, ensure that the stationery is in the printer and click ‘OK’ to print the cheques.
A single document is printed containing both the remittance and the cheque. For accounts with transactions that require more space than the allocated space on the middle of the pre-printed remittance, the system asks, at the end of the run, to insert plain paper into the printer to print out the remaining details of the payment run and thus not overprinting the cheque information. If pre-printed cheques are not being used, then print the remittances onto plain paper and write the cheques by hand, following the correct cheque numbers allocated to the transactions and attach these to the remittances.
If the pre-printed cheque stationery was not lined up correctly and therefore the cheques did not print in line, an opportunity to reprint is presented on screen. If a reprint is requested, confirm the new starting cheque number. These will be applied to the transactions and the remittances and cheques will print again. Once these have printed correctly, say ‘No’ to a reprint and the daybook should be printed detailing all the payments that have been made on the payment run.
You then have the option to remove remittances:

If No is selected these will still be available through the Purchase Ledger remittance routine.
A confirmation that the payments have been completed appears.

If pre-printed cheque stationery is being used, ensure that this is in the printer as printing will begin after clicking ‘OK’. Click ‘Exit’ to finish the process print a daybook.

If BACS payments are posted at the same time as the automatic payment run, the BACS file will need to be produced. This is done via the pop-up above, straight away after the initial process.
It can also be done after the fact by going to:
Accounts > Purchase Ledger > Processing > Remittances.

The transactions can be filtered by Accounting Group or account number range if required. To include all BACS payments made, leave these options blank. Select the ‘Produce BACS File’ box and chose the appropriate format from the dropdown box. Click ‘Continue’.
The option to download the file appears and this is saved to the PC. From the PC, it can be uploaded into the appropriate bank’s system when required.
After producing the BACS file, a pop up box appears prompting to ‘Print BACS Remittances’. Click ‘Yes’ to continue. Remittances are sent directly to the default printer. Remittances can be sent to the suppliers via email if the correct email address is entered in the Purchase Ledger > Account Maintenance screen for the supplier. There is also a prompt to print out the remittances that have been emailed out in this payment run.
When the print is completed the option to ‘Remove Printed BACS remittances’ appears. To remove both the remittances and to prevent the payments from being included on future BACS file downloads, select ‘Yes’.
HSBC Standard 18 Processing
If you wish to transmit BACS files via online HSBC Net Accounts, when you select the produce BACS File radio button there is an additional option within the drop down, HSBC – Standard 18. When selected you will be asked to select a Bank Account from the drop down because the sending bank account or originating bank account need to be included as part of the BACS file.
For all our previous BACS formats this has not been required. The Bank Account drop down will give you a list of your divisional bank accounts, any banks setup in the current division. This can be left as All for any other BACS file formats. It is also possible to select a bank account which will filter existing BACS files so only transactions for the select bank account will be included in the file. For the HSBC – Standard 18 format, if you do not select a bank account you will get a prompt to select a bank account.
Having selected the bank account and clicking continue you will see the following window.
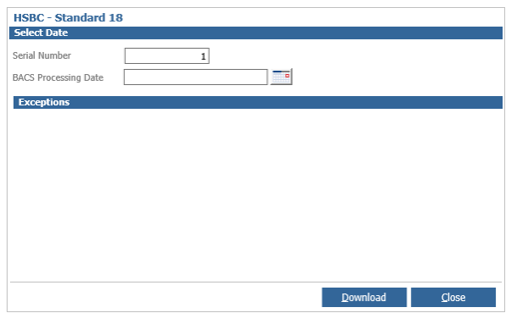
This pop up is changed from the usual pop up as it now contains a serial number. The serial number will start at 000001 and then increase by one for each file downloaded. This is required for this format. It is used amongst other reasons to verify if the file has been uploaded to their systems previously. If it has then you will not be able to re upload the same file.
The BACS processing date that shows below that will always default to tomorrow, this is because this BACS format / system does not allow you to process a BACS payment on the same day. BACS processing takes 3 days but the processing date cannot be today or in the past for this HSBC format. If you try to process a date of today or in the past you will be presented with a warning screen prompting, you to enter a future date.
If you are using this particular format the beneficiary names are taken from the Bank Account Holder Name field held against the purchase ledger account and held against your own divisional bank accounts. Note that the Account Holder Name is not necessarily the name of the account but it should be the account holder