
Express Posting is a new process aimed at streamlining daily banking processes, this process takes advantage of the exception handling screen and adds the ability to manually specify the amounts to be entered into the Cash Book.
To enable this feature on your system, please contact Support.
Summary:
- Allows you to quickly break down and post a larger sum to multiple ledgers in one step.
- Allows you to post all entries to a single ledger in one step.
- It is easier to find transactions to allocate using the transaction or payment reference.
- Automatically find, post and allocate receipt entries to the Sales Ledger based on reference, value or the Bank account number.
- You are no longer limited to posting unallocated receipts to the Purchase Ledger or payments to the Sales Ledger – the transactions can now be allocated at the same time.
- Accelerate departmental daybook processing by quickly locating and allocating all transactions created by a department on a specific date.
- Locate vehicles to post to without the need to select the branch first.
- You can record receipts or payments to multiple vehicle records in one Cash Book entry.
- Post entries to the Sales Ledger, Purchase Ledger, and sundries from trading currency bank accounts.
- Write off and discount entries now inherit the Shortcodes location from the transaction being paid.
Once selecting the Bank account you wish to process the entries into, it will display the total bank balance and currency of the account.
Once this is set, you will be prompted to add rows to the Cash Book entry screen. A single row here will relate to a single row in the Cash Book itself. Receipts or payments can be created by completing the fields shown below (asterisks indicate mandatory fields).
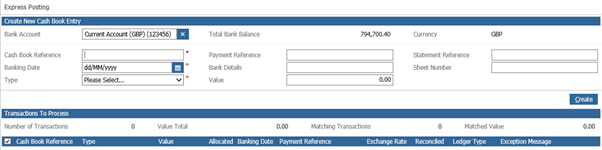
Cash Book Reference – The cash book reference and posting reference for the entry.
Banking Date – Date to be used on the Cash Book entry. This value also determines the period the entry will be posted to (and where a trading currency bank account is selected, the exchange rate to be applied).
Type – Payment or Receipt
Payment Reference – The payment reference can be entered to find a matching transaction by payment reference within the Sales Ledger when clicking the validate button.
Bank Details – The bank details can be entered to find a matching sales ledger account. It is possible to automatically post an entry based on identifying a Sales Ledger Account with this value where a transaction with a matching value is found. The behaviour is controlled by Cash Book Import Parameters set in Nominal Ledger.
Value – This field is the value of the payment or receipt. The value can be 0. Before processing the allocations, this value must match the allocated. If the entry was created with a value of 0.00 this will be updated automatically, or the row must be amended to update this value before the allocations can be created.
Statement Reference – The sheet reference is a reference used to reconcile the Receipt or Payment.
Sheet Number – The sheet number is a reference used to reconcile the Receipt or Payment.
Exchange Rate – The exchange rate field will only appear if a foreign currency bank account has been selected. This will allow the user to override the exchange rate for the given banking date.
Any bank account details added are shown in the Exception handling drill down and can be used for reference when locating an account.
If the row has a statement reference and sheet number, the row will be marked as reconciled. The statement reference and sheet number will be shown when hovered over the reconciled column.
The ledger column will be populated once a row has been allocated. If allocated to a single ledger, the name of the ledger will be displayed here, if more than one ledger is involved, then ‘Multiple’ will be displayed.
The checkboxes on the left of each row allow individual rows to be validated, processed, or deleted. If no rows are selected then the action will be applied to all rows.
The row can be amended or deleted by ticking the box and selecting the Amend or Delete button.
The print or export button can be selected to produce a print or export of all rows created.
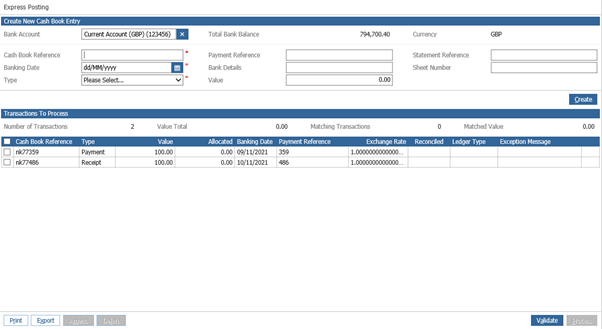
If a foreign currency bank account has been selected, an exchange rate field will be displayed. If you have access you can override the exchange rate.
Validate
This button will allow the DMS to attempt to match any receipt row to a Sales or Vehicle Ledger entry. A Green checkbox will be shown in the column to the right-hand side of the screen for any row that has been successfully matched.
Where some rows are manually allocated and then the validation routine has been run, the routine will remove all manual allocation and try to find a match using the payment reference or bank details. Therefore, a warning will be shown when validating the whole page and individual items have not been selected.
To prevent this, select individual items to validate.
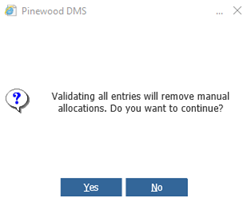
If all rows have been allocated manually, there is no need to press the validate option.
Any row that cannot be matched that was not already manually allocated will be highlighted by a yellow warning symbol in the right-hand column and an exception message.
It is important to note that postings are not created when the ‘validate’ process is run. Postings and allocations are only created when the ‘Process’ button is clicked.
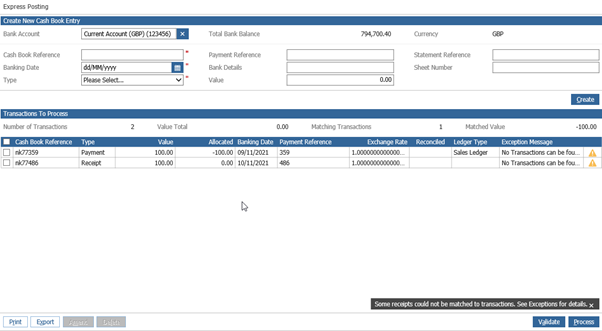
Process
Clicking this button will create Cash Book entries for all of the valid rows on the screen.
If a row could not be posted, for example, one of the accounts included in the set of allocations for that row was locked by another user, then the row will remain in place and an exception message will be shown in the exception column.
Any row that can be fully processed will be and will be removed from the list of rows on the screen when the process returns to the express screen.
Manual Allocation
To manually allocate an entry the row should be double-clicked. This will display the Exception Handling window which allows a user to select transactions, accounts, vehicles, or create nominal entries against which the value for the row is being processed to transactions across multiple ledgers.
The tabs in this window can then be used to locate transactions to allocate a value to, accounts to post an unallocated amount to or to post entries to vehicle records, or directly to nominal codes using the Sundry tab.
The Sales and Purchase Ledger Tab share a similar set of filters and allow a user to locate a transaction or account based on Account Code, Company Number, Bank Account Number, Reference, Sub Reference, Payment Reference, Value, Transaction Date, Location.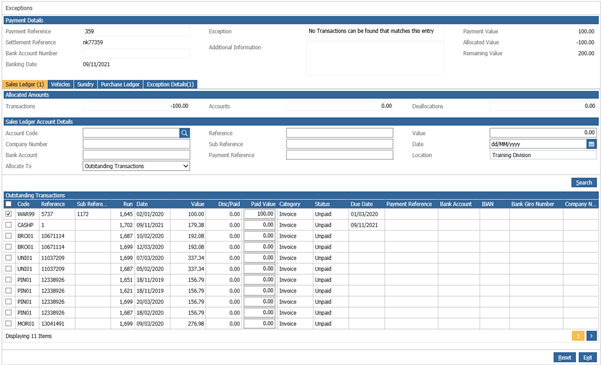
Search Accounts only causes the screen to return only matching SL account (or PL if you’re in the Purchase Ledger tab), rather than transactions. This allows unallocated amounts to be posted to an account by entering a value in the Paid Value field:
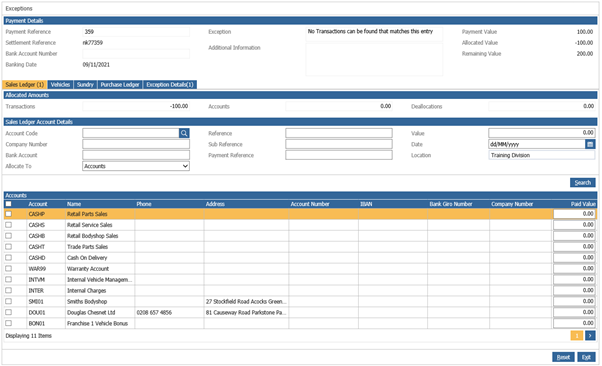
Once transactions have been selected, they are retained and a user can move between tabs or click exit to navigate back to the processing page. On returning to the processing page, the allocated values for the selected row will be updated.
Accessing the exception window for a row again after some or all of its value has been allocated will cause the tabs to display the previously allocated transactions at the top of the list of results making it easier to track which transactions have been associated with the row.
Over, under and part payments can be made on a per-transaction basis. As indicated above where shortcodes are enabled, the location of the transaction the write off or discount relates to will be written to postings for the write-off. Where more than one transaction has been discounted and where one or more of those transactions has a location different to the other, multiple postings will be created once for each location. This change also affects the same processing in the Imports screen.
Multi-currency transactions can also be allocated if the bank account selected is a foreign currency. The vehicle tab does not support multi-currency therefore it is disabled.
Within the Purchase Ledger tab, users are unable to see transactions created within a future period, for example, if the user is working in period 9, invoices created in period 10 will not be displayed. Automatic settlement discounts are available within the Purchase Ledger tab. When selecting a transaction with a settlement discount before the due date, the discount field will be populated with the settlement discount value original set through the purchase ledger post invoice.
Posting to Vehicles allows a user to locate a vehicle using any of the below filters:

By default, the screen will return any matching vehicle from any branch in the division, although results can be limited to a specific branch by using the ‘Branch Selector’ on the right-hand side.
The vehicle result will include both the outstanding Debtor and Creditor value for every vehicle. A paid value and a type should be entered against the vehicle to be posted to. The appropriate Receipt/Payment type should also be selected from the selector on the right-hand side. The options available will relate to the type of entry being created (Payment or Receipt):

Double-clicking the Stock number will load the vehicle Stock Card.
The Sundry tab allows values to be posted to nominal codes in the same way these can be posted in the CB Sundry Payments and Receipts pages. The express page also supports creating both a Receipt and Payment entry for the same Cash Book header (this is likely to be useful when both input and output VAT entries are required as part of a posting).
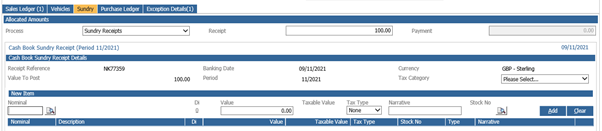
Clicking Reset on any page will remove the allocations set.
Clicking Exit will return the user to the Express Posting main page where entries can be processed.
Please note: Payment entries will not generate Cheques or EFT files and are the best used to handle Direct Debits from OEM or other bank charges.